Tiger Fly PJs #werkfromhomealong

ACS_0336

Everyone sits on their counter to drink coffee, right? 😉

ACS_0335

Getting out of bed is hard these days, and putting on real clothes is even harder. The #werkfromhomealong on Instagram was a great inspiration to sew more for my pajama drawer: the premise of the sew along was to make something to fill a gap in your leisure wardrobe and sew the WFH clothes we want to wear. Well, my PJs are anything but fancy (think old tees and sweats, or jammies I’ve been wearing for a realllly long time), and I decided to step up my game and add something nice and new to my collection.

ACS_0337

These are a TNT pattern, McCalls 6659 – I used these for a pair of flannel jammies last winter, and a pair of PJ pants that need a matching top (to be made soon). I made the short sleeve top with a curved hem and added a pocket to the front. I also made a narrow hem on the shirt instead of finishing it with ribbon – didn’t want to be bothered with that fussiness. Other than that, they were made straight out of the envelope!

What I did find challenging was the piping application – I’ve never been good at sewing piping on, especially around corners and curves. One afternoon while sewing these, I made a very first “studio vlog” of my attempt at sewing piping on to the top, following a method from one of my sewing books. Take a look below!


ACS_0338

Since I finished these last week, they’ve been getting a lot of wear. The fabric is a rayon print from Ruby Star Society called “Tiger Fly.” I love how cool and comfy the fabric feels when wearing them!

Pattern: McCall’s 6659 (out of print)

Fabric: Tiger Fly rayon by Ruby Star Society

Follow:

Hampton Jean Jacket

Hampton Jean Jacket1


Hampton Jean Jacket2


Continuing on my quest to stash-bust and sew through what I already own as much as possible this year, the Hampton Jean Jacket seemed like a perfect pattern to use with some Cone Mills denim I bought last year. Perfect because:

  • A) I don’t have a classic jean jacket in my wardrobe, just a white denim jacket from Nordstrom Rack that I wear a lot in the summer with dresses
  • B) I have sooooo many denim buttons that I bought by mistake last year and need to use them up, lol
  • C) the weight of this denim was better suited for a jacket instead of a pair of jeans and didn’t have the stretch I needed for jeans (I don’t know what I was thinking when I bought it)
Hampton Jean Jacket5

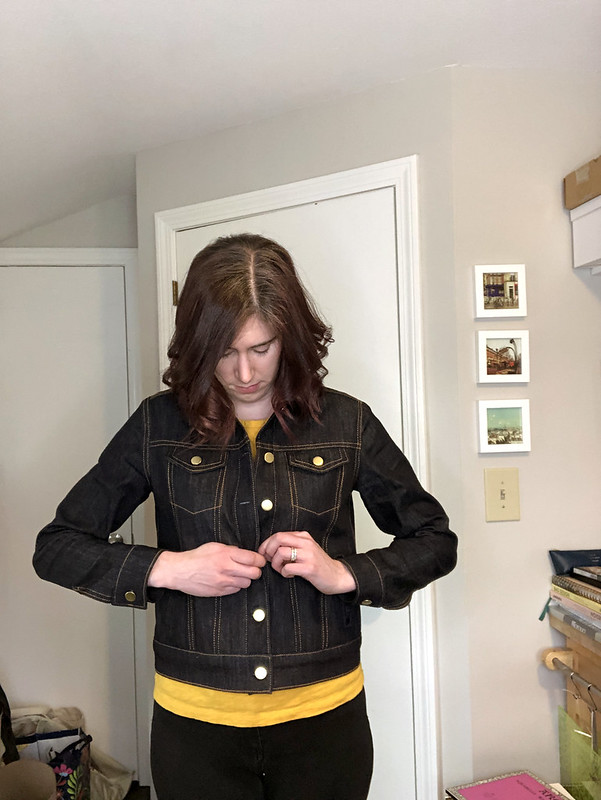
I wanted the cut and fit of this jacket to be similar to the fit of my white denim jacket, so I took some measurements of my white jacket to determine what size to make. Contrary to the picture above, I never button my denim jacket closed and didn’t really care about the ability to wear this over a sweater or bulky layers, so I cut out a size 2 even though my measurements would have put me between a 4 or a 6. I’m glad I cut the 2, and hey, I can still button it closed! I also shortened the body of the jacket by 1″.

Hampton Jean Jacket3

The construction is really straightforward and not complicated at all, the time-consuming parts of making this jacket were cutting out all of the pattern pieces (16 total!) and switching thread to complete all of the topstitching. I tried to batch as much topstitching together as I could so I wasn’t changing my thread all of the time, but it’s a step that really elevates the look of the garment and was time well-spent. I used a heavy-weight denim topstitching thread from Tailor Taylor in topaz for most of the topstitching and a lighter weight thread from Wawak in navy for the buttonholes and topstitching around the welt pockets.

The only tricky part with topstitching was the seam down the arm of the sleeve – I couldn’t figure out how to accomplish this since the sleeve at this point was no longer flat. The directions have you topstitch from the wrong side, but that would mean that I would need to have the topstitching thread in my bobbin and I wasn’t sure if my machine would handle that. So, I opted to skip it entirely.

And welt pockets…man, those scare me every time. I’ve put them in jackets a handful of times, but I’m always sweating it each time I cut into the body fabric to open up the pocket. But I love that there’s pockets in this jacket! They’re a teensy bit small and can juuuuust barely fit my iPhone 8 inside.

Hampton Jean Jacket7

I also opted to not include the back tabs – I didn’t like how they turned out (couldn’t get the points to look right) and didn’t want to fuss with adding them to the back. The photo above makes it look like the back doesn’t fit well, but it’s just because I’m pulling the jacket in closely with my hands in my pockets.

Hampton Jean Jacket4

My stitching isn’t 100% perfect on this. I messed up two of the buttonholes with my automatic buttonhole feature on my Bernina (even when using my compensation plate to make it easier to sew over the bulky seams), I accidentally topstitched part of the cuff with a very small stitch length (2.5 instead of 3.5, yikes), and something weird happened with my sleeve plackets. I need to go back and relook at them and see if there’s something I can adjust, but it looks like one side of the placket is longer than the other. I have no idea how/why this happened…I had no issues with the sleeve seams lining up and everything seemed to be the same length. You can see in some of the above photos that it balloons out a bit and doesn’t lie flat. Sigh…will need to see what I can do with this, maybe adjusting the bartack will help.

Hampton Jean Jacket8


Hampton Jean Jacket9

I love this jacket! Originally I was hesitant on using the topaz topstitching and the brass buttons because I thought it was going to be a lot louder/flashier than I wanted, but the finish result is perfect to me. It’s not a hard garment to make, just a bit time consuming with all of the stitching details, but it’s one of those garments that has a “wow” factor when you tell people you made it. The classic styling and fit is great – I would definitely make another one of these once I wear out my white one!

Fabric:Cone Mills Denim from Threadbare Fabrics

Buttons: Tailor Taylor

Topstitching Thread: Tailor Taylor and Wawak

Follow:

I Made a Bra!

I’ve sewn for over 20 years, but never made a bra before! In an effort to stash-bust and “sew what I own,” I found a bra kit in my fabric closet that I bought three years ago from Tailor Made Shop, and decided to finally give bra making a try this past weekend.

Here’s my take on the Cloth Habit Watson Bra pattern, and what it was like to sew my very first bra ever. Spoiler: there will be more to come!

Follow:

Archer + Alder Beach Coverup


archer alder coverup 1

This is my last summer-related project for the year – a mashup of Grainline Studio’s Archer Shirt, Alder Dress, and popover placket pattern add on.

Summer at the beach in Maine can be cold and I really wanted something that would be lightweight to wear, loose and flowy, and provide a little more coverage than my other beach coverups. Essentially, I wanted an oversized shirt with sleeves I could roll up. Plus, extra sun protection is always a good thing!

archer alder coverup 2

A few years back, I hacked together the skirt of the Alder Dress with the sleeves and upper bodice of the Archer Shirt to make a completely different dress. I figured, why not try out that same hack but for the beach instead?

archer alder coverup 3

Only change I made this go-round was to use the popover placket pattern add-on to the Alder shirt. I left it open with no buttons since hey, I’m wearing this with a swimsuit, so who cares about closing this up?

The fabric is a lovely rayon I stumbled across at Joann Fabrics unintentionally. I bought all that was left and have a little bit leftover for a tank top next summer.

archer alder coverup 4

That’s it for summer sewing – over the Labor Day weekend, I started my first fall sewing project. More on that soon!

Follow:

Cottesloe One-Piece Swimsuit

Cottesloe 3


Cottesloe 7

Oh summer vacation, take me back! We recently returned from our annual trip to Maine, and as customary in the last few years, I made a new swimsuit for vacation.

I’m so glad that one-piece swimsuits are considered stylish these days because they’re really what I’m most comfortable in. My pattern stash lacked a basic tank-style swimsuit pattern, so when Megan Nielsen released her Cottesloe swimsuit this year, I snatched it up. I love how this pattern acts as a base pattern to become whatever you want! Sometimes it’s the most simple patterns that are the best.

Not shown here, but I actually made the two piece version of the suit first – I wanted to check the fit before cutting into my lovely Liberty spandex fabric. I’m glad I did, I ended up going up a size in the top for my one piece (total shocker over here, hah!).

Cottesloe 2

I lovvvvvve the low scoop back of this suit. At first, I wasn’t sure if this was going to stay put and in place when I started sewing the suit together and trying it on. One of the perks of being a small-chested gal is not needing much support in my swimsuits (but I did add swim cups for modesty), so luckily once the elastic was in place, I felt pretty secure. It also passed the ocean waves test at the beach, whew!

Cottesloe 5
There are a few changes I made to the construction, one of which I should have thought out in more detail. I stumbled across a tutorial on using binding to finish the edges instead of turning and stitching the elastic edges, really liked the RTW effect of using binding, and thought to give it a try. What I didn’t take into account is that the binding actually created more width – the technique is the same as using fold-over elastic, so instead of turning back the seam allowances 3/8″, I essentially was just encasing the seam allowance with spandex strips. This made the straps wider, the leg holes a bit longer, and the neckline higher. I also pulled the binding a bit too tight around the leg holes, so it’s a really snug fit.

Not the end of the world, but some details I need to take into account if I decide to use this technique again. I really do like how it looks, and it feels smoother on my skin instead of having all of my serger threads rubbing against my skin.

Also, because someone asked me on Instagram – the booty coverage is on-point with this pattern. I like full butt coverage for my swimsuits, and this gets the job done.

Cottesloe 4

I also attempted to make tie straps a la Holly’s tutorial. I think it was a combination of using the binding technique along with the fabric I as using that attributed to the ties not looking, well, cute. And the binding was jutting out from the edges of the ties, looking awful! My solution was to snip off the tie extensions, sew the shoulder seams together, and then cut long spandex strips of fabric to tie at the shoulders and hide my sewing sins. I tacked them in place so they won’t come undone, and frankly, I like them a lot better than what I initially attempted to make. They flutter in the breeze!

Cottesloe 6

Looking forward to trying out some other design ideas with this pattern next summer! For now, it’s on to fall sewing.

Pattern: Cottesloe Swimsuit by Megan Nielsen, view A (without ties)
Fabric: Liberty swim spandex from The Fabric Store

Follow: