Republique du Chiffon Nellie Blouse

nellie 1

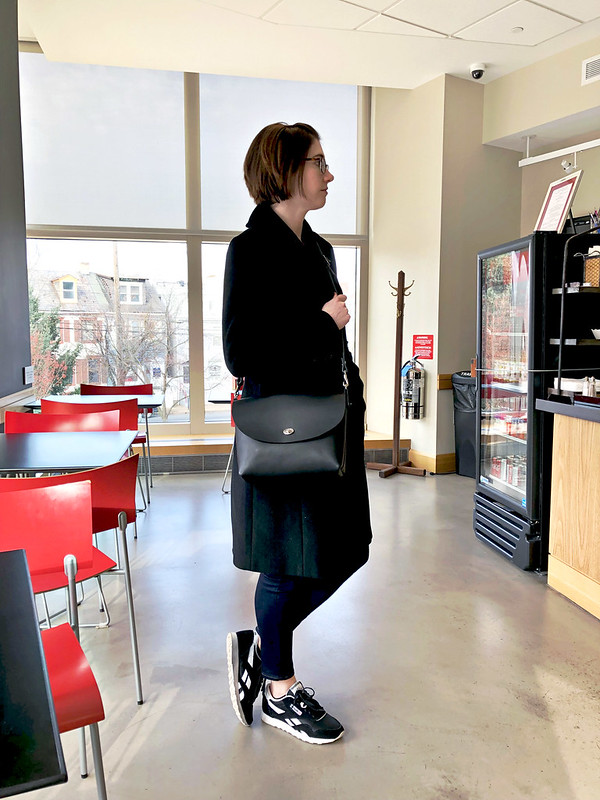
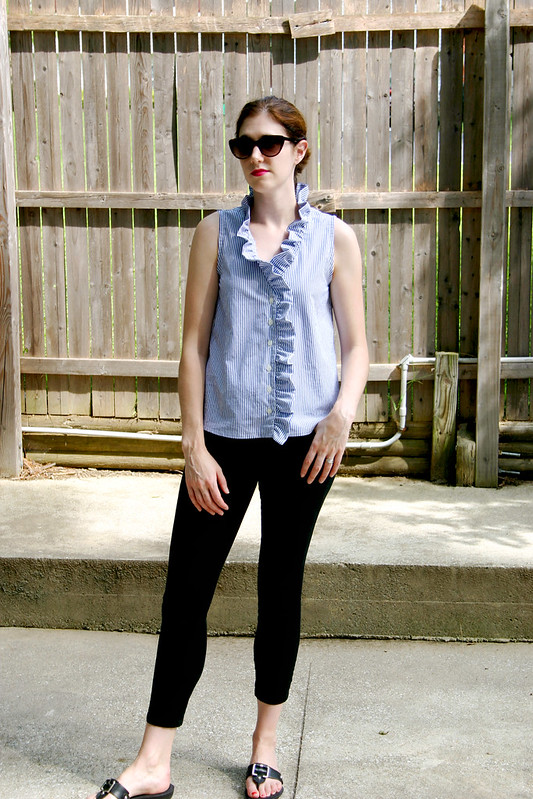
Trying to channel my inner French girl with this top…somthing a little bright lipstick and some big sunnies can’t fix!

True story: I was a French major in college. I love everything about French culture, music, movies, food, and I try to keep up to speed with my language skills by playing Duolingo and reading Le Monde (I’ve been out of undergrad for 11 years so I’m a bit rusty!). So, as logic would go, why not try out the multitude of French sewing pattern companies out there? Put those comprehension skills to work!

nellie 7

This is the Republique du Chiffon Nellie Blouse, a super easy to make top that packs quite the design punch. It’s really simple: two front pieces and a back, no bust shaping, and a really long rectangle gathered and sewn around the neckline and down the front. There are no markings on the pattern piece for buttons, so I used my handy-dandy button spacer marker (simflex ruler) to figure out the spacing of my buttonholes. I also ran out of fabric to cut out the bias strips to finish the armholes, so I just used plan white bias tape I had in my stash.

nellie 2

Remember that part where I mentioned that my language skills were a bit rusty? I chalk it up to being lazy/over-confident in my reading skills, because I completely missed the part of the pattern instructions, in the cutting diagrams, where it states that there are no seam allowances on the pattern pieces and they needed to be added. Umm…what’s French for, oops! I assumed that all seam allowances were 1cm (3/8″) since a lot of patterns that I made from other parts of the world (NZ, Europe) use that amount for seam allowance. Burda and Marfy don’t include seam allowances in their patterns, and I guess RDC doesn’t either. I just took a look at my Yvonne Jumpsuit pattern that I *hope* I get to this year, and it looks like there are no seam allowances on that either. Good to know!

The top fits, but you can tell that the fit is a little snug. I get pull lines from the shoulders down across my bust or from the armpit to the center front, which you can see in some of the photos. I also adjusted the button overlap to accommodate for this down the front. Not the end of the world, just chalking it up to a learning lesson. Everyone makes mistakes, regardless of how long they’ve been sewing!

nellie 3<

I think this top will transition nicely into early fall. The fabric is a Rag & Bone cotton from Mood I purchased during their 4th of July sale. It doesn’t read too summery, and it’s all about how it’s styled. Hello, messy pony tale and skinny black crops!

nellie 6

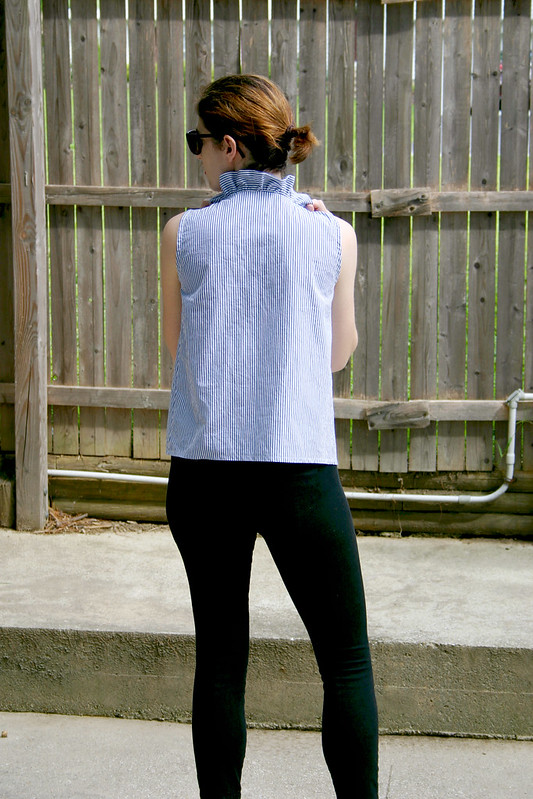
I love how high the ruffles come up and around to form a collar around the neck.

nellie 4

Pattern: Nellie Blouse by République du Chiffon

Fabric: Rag and Bone striped cotton shirting from Mood Fabrics

Follow:

How I Maximize My Sewing Time

sewing desk
Not my desk…I wish!

I’m just like you…I struggle to find time to sew, too.

I don’t have kids and a family to take care of (yet), but my time is in short supply when it comes to sewing. Here’s my reality: I have a full-time job, my commute is like a part-time job (four hours a day, no joke), I’m going to school for my MBA, and oh yeah, I have normal chores and stuff around the house that I need to do. Plus, I teach a fitness class on the side each week that I have to prep and practice for. Whew! It’s a miracle that anything gets sewn, really, when I think about it.

Because of all of the above life changes over the last several years, I don’t crank out as many garments as I used to. But, when I do have a bit of time here and there, I try to make the most of it. Here’s some tricks I use that you might find useful in your own sewing time.

  1. Batch-cut several projects at once – I have a small sewing room that requires me to rearrange the furniture to get my collapsable sewing table out. So, when I have my table out and all of my tools at the ready, and I’m in the frame of mind that I’m cutting out fabric, I try to cut out more than one project. Cutting out fabric is a task I really don’t enjoy, so if I can just do as much as possible at once and be done with it, I try to. The benefit is that I have multiple projects ready to go when I have a few minutes to spare
  2. Take advantage of even a few minutes of spare time – need to thread your serger for your next project? Or, maybe you have a few minutes free for sewing some darts or simple seams? Do it. Sure, it may not feel as satisfying as sitting down for a real sewing session of a few hours, but it’s amazing how those minutes add up and a project comes together. I tried this experiment a few years ago after reading Nancy Zieman’s “10-20-30 Minutes to Sew” and it’s something I’ve adopted ever since I made this Ginger Skirt.
  3. Have all of your materials ready to go – a good habit I try to maintain is pre-washing all of my fabrics as soon as they come home with me. It doesn’t happen all of the time, but I try to throw my fabrics in the wash so when I’m ready to pull them out of my closet for a project, they’re ready to be cut out and sewn. If I’m also planning on making a project coming up and don’t have time to get to the store, I’ll look online for the supplies I need and get them ready to ship in time for my next sewing date in my sewing room. A lot time these days my supplies come from shopping online, which is much more convenient with my schedule than trying to hunt them down at my local fabric stores.
  4. Use a rotary cutter and large pattern weights – this goes back to my first bullet point, but it’s the easiest and the fastest to cut out projects when I use a mat and rotary cutter. There are some fabrics where it’s really the best option to cut them out with a rotary cutter, like slippery knits, but it’s so much more accurate and faster than a pair of scissors. I’m also a convert to pattern weights instead of pins for securing pattern pieces. I’ll measure out and pin down the grainline of pattern pieces to make sure I have them straight, but then I’ll use weights to hold the tissue pieces in place on the fabric. You don’t have to use anything fancy, I use giant washers I bought at Home Depot that I covered in washi tape.
  5. Press your pieces in batches – I just used this strategy for a top I have coming to the blog next week! Instead of getting up every time I finish sewing a seam to press it open or to one side, I wait until I have a few to press and do them all at once. As long as waiting to press a seam doesn’t interfere with sewing another one (think of an intersecting seam, or a dart and a waistband seam, for example), I try to do this as much as possible.
  6. Keep a running list of your sewing queue – this one is a fave of mine. I use Evernote to keep track, on a seasonal basis, of patterns I want to make and fabrics I have in my stash that would work with the pattern. I also use a special notation to call out projects that are easy to whip-up quickly vs projects that will take more time due to needing to make a muslin to get the fit right. It helps me prioritize when I suddenly have some free time and am not sure what to make next.

I hope some of these methods help to speed up your sewing time! Let me know if any of these work for you, or how you sew as efficiently as possible. I need all the help I can get, hah!

Follow:

Seamwork Leonora Skirt

leonora skirt1

I don’t even know where to begin to describe how much I love this skirt. The real questions is: why did it take me so long to getting around to sewing this pattern?

leonora skirt5

After I made my new Grainline Studio Maritime Shorts, I had enough white stretch denim leftover for something else…just enough to cut out a skirt. Years ago, I used to have a denim skirt that I wore all of the time, spring through fall, and I missed having that wardrobe staple in my closet. Plus, I’m currently obsessed with any type of button-down skirt pattern (there’s three in my sewing queue right now), so I decided to pair the Seamwork Leonora pattern with my leftover denim.

The pattern is beautifully drafted, as I’d expect from Colette/Seamwork. I lucked out because the body measurements matched mine exactly, so I crossed my fingers and moved forward with making the skirt without doing a muslin. It fits so well and I love how the yoke of the back of the skirt is shaped to accommodate curves of the body (aka my booty). It’s brilliant.

leonora skirt2

Some changes I made: I omitted the patch pockets on the skirt front – not really my jam, and I don’t like calling attention to my hips like that. I also constructed the waistband in the same manner as the waistband for the Baste + Gather Birkin Flares, it’s my favorite way of sewing denim waistbands. And, no belt loops for me because I don’t really wear belts.

leonora skirt3

I used a beige topstitching thread that’s specific for denim from Taylor Tailor on all parts of the skirt that require topstitching. There’s something about the contrast of the light brown with the white that I really really like, and it feels more professional looking than if I just used plain white thread.

On a funny note – I ordered my denim buttons from Taylor Tailor as well when I ordered the topstitching thread. The pattern called for 7 jean buttons, so I thought I put 7 buttons in my cart…and the I was surprised at how much my total came to once I checked out and paid. Well, it helps to pay attention to details, because I didn’t realize that each button is sold as a set of 5. I ordered 35 brass jean buttons! I guess I’m all set with jean buttons for a long time!!

leonora skirt4

I can’t believe it’s August and summer is getting close to the end (and I’m done with grad school until September, hooray). Because I love this skirt so much, and will try to wear it as much as possible before summer is over, I need to make another one of these for the fall out of blue denim. I think this will be another stash-busting project!

Pattern: Leonora Skirt by Seamwork Magazine

Fabric: leftover white stretch denim, bought at LA Finch Fabrics

Hardware: brass buttons from Taylor Tailor

Follow:

Hadley Top and Denim Maritime Shorts


hadleytop1


Hello hello!  Dusting off the blog and posting for the first time in a very long time – I missed this!

I’ve been sewing this year, but a rarity has been finding the time to take proper blog pictures. Most of the time, snapping a quick hallway mirror/gym bathroom/sewing room mirror picture is all that I can do, and then post a quick blurb on Instagram. Hoping to change that going forward for the rest of the year.

Something else I’ve been trying to do this year is to cut back on my fabric shopping and instead sew through my stash. Well, this outfit covers about 50% of that!


hadleytop4


In going through my stash and trying to brainstorm ways to use up my fabric, I thought that this floral linen blend fabric from Joann would pair really well with the Hadley Top pattern by Grainline Studio. I’ve had this fabric for several years and always had it earmarked for different dress patterns, but my style lately is turning away from dresses and more towards separates. I really like the shape and fit of the Hadley Top that I made a few years ago and with the heat we’ve been having in New England, a breezy, cool top was a void in my closet.

Some changes I made to view B:

  • Raised the neckline 1″ – many reviewers made a neckline adjustment and I’m really glad I did, this would have been way too low for me. I could have raised it a bit more for more modesty, but this still works. I completely forgot to adjust the facing so I had to do a little fudging and easing when I assembled the top and neckline facing.
  • Eliminated the darts – I used Jaime’s idea to eliminate the darts from the Hadley top this go-round. Frankly this came from me just being plain lazy and not wanting to raise the darts on the bodice pattern (an alteration I almost always need to do for bust darts) and I really don’t need bust darts since I’m pretty small up top. I should try this out on other patterns because it worked out really well

If I make this again, which I definitely could see in the future, I’d like to do an all-in-one facing instead of having separate neckline and armhole facings. I stitched the facings in-the-ditch where I could, and then hand-tacked them down everywhere else.


hadleytop2


The Maritime Shorts pattern by Grainline is my go-to for summer shorts, and this is my third pair. I love these shorts!! I used to have a pair of white shorts from J Crew several years ago, but spilled some red wine on them and…you know the rest of the story there. For this pair, I used a white stretch denim from LA Finch Fabrics that was on closeout and it’s such a comfy, stretchy denim that doesn’t make you feel constricted when wearing it.

To prevent the pocketing from really showing through (you know, white-on-white), I found some cotton fabric that matched my skin tone and used that for the pocket facing and pocket bag, thanks to an article I found in an older issue of Threads Magazine. You can still see a bit of the outline of the pocket but it’s much better looking than using the white denim for the pocket.

I also used brass rivets and a denim button, and used a tan-colored topstitching thread for some added contrast.


hadleytop3


I’m currently finishing up the last of my summer classes for grad school and am looking forward to having the month of August free for all of the summer sewing and crafting I can churn out. Lots I want to try and tackle next month: a white denim skirt, Lucerne Blouse, and a swimsuit. Fingers crossed!

Patterns: Hadley Top; Maritime Shorts
Fabrics: Hadley Top – linen blend from Joann Fabrics; Maritime Shorts – designer denim closeout from LA Finch Fabrics

Follow:

Leather Cross-Body Bag and Clutch


cross body 5


cross body 1


The leather-working bug is highly contagious – after making my backpack I last month, I couldn’t wait to get started on my next leather project!  Especially because I have access to industrial sewing machines at my job, there was no reason to not give leather handbag making another try.

For my next project, I wanted to make a “wear with anything” black leather bag that was a simple shape but could hold a lot when running errands or travelling. I scoured patterns online and available on Etsy and stumbled across this shop, which offers a lot of very simple but classic patterns.  All of the patterns are designed to be hand-sewn, which is a great option if you don’t have an industrial sewing machine that can power through thick leather.


cross body 2


Over the past year I collected a few pieces of leather as I dabbled in sandal making, and had just enough of a black piece of 5oz cowhide left over to cut out the main body of the bag in one piece instead of two and needing to sew a seam in the bottom of the bag. It’s a firm piece of leather that’s thick enough to hold the shape of the bag nicely without being too soft.


cross body 9


I followed the instructions for the pattern for the most part, but they were a bit on the vague side of things and didn’t properly explain how to finish the raw edges of the leather, what size hardware to buy, etc. I found all of my hardware at my local Tandy Leather: turn lock, d-rings, halter snaps, and rivets. I also picked up a piece of leather strapping for my bag instead of cutting out a strap from my leather, but I think I’m going to replace it with something else because the leather is a bit on the thick side and I’d rather use something that is a little more flexible. Plus, the raw side is exposed underneath and unfinished, which is starting to wear.

Installing the turn lock was a bit challenging since I don’t have a nice punch to cut out an even hole, so I had to use my utility blade and a bit of trial and error with inserting the lock to make sure enough of the leather was removed for the post to go through the opening and close properly.

For the flap of the bag, I used two coats of Fiebing’s Edge Kote to give the leather a bit of a more polished look. For whatever reason, I thought to only do this on the flap but not the rest of the leather pieces that have exposed raw edges, like the d-ring carriers, top edge of the bag, and the outside pocket on the back of the bag. Oh well, live and learn! I’m also not 100% sure if this was the best type of edge paint for this leather, or if I should have used something like Vernis edge paint to get a more “finished” looking edge. Will have to play around with that and experiment! After finishing the edges of the flap, I sewed it on to the back of the bag.


cross body 8


The body of the bag was assembled wrong side out and then flipped out after the sides and corners were sewn. Boy, it was a wrestling match to get this leather flipped right side out and the corners pushed out. In retrospect, I should have skivved the edges of the bag before sewing to reduce the bulk, but the skivving machine wasn’t functioning properly when I had sometime to use the machines at work so I had to forgo using it. I was so nervous that I wouldn’t be able to power through two layers of 5oz leather and intersecting seams with the Juki industrial machine, because I didn’t skive my leather, but that baby sewed right through it like butter!


cross body 7


After work that night, I assembled the d-ring carriers and the strap onto my bag. Truth be told, my rivets are a bit on the wonky side – the posts were too long and I didn’t realize it when I bought them. This meant that when I hammered my rivets into the leather to hold the d-ring carriers and the strap ends together, the metal post bended and they don’t go through my bag or strap straight. I bought these rivets purely based on the size of the head of the rivet and not the post length, d’oh! Again, leather working newbie mistake.


cross body 6


cross body 3


I love how roomy and spacious this bag is – I had my wallet, leather clutch with my makeup, gloves, keys, and a Kindle inside the bag with no problem during my trip to PA to visit my family for Christmas . It’s a great bag for traveling.


ida clutch 1


ida clutch 2


I also made an Ida Clutch out of a green Italian lamb hide the day before we left on our trip. It’s such an easy sew, I whipped it up in a couple of hours in the afternoon. The only issue I had was inserting the zipper, the leather stretched out a bit since I couldn’t use my walking foot to get close to the zipper and had to use my zipper foot. I also didn’t have any snaps handy like the pattern calls for, so I used a magnetic snap instead for the closure.


cross body 4


Next up I have a soft brown leather tote bag in the works and I’m planning my next shoe designs – I’m heading to London in about a week for a 3-day shoemaking workshop!


Leather: Cross-Body – cowhide, Ida Clutch – lamb
Patterns: Cross-Body, Ida Clutch
Hardware: Tandy Leather
Sewing Machine: Juki LZ-2280A

Follow: