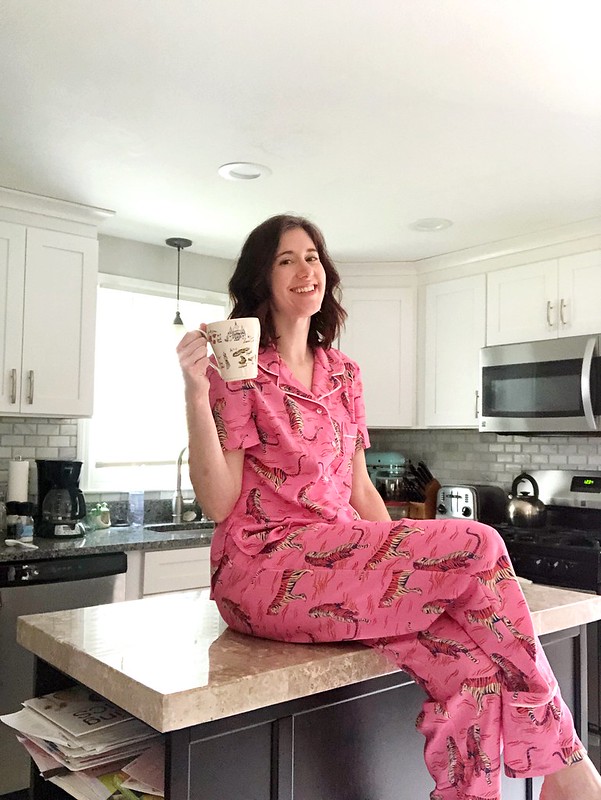
Tiger Fly PJs #werkfromhomealong

ACS_0336

Everyone sits on their counter to drink coffee, right? 😉

ACS_0335

Getting out of bed is hard these days, and putting on real clothes is even harder. The #werkfromhomealong on Instagram was a great inspiration to sew more for my pajama drawer: the premise of the sew along was to make something to fill a gap in your leisure wardrobe and sew the WFH clothes we want to wear. Well, my PJs are anything but fancy (think old tees and sweats, or jammies I’ve been wearing for a realllly long time), and I decided to step up my game and add something nice and new to my collection.

ACS_0337

These are a TNT pattern, McCalls 6659 – I used these for a pair of flannel jammies last winter, and a pair of PJ pants that need a matching top (to be made soon). I made the short sleeve top with a curved hem and added a pocket to the front. I also made a narrow hem on the shirt instead of finishing it with ribbon – didn’t want to be bothered with that fussiness. Other than that, they were made straight out of the envelope!

What I did find challenging was the piping application – I’ve never been good at sewing piping on, especially around corners and curves. One afternoon while sewing these, I made a very first “studio vlog” of my attempt at sewing piping on to the top, following a method from one of my sewing books. Take a look below!


ACS_0338

Since I finished these last week, they’ve been getting a lot of wear. The fabric is a rayon print from Ruby Star Society called “Tiger Fly.” I love how cool and comfy the fabric feels when wearing them!

Pattern: McCall’s 6659 (out of print)

Fabric: Tiger Fly rayon by Ruby Star Society

Follow:

I Made a Bra!

I’ve sewn for over 20 years, but never made a bra before! In an effort to stash-bust and “sew what I own,” I found a bra kit in my fabric closet that I bought three years ago from Tailor Made Shop, and decided to finally give bra making a try this past weekend.

Here’s my take on the Cloth Habit Watson Bra pattern, and what it was like to sew my very first bra ever. Spoiler: there will be more to come!

Follow:

Cottesloe One-Piece Swimsuit

Cottesloe 3


Cottesloe 7

Oh summer vacation, take me back! We recently returned from our annual trip to Maine, and as customary in the last few years, I made a new swimsuit for vacation.

I’m so glad that one-piece swimsuits are considered stylish these days because they’re really what I’m most comfortable in. My pattern stash lacked a basic tank-style swimsuit pattern, so when Megan Nielsen released her Cottesloe swimsuit this year, I snatched it up. I love how this pattern acts as a base pattern to become whatever you want! Sometimes it’s the most simple patterns that are the best.

Not shown here, but I actually made the two piece version of the suit first – I wanted to check the fit before cutting into my lovely Liberty spandex fabric. I’m glad I did, I ended up going up a size in the top for my one piece (total shocker over here, hah!).

Cottesloe 2

I lovvvvvve the low scoop back of this suit. At first, I wasn’t sure if this was going to stay put and in place when I started sewing the suit together and trying it on. One of the perks of being a small-chested gal is not needing much support in my swimsuits (but I did add swim cups for modesty), so luckily once the elastic was in place, I felt pretty secure. It also passed the ocean waves test at the beach, whew!

Cottesloe 5
There are a few changes I made to the construction, one of which I should have thought out in more detail. I stumbled across a tutorial on using binding to finish the edges instead of turning and stitching the elastic edges, really liked the RTW effect of using binding, and thought to give it a try. What I didn’t take into account is that the binding actually created more width – the technique is the same as using fold-over elastic, so instead of turning back the seam allowances 3/8″, I essentially was just encasing the seam allowance with spandex strips. This made the straps wider, the leg holes a bit longer, and the neckline higher. I also pulled the binding a bit too tight around the leg holes, so it’s a really snug fit.

Not the end of the world, but some details I need to take into account if I decide to use this technique again. I really do like how it looks, and it feels smoother on my skin instead of having all of my serger threads rubbing against my skin.

Also, because someone asked me on Instagram – the booty coverage is on-point with this pattern. I like full butt coverage for my swimsuits, and this gets the job done.

Cottesloe 4

I also attempted to make tie straps a la Holly’s tutorial. I think it was a combination of using the binding technique along with the fabric I as using that attributed to the ties not looking, well, cute. And the binding was jutting out from the edges of the ties, looking awful! My solution was to snip off the tie extensions, sew the shoulder seams together, and then cut long spandex strips of fabric to tie at the shoulders and hide my sewing sins. I tacked them in place so they won’t come undone, and frankly, I like them a lot better than what I initially attempted to make. They flutter in the breeze!

Cottesloe 6

Looking forward to trying out some other design ideas with this pattern next summer! For now, it’s on to fall sewing.

Pattern: Cottesloe Swimsuit by Megan Nielsen, view A (without ties)
Fabric: Liberty swim spandex from The Fabric Store

Follow:

Seamwork Leonora Skirt

leonora skirt1

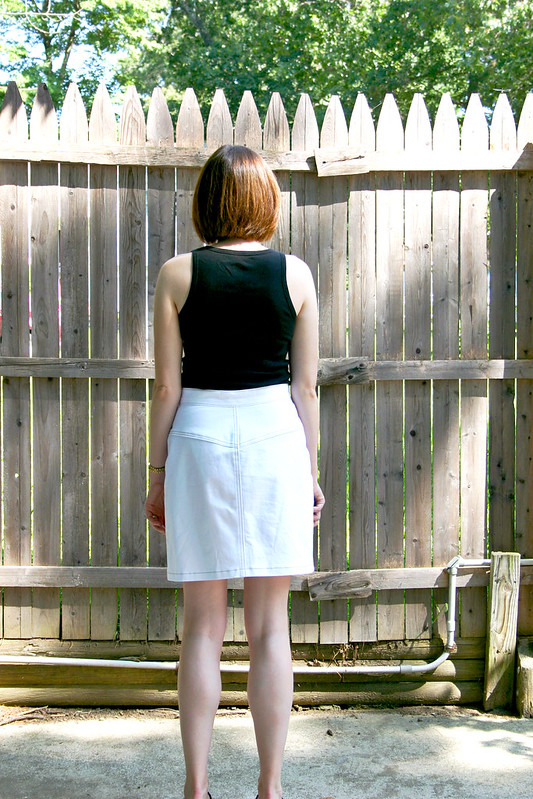
I don’t even know where to begin to describe how much I love this skirt. The real questions is: why did it take me so long to getting around to sewing this pattern?

leonora skirt5

After I made my new Grainline Studio Maritime Shorts, I had enough white stretch denim leftover for something else…just enough to cut out a skirt. Years ago, I used to have a denim skirt that I wore all of the time, spring through fall, and I missed having that wardrobe staple in my closet. Plus, I’m currently obsessed with any type of button-down skirt pattern (there’s three in my sewing queue right now), so I decided to pair the Seamwork Leonora pattern with my leftover denim.

The pattern is beautifully drafted, as I’d expect from Colette/Seamwork. I lucked out because the body measurements matched mine exactly, so I crossed my fingers and moved forward with making the skirt without doing a muslin. It fits so well and I love how the yoke of the back of the skirt is shaped to accommodate curves of the body (aka my booty). It’s brilliant.

leonora skirt2

Some changes I made: I omitted the patch pockets on the skirt front – not really my jam, and I don’t like calling attention to my hips like that. I also constructed the waistband in the same manner as the waistband for the Baste + Gather Birkin Flares, it’s my favorite way of sewing denim waistbands. And, no belt loops for me because I don’t really wear belts.

leonora skirt3

I used a beige topstitching thread that’s specific for denim from Taylor Tailor on all parts of the skirt that require topstitching. There’s something about the contrast of the light brown with the white that I really really like, and it feels more professional looking than if I just used plain white thread.

On a funny note – I ordered my denim buttons from Taylor Tailor as well when I ordered the topstitching thread. The pattern called for 7 jean buttons, so I thought I put 7 buttons in my cart…and the I was surprised at how much my total came to once I checked out and paid. Well, it helps to pay attention to details, because I didn’t realize that each button is sold as a set of 5. I ordered 35 brass jean buttons! I guess I’m all set with jean buttons for a long time!!

leonora skirt4

I can’t believe it’s August and summer is getting close to the end (and I’m done with grad school until September, hooray). Because I love this skirt so much, and will try to wear it as much as possible before summer is over, I need to make another one of these for the fall out of blue denim. I think this will be another stash-busting project!

Pattern: Leonora Skirt by Seamwork Magazine

Fabric: leftover white stretch denim, bought at LA Finch Fabrics

Hardware: brass buttons from Taylor Tailor

Follow:

Hadley Top and Denim Maritime Shorts


hadleytop1


Hello hello!  Dusting off the blog and posting for the first time in a very long time – I missed this!

I’ve been sewing this year, but a rarity has been finding the time to take proper blog pictures. Most of the time, snapping a quick hallway mirror/gym bathroom/sewing room mirror picture is all that I can do, and then post a quick blurb on Instagram. Hoping to change that going forward for the rest of the year.

Something else I’ve been trying to do this year is to cut back on my fabric shopping and instead sew through my stash. Well, this outfit covers about 50% of that!


hadleytop4


In going through my stash and trying to brainstorm ways to use up my fabric, I thought that this floral linen blend fabric from Joann would pair really well with the Hadley Top pattern by Grainline Studio. I’ve had this fabric for several years and always had it earmarked for different dress patterns, but my style lately is turning away from dresses and more towards separates. I really like the shape and fit of the Hadley Top that I made a few years ago and with the heat we’ve been having in New England, a breezy, cool top was a void in my closet.

Some changes I made to view B:

  • Raised the neckline 1″ – many reviewers made a neckline adjustment and I’m really glad I did, this would have been way too low for me. I could have raised it a bit more for more modesty, but this still works. I completely forgot to adjust the facing so I had to do a little fudging and easing when I assembled the top and neckline facing.
  • Eliminated the darts – I used Jaime’s idea to eliminate the darts from the Hadley top this go-round. Frankly this came from me just being plain lazy and not wanting to raise the darts on the bodice pattern (an alteration I almost always need to do for bust darts) and I really don’t need bust darts since I’m pretty small up top. I should try this out on other patterns because it worked out really well

If I make this again, which I definitely could see in the future, I’d like to do an all-in-one facing instead of having separate neckline and armhole facings. I stitched the facings in-the-ditch where I could, and then hand-tacked them down everywhere else.


hadleytop2


The Maritime Shorts pattern by Grainline is my go-to for summer shorts, and this is my third pair. I love these shorts!! I used to have a pair of white shorts from J Crew several years ago, but spilled some red wine on them and…you know the rest of the story there. For this pair, I used a white stretch denim from LA Finch Fabrics that was on closeout and it’s such a comfy, stretchy denim that doesn’t make you feel constricted when wearing it.

To prevent the pocketing from really showing through (you know, white-on-white), I found some cotton fabric that matched my skin tone and used that for the pocket facing and pocket bag, thanks to an article I found in an older issue of Threads Magazine. You can still see a bit of the outline of the pocket but it’s much better looking than using the white denim for the pocket.

I also used brass rivets and a denim button, and used a tan-colored topstitching thread for some added contrast.


hadleytop3


I’m currently finishing up the last of my summer classes for grad school and am looking forward to having the month of August free for all of the summer sewing and crafting I can churn out. Lots I want to try and tackle next month: a white denim skirt, Lucerne Blouse, and a swimsuit. Fingers crossed!

Patterns: Hadley Top; Maritime Shorts
Fabrics: Hadley Top – linen blend from Joann Fabrics; Maritime Shorts – designer denim closeout from LA Finch Fabrics
Follow: