How I Maximize My Sewing Time

sewing desk
Not my desk…I wish!

I’m just like you…I struggle to find time to sew, too.

I don’t have kids and a family to take care of (yet), but my time is in short supply when it comes to sewing. Here’s my reality: I have a full-time job, my commute is like a part-time job (four hours a day, no joke), I’m going to school for my MBA, and oh yeah, I have normal chores and stuff around the house that I need to do. Plus, I teach a fitness class on the side each week that I have to prep and practice for. Whew! It’s a miracle that anything gets sewn, really, when I think about it.

Because of all of the above life changes over the last several years, I don’t crank out as many garments as I used to. But, when I do have a bit of time here and there, I try to make the most of it. Here’s some tricks I use that you might find useful in your own sewing time.

  1. Batch-cut several projects at once – I have a small sewing room that requires me to rearrange the furniture to get my collapsable sewing table out. So, when I have my table out and all of my tools at the ready, and I’m in the frame of mind that I’m cutting out fabric, I try to cut out more than one project. Cutting out fabric is a task I really don’t enjoy, so if I can just do as much as possible at once and be done with it, I try to. The benefit is that I have multiple projects ready to go when I have a few minutes to spare
  2. Take advantage of even a few minutes of spare time – need to thread your serger for your next project? Or, maybe you have a few minutes free for sewing some darts or simple seams? Do it. Sure, it may not feel as satisfying as sitting down for a real sewing session of a few hours, but it’s amazing how those minutes add up and a project comes together. I tried this experiment a few years ago after reading Nancy Zieman’s “10-20-30 Minutes to Sew” and it’s something I’ve adopted ever since I made this Ginger Skirt.
  3. Have all of your materials ready to go – a good habit I try to maintain is pre-washing all of my fabrics as soon as they come home with me. It doesn’t happen all of the time, but I try to throw my fabrics in the wash so when I’m ready to pull them out of my closet for a project, they’re ready to be cut out and sewn. If I’m also planning on making a project coming up and don’t have time to get to the store, I’ll look online for the supplies I need and get them ready to ship in time for my next sewing date in my sewing room. A lot time these days my supplies come from shopping online, which is much more convenient with my schedule than trying to hunt them down at my local fabric stores.
  4. Use a rotary cutter and large pattern weights – this goes back to my first bullet point, but it’s the easiest and the fastest to cut out projects when I use a mat and rotary cutter. There are some fabrics where it’s really the best option to cut them out with a rotary cutter, like slippery knits, but it’s so much more accurate and faster than a pair of scissors. I’m also a convert to pattern weights instead of pins for securing pattern pieces. I’ll measure out and pin down the grainline of pattern pieces to make sure I have them straight, but then I’ll use weights to hold the tissue pieces in place on the fabric. You don’t have to use anything fancy, I use giant washers I bought at Home Depot that I covered in washi tape.
  5. Press your pieces in batches – I just used this strategy for a top I have coming to the blog next week! Instead of getting up every time I finish sewing a seam to press it open or to one side, I wait until I have a few to press and do them all at once. As long as waiting to press a seam doesn’t interfere with sewing another one (think of an intersecting seam, or a dart and a waistband seam, for example), I try to do this as much as possible.
  6. Keep a running list of your sewing queue – this one is a fave of mine. I use Evernote to keep track, on a seasonal basis, of patterns I want to make and fabrics I have in my stash that would work with the pattern. I also use a special notation to call out projects that are easy to whip-up quickly vs projects that will take more time due to needing to make a muslin to get the fit right. It helps me prioritize when I suddenly have some free time and am not sure what to make next.

I hope some of these methods help to speed up your sewing time! Let me know if any of these work for you, or how you sew as efficiently as possible. I need all the help I can get, hah!

Follow:

Seamwork Leonora Skirt

leonora skirt1

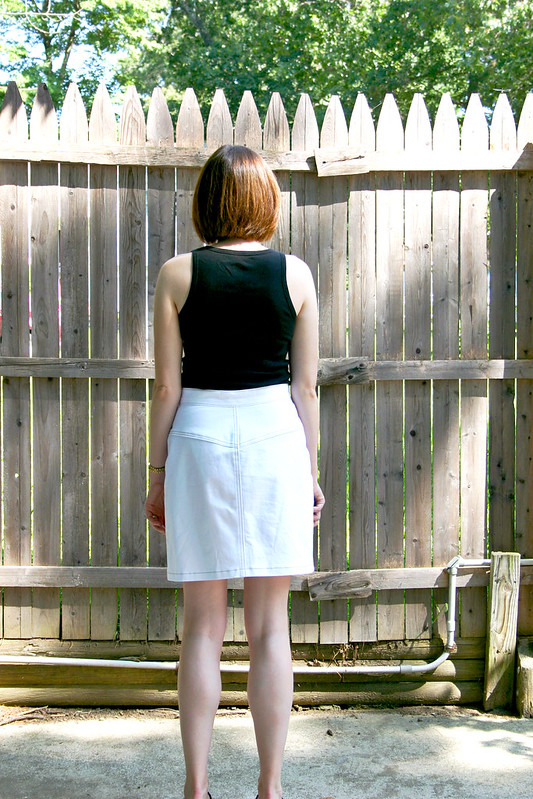
I don’t even know where to begin to describe how much I love this skirt. The real questions is: why did it take me so long to getting around to sewing this pattern?

leonora skirt5

After I made my new Grainline Studio Maritime Shorts, I had enough white stretch denim leftover for something else…just enough to cut out a skirt. Years ago, I used to have a denim skirt that I wore all of the time, spring through fall, and I missed having that wardrobe staple in my closet. Plus, I’m currently obsessed with any type of button-down skirt pattern (there’s three in my sewing queue right now), so I decided to pair the Seamwork Leonora pattern with my leftover denim.

The pattern is beautifully drafted, as I’d expect from Colette/Seamwork. I lucked out because the body measurements matched mine exactly, so I crossed my fingers and moved forward with making the skirt without doing a muslin. It fits so well and I love how the yoke of the back of the skirt is shaped to accommodate curves of the body (aka my booty). It’s brilliant.

leonora skirt2

Some changes I made: I omitted the patch pockets on the skirt front – not really my jam, and I don’t like calling attention to my hips like that. I also constructed the waistband in the same manner as the waistband for the Baste + Gather Birkin Flares, it’s my favorite way of sewing denim waistbands. And, no belt loops for me because I don’t really wear belts.

leonora skirt3

I used a beige topstitching thread that’s specific for denim from Taylor Tailor on all parts of the skirt that require topstitching. There’s something about the contrast of the light brown with the white that I really really like, and it feels more professional looking than if I just used plain white thread.

On a funny note – I ordered my denim buttons from Taylor Tailor as well when I ordered the topstitching thread. The pattern called for 7 jean buttons, so I thought I put 7 buttons in my cart…and the I was surprised at how much my total came to once I checked out and paid. Well, it helps to pay attention to details, because I didn’t realize that each button is sold as a set of 5. I ordered 35 brass jean buttons! I guess I’m all set with jean buttons for a long time!!

leonora skirt4

I can’t believe it’s August and summer is getting close to the end (and I’m done with grad school until September, hooray). Because I love this skirt so much, and will try to wear it as much as possible before summer is over, I need to make another one of these for the fall out of blue denim. I think this will be another stash-busting project!

Pattern: Leonora Skirt by Seamwork Magazine

Fabric: leftover white stretch denim, bought at LA Finch Fabrics

Hardware: brass buttons from Taylor Tailor

Follow:

Hadley Top and Denim Maritime Shorts


hadleytop1


Hello hello!  Dusting off the blog and posting for the first time in a very long time – I missed this!

I’ve been sewing this year, but a rarity has been finding the time to take proper blog pictures. Most of the time, snapping a quick hallway mirror/gym bathroom/sewing room mirror picture is all that I can do, and then post a quick blurb on Instagram. Hoping to change that going forward for the rest of the year.

Something else I’ve been trying to do this year is to cut back on my fabric shopping and instead sew through my stash. Well, this outfit covers about 50% of that!


hadleytop4


In going through my stash and trying to brainstorm ways to use up my fabric, I thought that this floral linen blend fabric from Joann would pair really well with the Hadley Top pattern by Grainline Studio. I’ve had this fabric for several years and always had it earmarked for different dress patterns, but my style lately is turning away from dresses and more towards separates. I really like the shape and fit of the Hadley Top that I made a few years ago and with the heat we’ve been having in New England, a breezy, cool top was a void in my closet.

Some changes I made to view B:

  • Raised the neckline 1″ – many reviewers made a neckline adjustment and I’m really glad I did, this would have been way too low for me. I could have raised it a bit more for more modesty, but this still works. I completely forgot to adjust the facing so I had to do a little fudging and easing when I assembled the top and neckline facing.
  • Eliminated the darts – I used Jaime’s idea to eliminate the darts from the Hadley top this go-round. Frankly this came from me just being plain lazy and not wanting to raise the darts on the bodice pattern (an alteration I almost always need to do for bust darts) and I really don’t need bust darts since I’m pretty small up top. I should try this out on other patterns because it worked out really well

If I make this again, which I definitely could see in the future, I’d like to do an all-in-one facing instead of having separate neckline and armhole facings. I stitched the facings in-the-ditch where I could, and then hand-tacked them down everywhere else.


hadleytop2


The Maritime Shorts pattern by Grainline is my go-to for summer shorts, and this is my third pair. I love these shorts!! I used to have a pair of white shorts from J Crew several years ago, but spilled some red wine on them and…you know the rest of the story there. For this pair, I used a white stretch denim from LA Finch Fabrics that was on closeout and it’s such a comfy, stretchy denim that doesn’t make you feel constricted when wearing it.

To prevent the pocketing from really showing through (you know, white-on-white), I found some cotton fabric that matched my skin tone and used that for the pocket facing and pocket bag, thanks to an article I found in an older issue of Threads Magazine. You can still see a bit of the outline of the pocket but it’s much better looking than using the white denim for the pocket.

I also used brass rivets and a denim button, and used a tan-colored topstitching thread for some added contrast.


hadleytop3


I’m currently finishing up the last of my summer classes for grad school and am looking forward to having the month of August free for all of the summer sewing and crafting I can churn out. Lots I want to try and tackle next month: a white denim skirt, Lucerne Blouse, and a swimsuit. Fingers crossed!

Patterns: Hadley Top; Maritime Shorts
Fabrics: Hadley Top – linen blend from Joann Fabrics; Maritime Shorts – designer denim closeout from LA Finch Fabrics

Follow:

Avoca One-Piece Swimsuit

Avoca 5
 

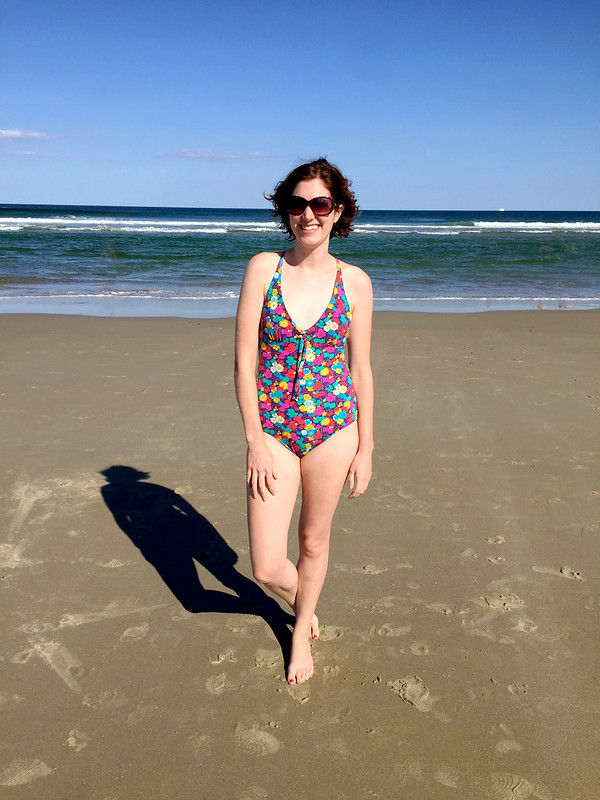
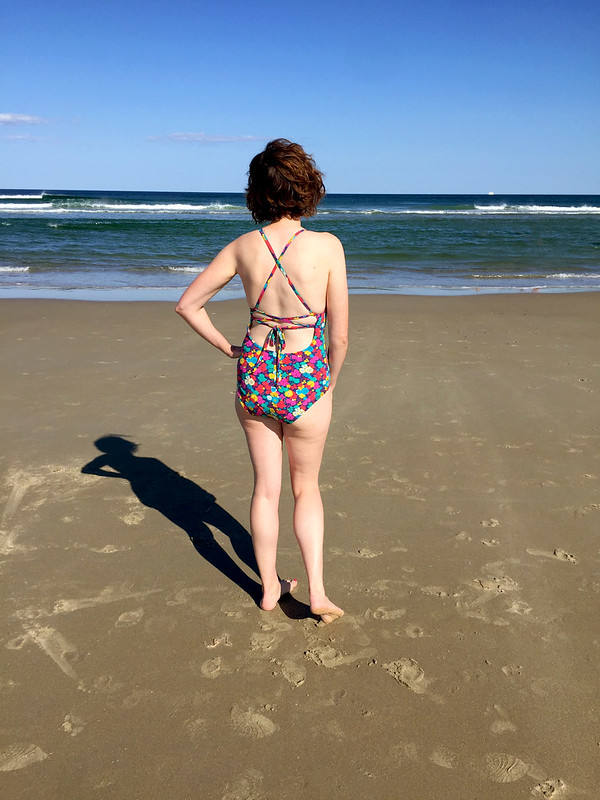
I really didn’t think I was going to make a swimsuit this year. Don’t get me wrong, I love sewing swimwear, but there doesn’t seem to be a whole lot of cute one-piece swimsuit patterns out there – I’m no longer a bikini/two-piece kinda gal these days. But when Swim Style Patterns released their Avoca swimsuit pattern, I instantly fell in with the lace-up detail of the scoop back and the cute lace-up front, and it jumped to the top of my sewing queue for the summer.

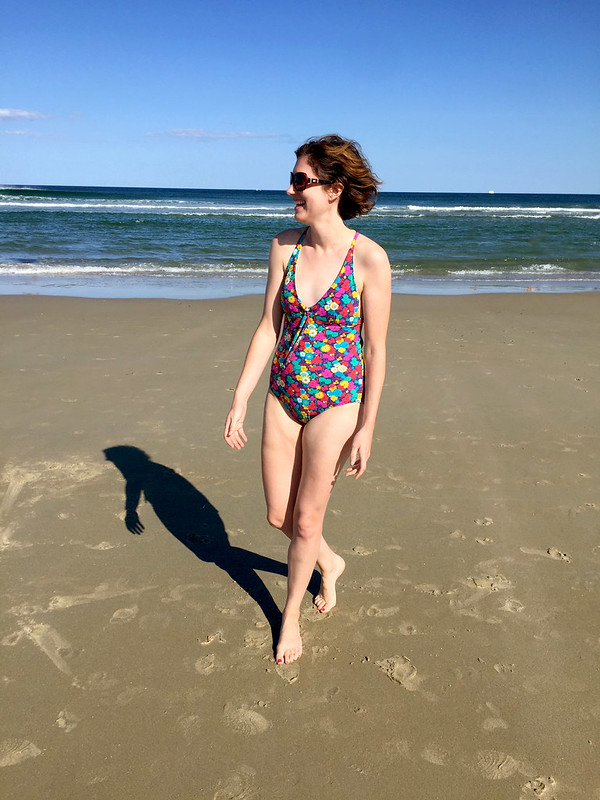
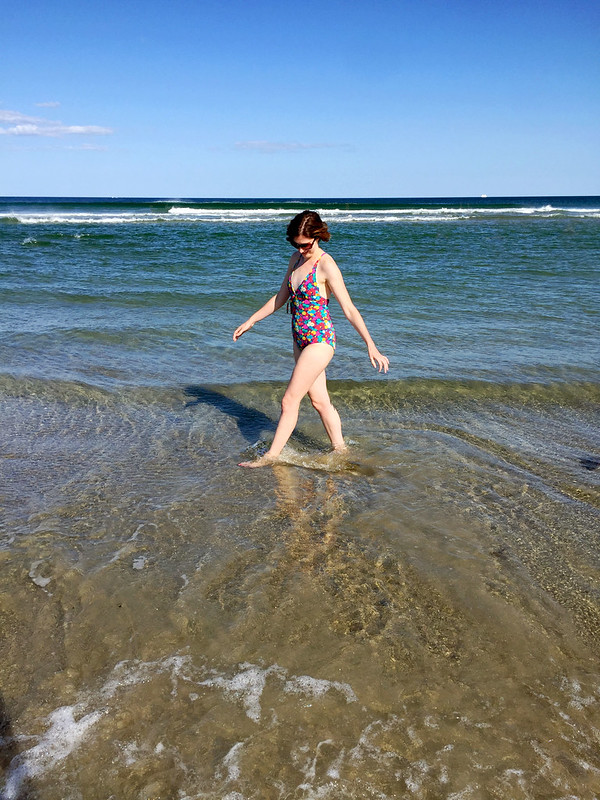
Before I jump into sewing this swimsuit – omg, isn’t this spandex so freaking pretty?? This is a much sought-after Liberty London spandex that I found online from The Fabric Store in New Zealand. I honestly couldn’t find their spandex anywhere else, even when I went to the Liberty department store in London earlier this year! It was really hard to choose a print to use, but I love the vibrancy and colors of this floral print and thought it would pair nicely with this pattern.

I’ve never sewn with Swim Style Patterns, and to be honest, if you’re just starting out with sewing swimsuits, I’d recommend starting with a Big 4 pattern to learn swimwear construction techniques and then move to Swim Style. I think in the sewing community we have a tendency to be “nice” in our reviews of indie pattern companies and to not hold back when reviewing the Big 4 (or, at least, this is what I’ve seen), but my goal is to be as transparent as possible and provide guidance/help/advice for anyone thinking about trying out any particular sewing pattern – and I think this is why a lot of us got into blogging. With that being said, I overall was perplexed as to the “why” for constructing the suit in the manner that it was, and there’s quite a bit that I would change in my next version of this pattern.  I also found the written instructions to be a little funky and relied a lot on my prior swimsuit sewing knowledge to make this suit, but referred to the instructions for the placement of straps and other details like that.


Avoca 1
 

.

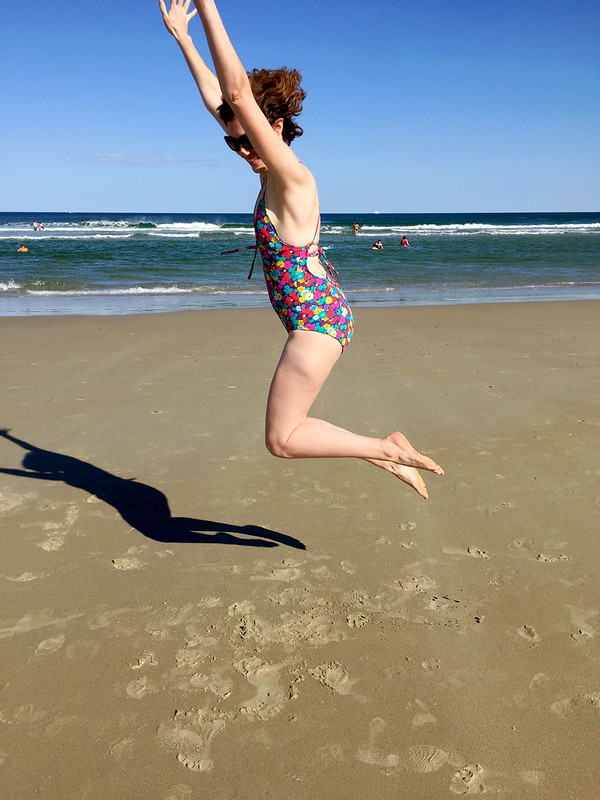
First things first: I’m not certain of how supportive this suit would be for larger-busted gals. I don’t have a lot going on up top (ahem), and there are some suggestions in the instructions on ways to add more support that I opted not to do (like adding piece of elastic around the underbust and along the sides of the cups), but I found myself regularly adjusting the straps to make sure I felt secure when jumping around in the waves and such. Maybe if I added the elastic underneath the bust it would be different? Not sure, I might give it a go the next time.

One thing that I wish I did when sewing the bust cups: construct them the normal way by stitching elastic along the edges of the cups, and then turning the seam allowance to the wrong side and stitching in place. Every RTW suit I ever owned is made this way, and every suit I made thus far is made that way. So, why not this one? What I found super annoying is that even though I under-stitched the lining per a reviewer’s suggestion on Pattern Review, it still managed to peek over the edge of the cups a bit and was visible when wearing the suit. If the bust cups were sewn the normal way with elastic and raw edges turned, this would not have happened! I think part of the reason why this instructions weren’t this way may have had to do with trying to create less bulk at the center front where the loops are added for the front lacing, but I would have been ok with a little bit more finagling with that part of the swimsuit vs having the lining showing. The instructions also call for top stitching of the cups, and maybe that would have helped to control the lining from coming out, but I couldn’t get the top stitching to look nice on the bias edge of the spandex cup, so I gave up.

The pattern includes a separate piece for a swim cup pocket – it’s a nice addition if you’re not a fan of using swim cups in swimwear and want the cups to be removable, but I would personally eliminate it and just insert the cup between the main fabric and the lining for simplicity.


Avoca 2
 

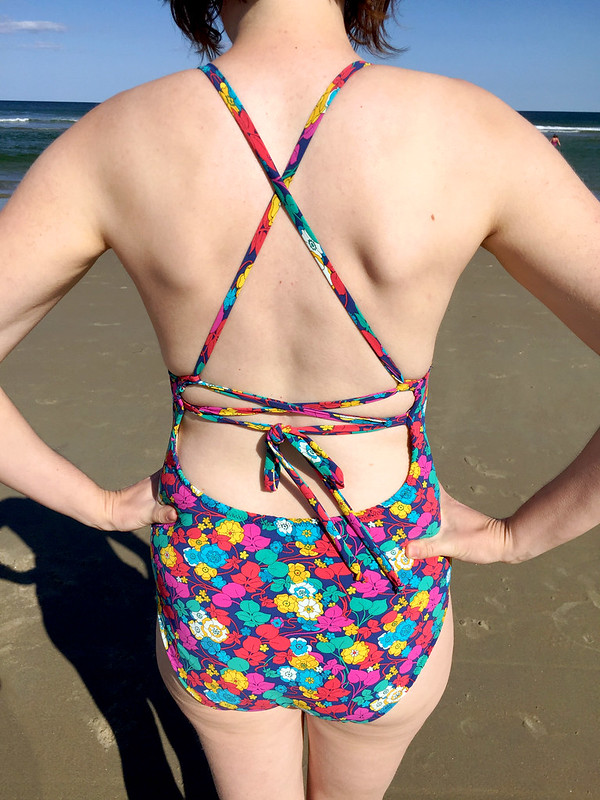
I’m really glad I made a mock-up of this pattern out of some spandex scraps in my stash before cutting into my Liberty spandex, because the rear coverage felt pretty skimpy to me. I ended up merging the bottom pattern from the Vogue 9192 suit I made with the torso of this swimsuit pattern, and got the fit and coverage I like and feel comfortable with.  So, beware if you make this suit and you like a more modest fit!

I also ignored the instructions on how to apply the elastic to the back and legs and did it my normal way: attach it to both layers of the suit (lining and main fabric) on the inside of the suit with my serger, turn the raw edges to the wrong side, and top stitch with a zig-zag stitch.


Avoca 3
 

Like I mentioned earlier, the back is what sold me on this pattern – isn’t that lacing detail a great design element?? Something I would change next time that may give the straps a more supportive role in the fit of the suit is to use elastic inside of the tube straps. I did this when I made a Maison Fleur bikini top, and when I wore the suit, the fit felt very secure and the elastic gave the straps more recovery. When wearing my Avoca suit on vacation, I had to really really pull and adjust the strap lacing and tie it super tight, otherwise there was too much slack in the simple spandex tubes. With this being such a key part of getting the fit right and keeping the suit in place, it’s worth a try to see if it improves the overall functionality.


Avoca 4
 

Overall, I really enjoyed wearing this suit on vacation last week to Ogunquit, ME and it checked off all of the boxes when I look for a one-piece suit: cute and stylish, on the somewhat modest side, but not too mumsy/mature looking. Despite my challenges with the pattern and things I wish I had done differently, I would make this again (or any patterns by Swim Style) but make sure to use the construction methods I know that work instead.


Avoca 6
 

Pattern: Avoca One-Piece by Swim Style Patterns
Fabric: Liberty spandex from The Fabric Store

Follow:

2018 Reader Sewing Survey

2018Reader sewing survey
 

Well, hello there! It’s been a few years since I ran a reader survey, and I’d love to hear from you lovely peeps about your sewing habits, the types of things you like to make, and what challenges or frustrations you have when it comes to sewing. This will also help inform me on the types of things you’d like to see on Sew Wrong in 2018!

Take the 9 question, 5-minute survey here: 2018 Reader Sewing Survey

Thanks!
Lucinda

Follow: