Finished Project: Anise Jacket [Colette Patterns]


anise 1


anise 2

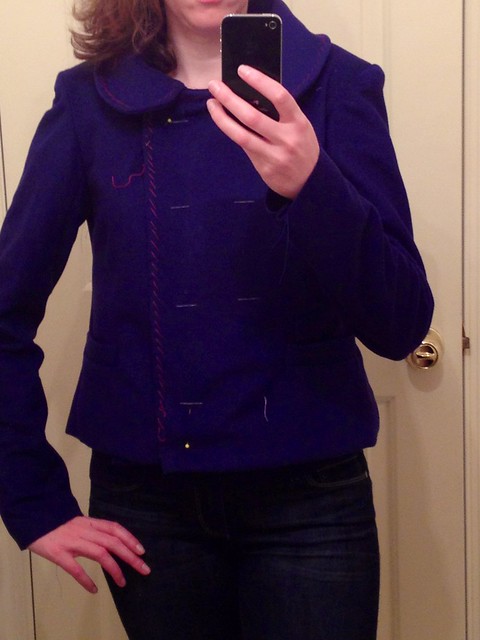
You guys – I reached the finish line!  Seriously, this is the most time-consuming, difficult garment I’ve made in my sewing career.  But I did it!

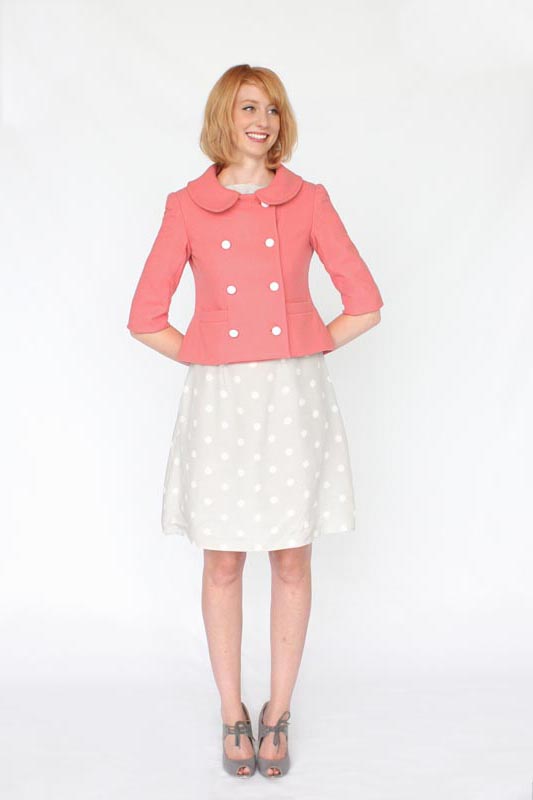
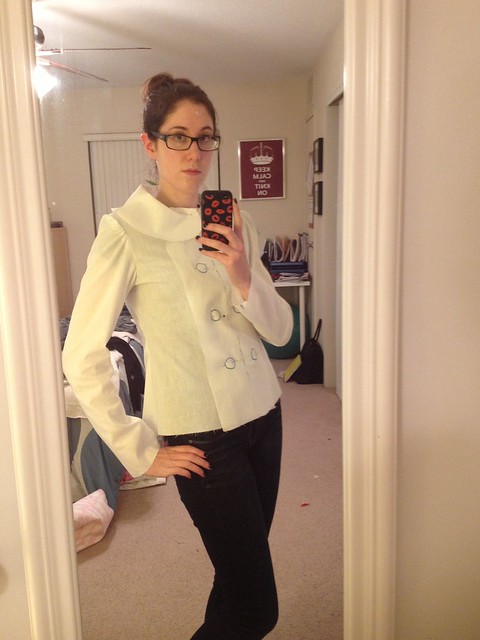
Pattern: Anise by Colette Patterns
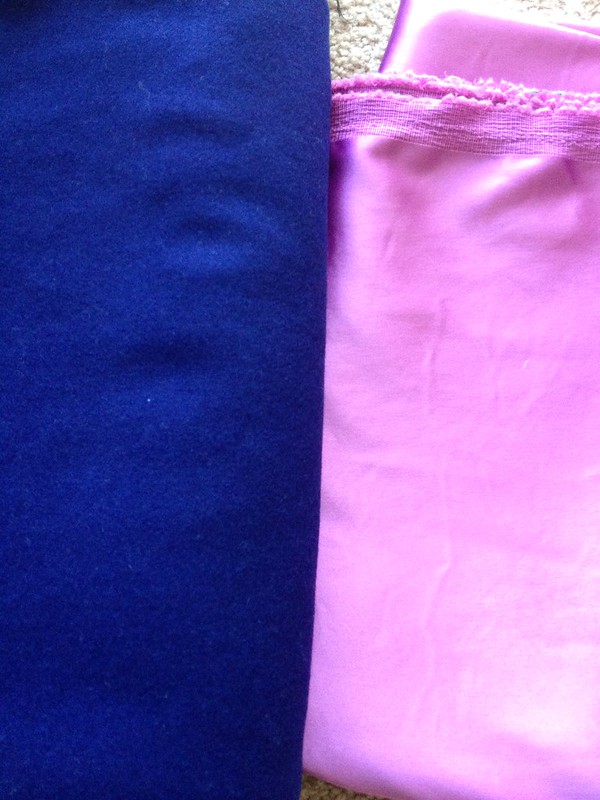
Fabric:  main – wool from Metro Textiles in NYC; lining – stretch poly charmeuse from Fabric Place Basement
Size: 4 graded to a 6 at the hips

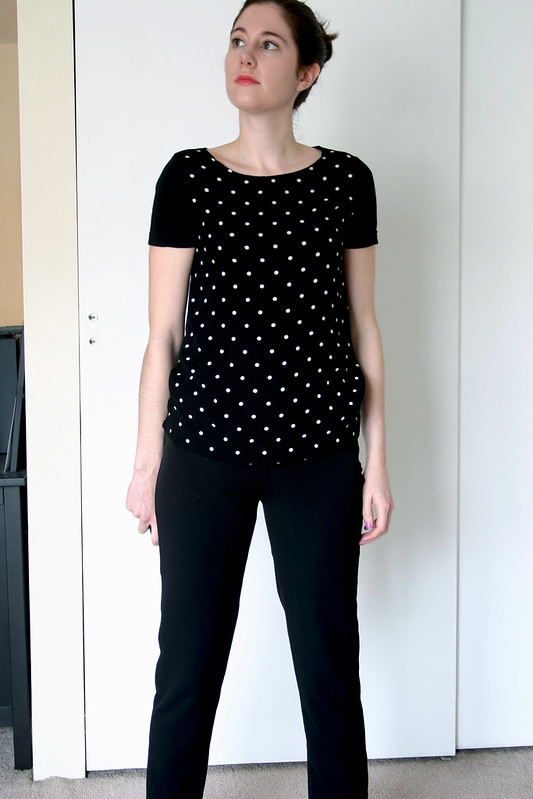
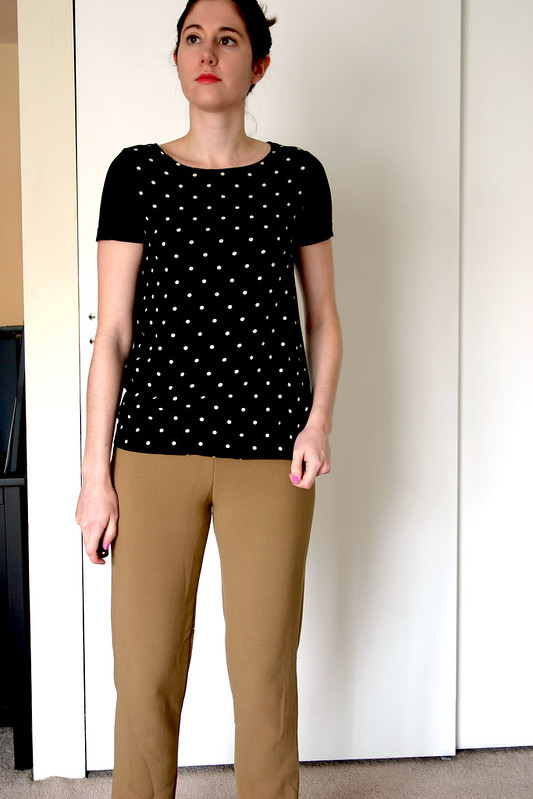
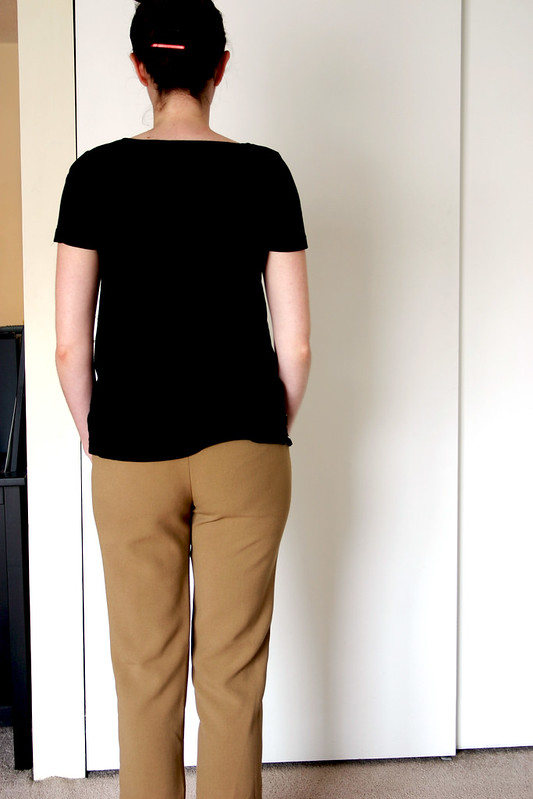
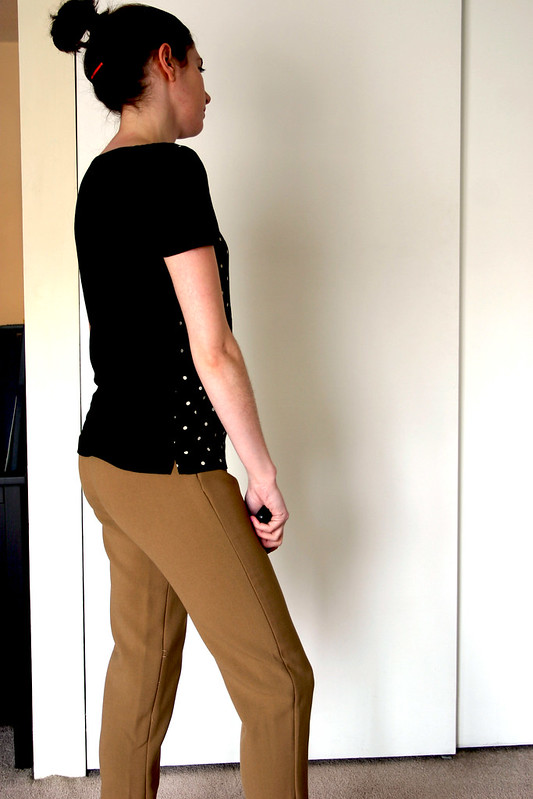
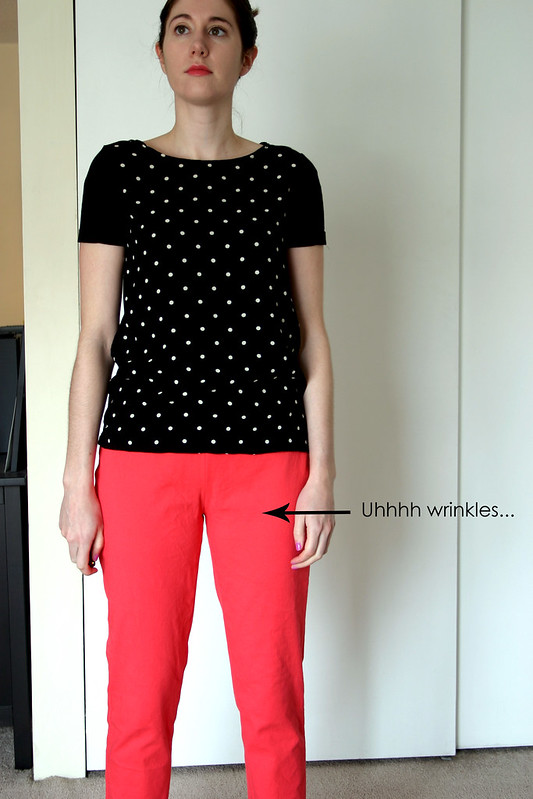
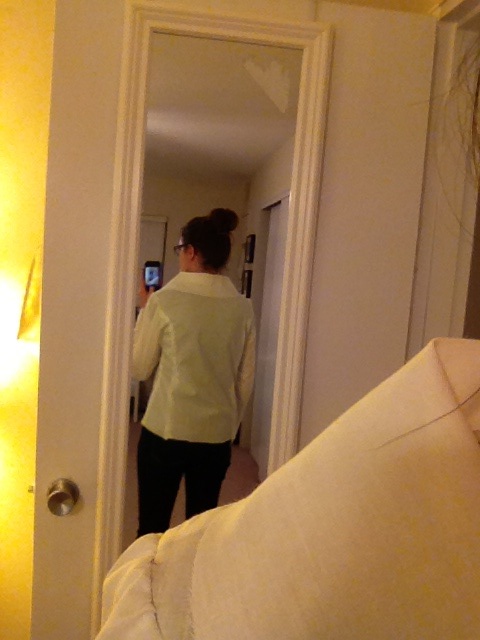
Shirt: Scout tee variation, unblogged
Jeans: Levi’s
Sneakers: Reebok

I want to thank everyone for their kind words and helpful comments as I struggled over the last month to make this.  Don’t get me wrong – I loved learning about the tailoring process, and I can’t wait to sew more tailored projects, but this pattern just didn’t work for me.  When I posted my last update on the jacket, I was actually 95% of the way done and too far beyond going back to fix some things that you all suggested, but they’re definitely worth exploring for my next go-round with tailoring.

So yes, this jacket isn’t perfect – but at this point, it really doesn’t matter to me.  I made a freaking tailored jacket, with welt pockets to boot!  I know my mistakes will be evident to experienced sewists looking at these photos, but I’m going to wear this jacket with pride, knowing that I learned soooo much doing this.


anise 3

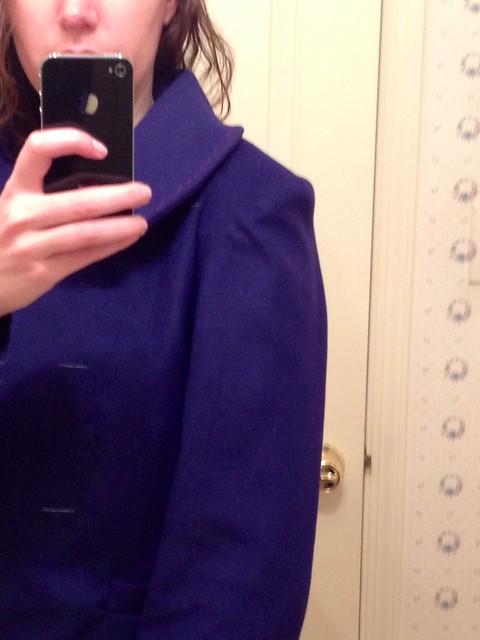
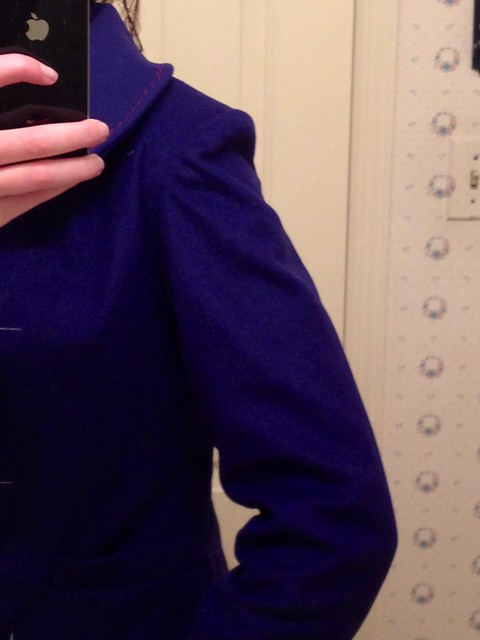
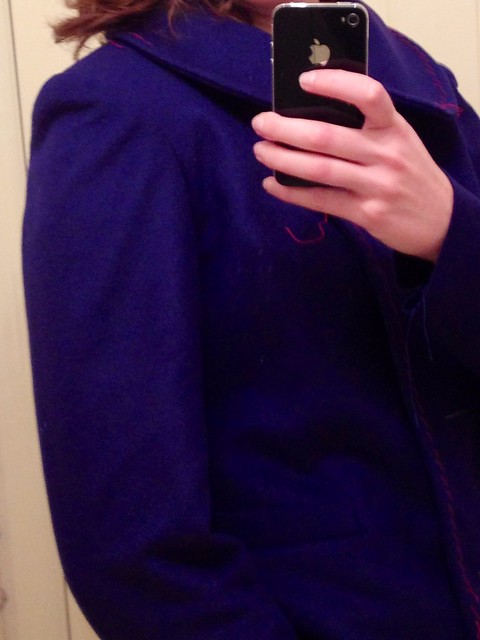
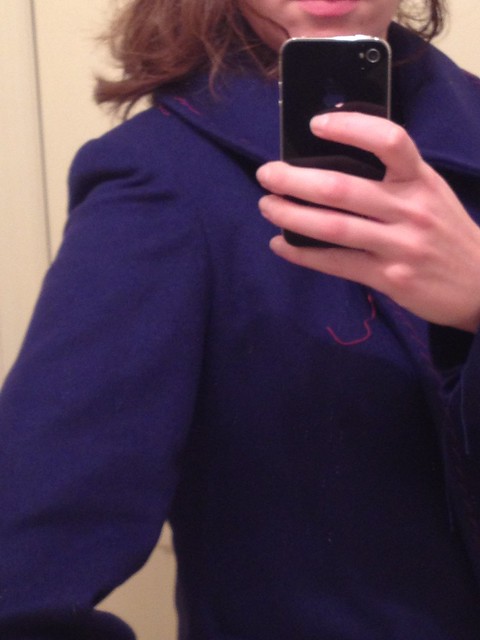
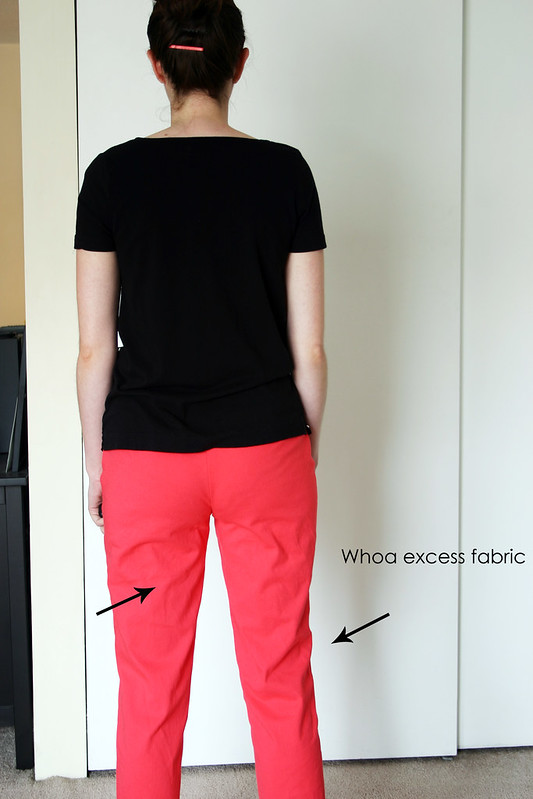
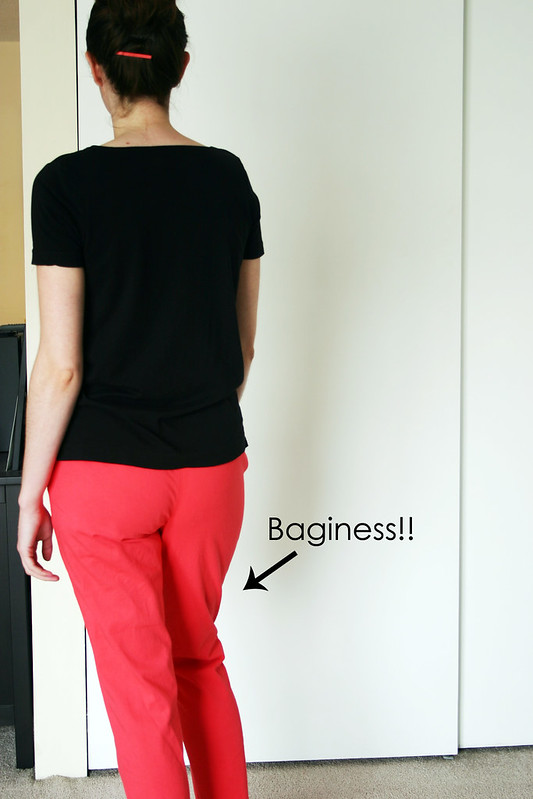
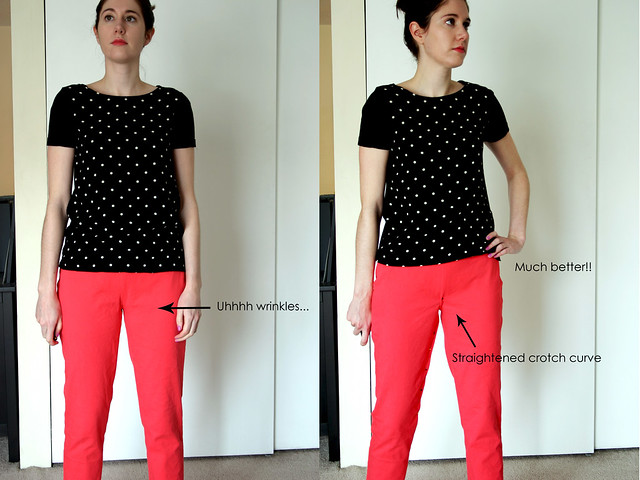
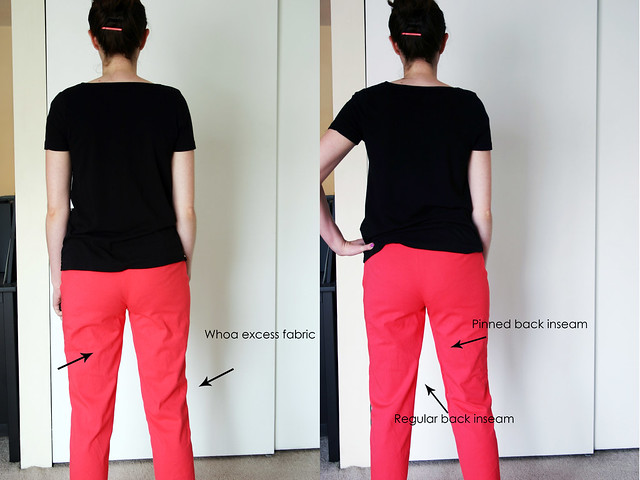
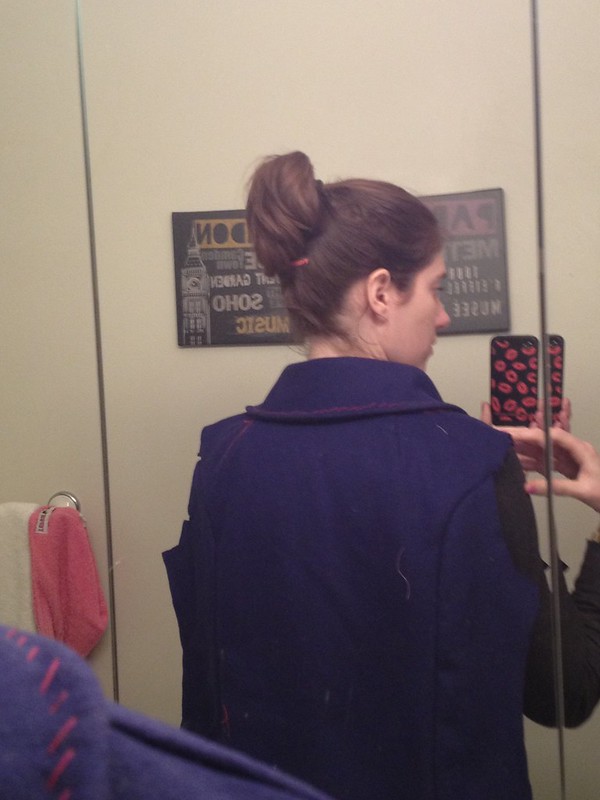
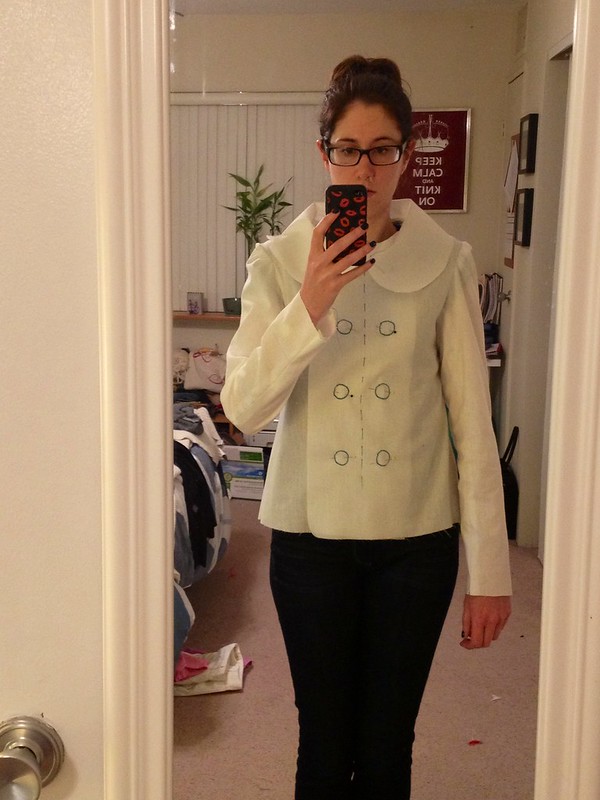
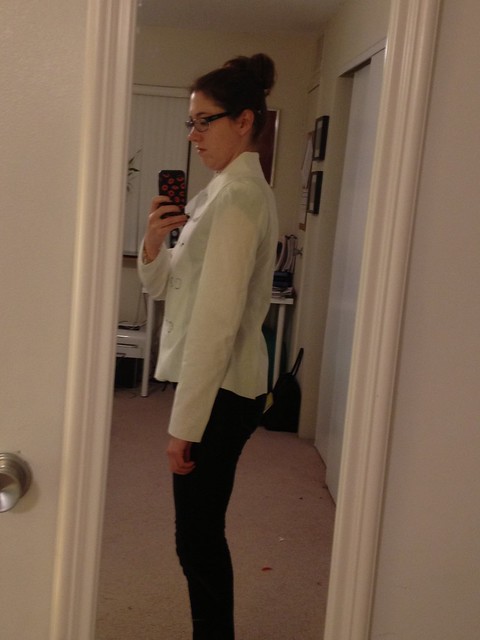
1. I Have Narrow Shoulders – This is something I should have remembered from all of the blazers my Mom made for me for my first job.  She had to alter each pattern because the shoulder seams came way past where the shoulder seam needed to be.  This wasn’t evident when I made my muslin, but going back to try it on again, I could baaaarely see it.  Which also brings me to another learning – make my muslin in the same fabric weight as the final garment.  I’m sure if I had, the fit issue would have been more evident in a heavier weight fabric than light, flimsy cotton.

Having said all of that, I explored how to make my own shoulder pads, drafted sleeve heads for my jacket, and studied different kinds of shoulder pads for different types of garments (definitely need to give raglan shaped pads a try).  Maybe if I didn’t have this fit problem, I wouldn’t have learned all of these tidbits of knowledge.

Also, I could not for the life of me figure out why there was so much ease in the front of my sleeve cap.  No, it wasn’t inserted backwards.  I’m just…perplexed, and it’s not as smooth as I’d like.


anise 5

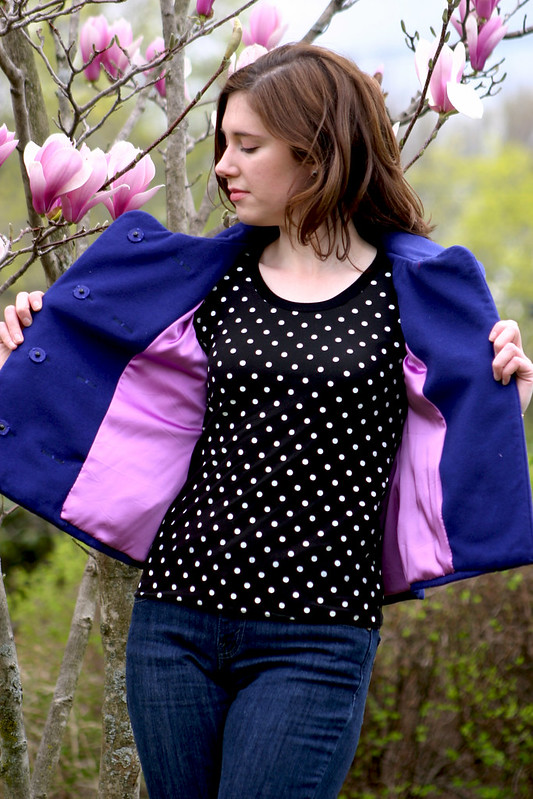
2. Stretch Fabric Isn’t a Great Idea For a Lining – but this one sure looks pretty!  The color is why I picked it, which is kind of silly, I know.  I thought the stretch would be an added bonus to give my jacket more movement and ease in the inside, but it ended up being more of a pain to cut out and stitch properly without getting runs in the weave.  It was anything but fun when it came to setting the sleeves in by hand, yuck!

However, this lining is an improvement over my original intended lining – a light gold acetate.  Acetate is a terrible idea for a jacket lining: it shows water marks and sweat stains (not good for my armpits, no way), doesn’t breathe well at all, and shouldn’t be used for garments with lots of wear.  I plan on wearing this jacket a lot, so no dice with the acetate.  I know poly isn’t a whole lot better in terms of breathability, but it was in my budget for this project.


anise 4

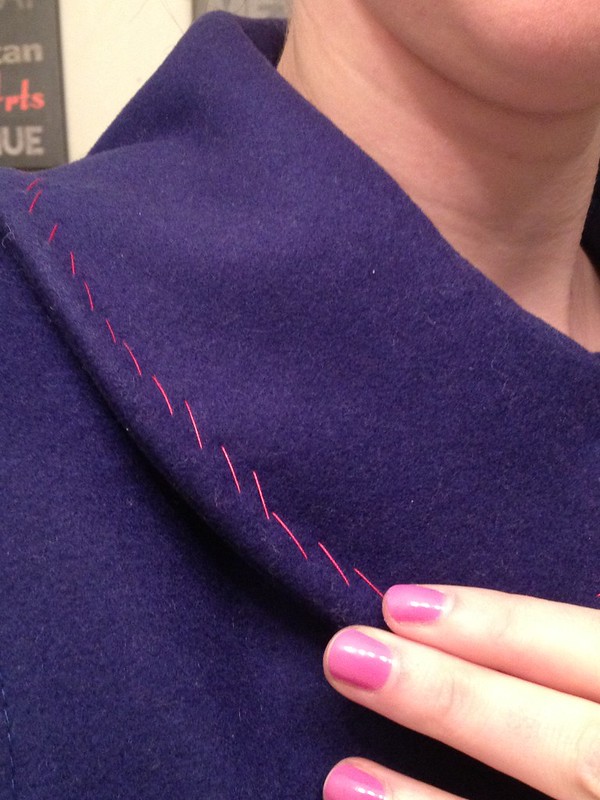
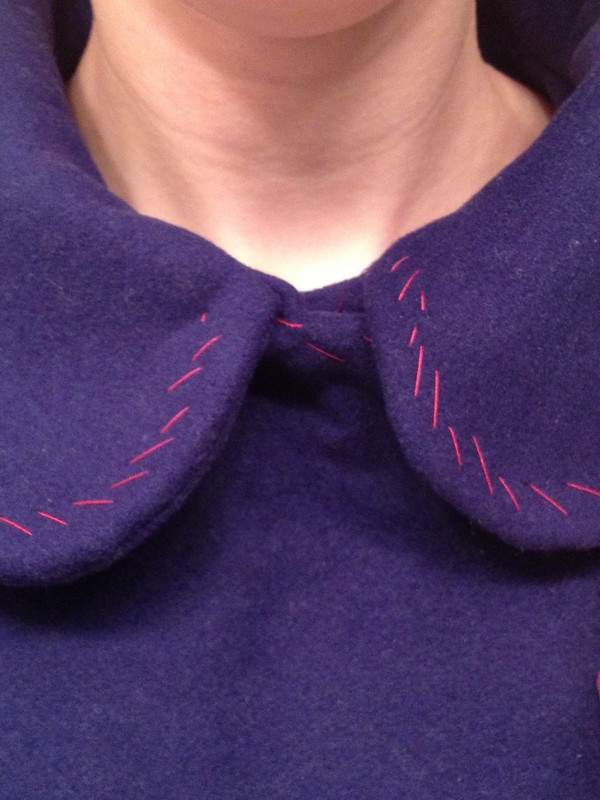
3. Press, Press, Press – I originally thought I did a great job taking my time when it came to pressing, really taking my time and pressing every seam like The Pressinatrix recommends, but I guess this jacket could have used a little more based on the above photo.  Having the right tools is imperative as well, I’m so glad I asked for pressing tools like a seam roll, clapper, and a tailor board last year for my birthday – they made getting to every area I needed to steam a lot easier.


anise 6

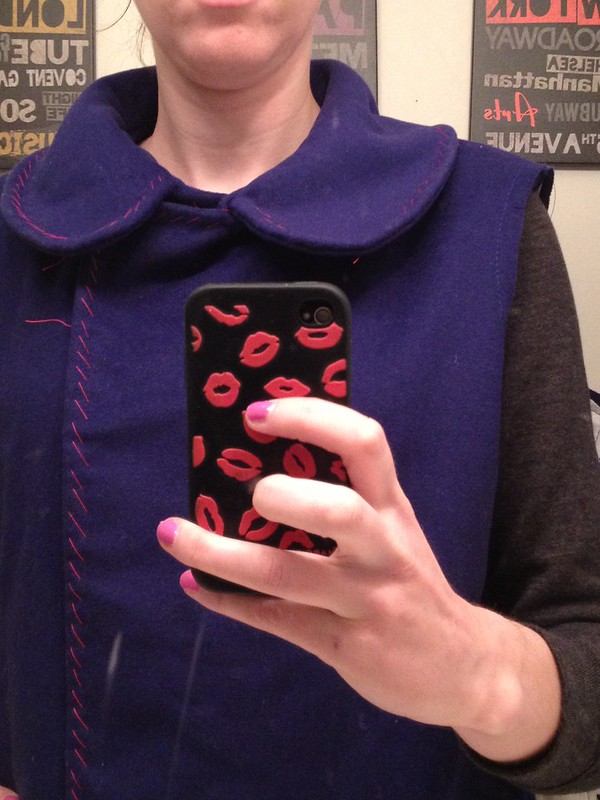
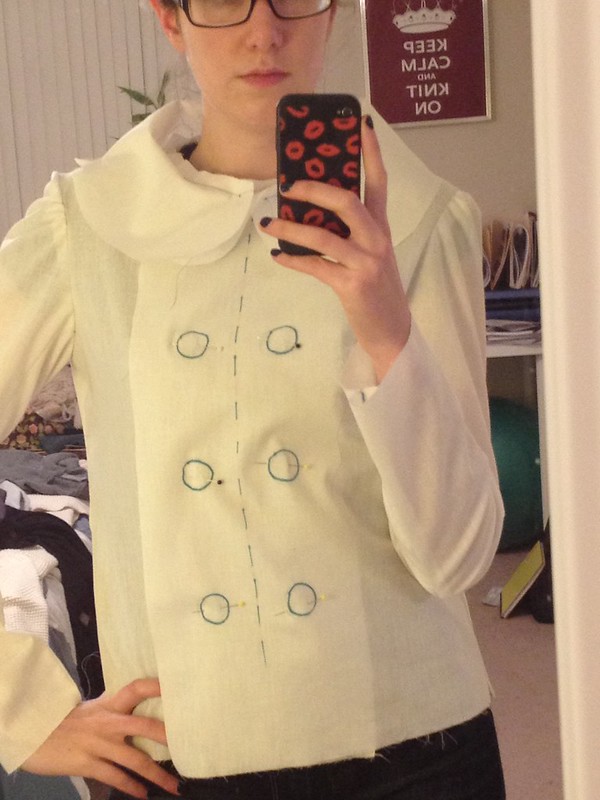
4. Creativity Is My Friend – you may have noticed in an earlier photo that I have snaps on the inside of my jacket.  This wasn’t the original plan, I had every intention of making buttonholes on my Mom’s wonderful Bernina (the automatic buttonhole feature is killer) when I was visiting a few weeks ago.  However, the bulk at the edge of my jacket front threw off the calculations of the machine and I ended up with some wonky looking, uneven buttonholes that wouldn’t pass muster.  That’s when the light bulb went off in my head that I could use snaps instead to close the jacket, and my Mom suggested covering the snaps in a coordinating lining fabric.  Problem solved, and a new technique under my belt.


anise 7

5. Perfectionism Is My Enemy – I was really close to not even finishing this jacket when I realized the problem with the shoulders, and the fact that how I made my welt pockets caused the front to pull.  There were tears, I threw the jacket in the corner, and I didn’t touch the project for over a week.  I wanted everything about this jacket to be crisp and perfect, I wanted people to ask me where I bought my jacket – I didn’t want it to look “home-made.”  But in the course of trying to achieve something “perfect” looking, I realized I needed to cut myself some slack – this was my first ever tailoring project.  How could my expectations be set so high for something I’ve never done?  I trudged on with the shoulder pads, the lining, the hand hemming.  There was way too much time invested in this project to give up – I steadily worked on this for a month, and to not have anything to show for all of that time would be sad.  From here on out, I need to chill and just enjoy the process of making clothes, and not get all hung up on details that will probably be evident to only me.

I’m so glad I didn’t let my perfectionist tendencies when it comes to sewing prevent me from finishing this jacket!  I wore it for the first time this past weekend, and it may be my last until fall since the weather is finally getting warm in Boston.  I never thought I would sew a project like this, let alone enjoy something that seemed so tedious to me like tailoring.  But now that I’ve taken my first step with this project, I’m determined to master the skills it takes to tailor well.

Follow:

8 Days to Anise: Well, Not Really…

Things have been quiet here for the last week, mainly because I hit a major roadblock with my Anise Jacket, and there’s nothing I could do to fix it.  After getting over my initial disappointment, I picked it up and decided to sally forth – I’ve spent so much time on this, it would be a shame to not finish it regardless of the fact that it…doesn’t fit correctly.

Here, I’ll show you.


Untitled

It’s those damn shoulders.  And I should have known better, based on when my Mom made blazers for me a few years ago.


I just got out of the shower and my hair was wet in these pictures…

The shoulders of the jacket are too wide for my shoulders, which is why I’m getting a dent right below my shoulder pad…sigh.  When my Mom made blazers for me before, she adjusted the shoulders in since the sleeve seams were waaaay past where they need to fall on me.  I didn’t really notice this in my muslin, and when I tried it on again it was so slight and looked ok in the lighter weight fabric.  The effect is now emphasized in the heavier weight wool.

I tried using a 1/2″ shoulder pad instead of the 1/4″ pad, to see if it would help eliminate the dent, and it only made the dent more pronounced.

Oh, and I could never figure out that stupid ease in the front of the sleeve head.  Why in the world is there that much ease???  Ease like that should be in the back on the sleeve, not the front.  And yes, this is inserted correctly.


It looks even worse when I bend my arm, you can really see the shoulder pad.


Untitled


Same results on the other sleeve, too.


I think this pulling is the result of something that happened when I sewed the welt pocket, don’t think I can fix it either. 

Well, I learned a lot from making this jacket, and it’s by no means perfect.  There was a quote I saw somewhere recently that said “perfectionism is a disease,” and I have to agree – I was getting so hung up on having everything look just right, and I freaked out when I couldn’t get the sleeves to hang correctly..  As much as I’d like for this to look flawless, it’s my first tailored jacket and my skills will only get better the more I continue to practice and make more jackets/blazers/coats.  So for now, I’m finishing up this jacket and will wear it proudly when it’s finished.

Follow:

Fabric Affects Fit – A Comparison of Clover Pants

Last year, I wanted to finally tackle sewing pants.  And yes, I made two pairs of pants, but they never made it to the blog – I still have to fix a zipper in one pair, and the other pair is made out of a brown fabric that I don’t know how to wear.  I want to share these pants, and demonstrate how a difference in fabric can affect the fit of the same exact pattern.

Note: this is a picture heavy post, and I’ll be talking about crotches.  Hey, it’s a sewing term!

I spent a week last year trying to get the fit right on a pair of Colette Clover Pants, and learned a lot about pant fitting by combing through my back issues of Threads, searching for articles online, and reading Pants For Real People.  By the end of the week, I ended up with these black Clovers:


black clovers1


black clovers2


black clovers3

I was pretty happy with the fit!  I took out a lot of bagginess in the seat and back leg by adjusting the crotch seam and back inseam.  The fabric was a RPL (rayon-poly-lycra) I had in my stash from when I thought I’d be sewing clothes for my old job, and it had just the right amount of stretch.  These pants still aren’t finished, because I botched the zipper, but I really should fix them because I love how they fit!

So after I made the black pair, I decided to use some taupe colored poly in my stash from Metro Textiles to make Clover #2 last fall:


taupe clovers1


taupe clovers2


taupe clovers3

I liked the fit of these even better!  The fabric was a little thicker than the RPL of the first pants, and had a nice amount of stretch and recovery.  However, I never finished the hem on these or wore them – the color just doesn’t work for me.  For some reason, this brown reminds me of those polyester pants with elastic waists by Alfred Dunner that old ladies wear to play bingo.  Trust me, the color looks a lot nicer here than in-person.  I can’t find a single thing to wear them with in my closet, which is why they’re all wrinkled looking – they’ve been sitting in a bin in my closet.  But all of that aside, I was very happy with how these fit, more so than the first pair.

Which brings me to Clover #3, which I stitched up last night.  Keep in mind – all three of these pants are cut from the same pattern with the same alterations.


coral clovers1

For these Clovers, I’m using a stretch cotton twill from Mood Fabrics.  And the fact that this fabric is pink, and there were folds of excess fabric in the front…I just kept looking at these pants and getting the idea that I had camel toe going on, even though these weren’t tight!!


coral clovers2

This was completely unexpected as well, look at all of that extra fabric in the back.  Now, I don’t want these pants to be skin-tight, since that’s not how they’re designed, and the instructions warn against over-fitting.  I need to be able to move and sit, but this just won’t do.


coral clovers3

I mean, come on!!!  Maybe if this was circa 1998 the fit would be ok, but not the look I’m going for (I was watching “You’ve Got Mail” the other day, and Meg Ryan’s pants fit just like this in the back…and that movie came out in the late 90’s).

After studying my Pants For Real People book (which I highly recommend), and having a good laugh with Sonja and Neeno, I figured out what kind of alterations I need to make for these to fit.  I’ve got a case of – wait for it – “Crotch Oddities.”

Yes, my friends, it’s a term that I read in my book.  Specifically, I’ve got a front crotch bubble, which can be solved by straightening out the front crotch seam.


front before and after

I essentially pinned out a 1/4 inch of fabric right around where I had the “wrinkles,” effectively straightening the front crotch seam.


back before and after

As for the back, I made the alteration that I did on the original paper pattern: took out leg width via the back inseam.  I pinned about a 1/4″ in from the original seam on the back leg, but still kept the original seam allowance in the front (in the above right photo, I only pinned the right leg with this change, the left leg is the same).  I’m realizing that it doesn’t look like much of a change from the photo on the left, but it really does fit better and look trimmer.  Again, I don’t want these pants to be skin-tight, and I need some ease for sitting.

You know, I ran into this problem when I made my Elisa-lotte dress recently with a stretch cotton fabric.  I’ve made the Charlotte skirt many times, and never had a fitting problem, but when I made it with the stretch cotton, I had to take it in a ton on the sides.  I’m guessing that that’s what I’ll run into when I work with stretch cotton.

So I guess the moral of this story is: just because a pattern fits with one type of fabric, it doesn’t mean that it will fit with another.  These were all stretch fabrics, with a good degree of stretch, but because they had different fiber contents, the fit that I got with all three were different.

Follow:

8 Days to Anise: Days 3-5


Untitled

What I learned last week: I really love tailoring.  Never thought that I would!  I like fast, simple, quick, easy, instantly-gratifying projects with not a lot of fitting, and it’s not often that I work on something for more than a week.  I think that’s part of the reason why I put off making this jacket for over a year – Chris bought me this pattern for Christmas 2012 and I bought the fabric shortly thereafter, but looking at all the steps and hand-sewing, I just didn’t want to devote the time to it that I knew I needed to.

But I can really, honestly say that I’m enjoying the entire process so far.  Even cutting out the fabric I didn’t mind as much as I usually do (my hands said otherwise)!  It took about two nights to cut out everything since I needed to cut out the wool, the lining, the underlining, and the interfacing, plus fuse the interfacing and sew the underling to the wool.  Whew!  That definitely would have been too much in one night for me to accomplish.

I’ve been reading a lot about the proper way to press while sewing, because after all, pressing IS sewing – The Pressinatrix has some great tips on tools and pressing techniques for sewing with all types of fabrics.  Since I’m doing soft tailoring on this jacket, I’ve found that I’m spending just as much time at my ironing board that I am at my sewing machine.  My trusty little Black ‘N Decker iron is holding up just fine, and I’m so glad I asked for pressing tools last year for my birthday, they’re really making the difference.

Enough chatter, onto the photos!


Untitled

Shhhh, excuse my dirty mirror!


Untitled

I love how this is turning out.  I hand-basted everything yesterday afternoon while re-watching season 3 of Game of Thrones – it was a rainy, miserable day and was the perfect excuse to be a bump on the couch.  But a productive bump!


Untitled

I still need to press the edges of the collar and jacket fronts, but I was amazed at how the basting really made everything look so nice.  And I figured if I need to hand-baste with silk thread, it might as well be a fun, contrasting color!


Untitled

The collar is looking good.  I was worried about how it would turn out: I fused the interfacing to the collar piece instead of the undercollar.  Whoops!!  When I went back to Joann Fabrics, they were all sold out of fusible weft interfacing.  The solution was to use my leftover interfacing to creatively fuse together a big enough piece to cover the undercollar – problem solved!  The collar may be a little stiffer and more structured than it’s supposed to be, since the entire collar is now interfaced, but I’m ok with how it’s behaving.  And it seems to be rolling under ok as well.

So far, I’ve worked on this jacket for five days – I’m right on track!  Now, to hunt down the perfect buttons…

Do you enjoy tailoring?  Any good book recommendations on the topic?

Follow:

8 Days to Anise – Days 1 and 2


anise jacket


If I was going by the temperature today, I wouldn’t believe that we’re in the spring season – it’s a balmy 30 degrees this morning.  Ah, such is New England weather, and my fingers are crossed that things warm up in the next few weeks in April (I’m running my first 5K in three weeks!).  I figured now is the time to get over my fear of jacket sewing and jump right in to making an Anise for spring – by the time I’m done, the weather will probably be warm enough to wear it.
I’ve owned the pattern and the fabric for well over a year, and had every intention of sewing this last year, but the time got away from me and when I was ready to sew it, the weather changed and I was in no mood to sew with wool in the heat.  My last few projects have been quick, crank-’em-out garments that I can make in a night or two, and it’s been a long time since I made a project that I can really bite my teeth into and spend a decent amount of time constructing. 
So, I’m calling this project my “8 Days to Anise” challenge – according to the companion book (which has a lot of helpful tips!), this jacket can be broken down into bite-size sewing chunks over the course of eight sewing sessions.  This makes sewing a tailored jacket a lot less intimidating and more manageable!  Let me show you my supplies so far:


Anise fabric

It was hard to get the colors right, but the left is a dark violet/indigo wool (from Metro Textiles), and the left is a lilac poly sateen for the lining (from Fabric Place Basement).  I originally bought a white gold acetate for the lining, but learned from some research online that it’s a weak fabric, should be used on garments that won’t be worn often, and shows water/sweat marks.  No thanks!  I’ll save that fabric for lining skirts.  As much as I really wanted to use silk charmeuse for the lining, I couldn’t justify spending that much money on the lining, and I’m pretty happy with what I found instead.  I preshrunk my wool using the dryer shrink method Sarai explains on the sewalong page, and washed my poly in cold water with some of my other clothes.  This jacket is going to be drycleaned, so I’m not too worried about shrinkage (and I’m notoriously bad about taking my coats to the cleaners).

All that’s left is to find nicer fusible weft interfacing than what I found at Joann’s (not convinced that it’s right for my fabric), and buttons that will coordinate.  Grey’s Fabric has some weft interfacing that I’m going to pick up this week, and the buttons can always wait until I’m finished with the coat – no bound buttonholes for me on this project.

On to the fitting photos!  I’m pretty pleased with how it turned out, but I have a few concerns. There’s quite a few iPhone photos below:


Untitled

The front looks pretty good! Not too tight in the bust and plenty of room in the hips.


Untitled

Further away, full front photo.  Yes, it’s hair up/glasses on on the weekends, hahaha.


Untitled

View from the back, looks good. No extra fabric or bagginess, definitely easy to move in.


Untitled


Untitled

This is where I’m not sure about the fit – the sleeves.  Granted, I did a crappy job inserting the sleeves, there was soooo much ease in the front of the sleeve cap and I didn’t do the greatest job inserting them.  However, it seems like there’s excess fabric at the cap because of the drag lines I’m seeing.  Here’s some other views:


Untitled


Untitled

Lololol bitchy resting face.

See? It’s dragging in the front.  I pinned my shoulder pads in to the muslin as well to see if that would help.  I’m hesitant to make any changes to the cap, and if it’s really because I didn’t distribute the ease properly (it seemed like there was a ton of ease up front and a little in the back, according to how the markings lined up), I may go back and redo the sleeves to see if that changes anything.  When my arms are relaxed, it’s not as apparent.  I’m also going to make a sleeve head when I sew my final garment, so maybe that will help.

Suggestions on the sleeves?  Anyone else run into this when making their Anise?

Follow: