Owls Sweater Fail [“If You Want to Destroy My Sweater…”]

I have a tale of woe to share, not for the faint of knitting heart.

In the past 17 years of knitting, I have only had three major finished sweater fails, which isn’t that bad, really.  The first being the Central Park Hoodie, a sweater that taught me the importance of knitting a gauge swatch – when I finished sewing all of the seams and tried it on, the sweater would have fit an eight year old and I was 19 at the time.  The second is a Twinkle Skating Sweater I made out of Rowan Big Wool, and I learned that super bulky yarn and cables are not that flattering or slimming on the human body.  The third, which is chronicled below, taught me the a new lesson: knitting a gauge swatch is not enough, it must be blocked as well to determine how the finished product will actually look and fit.

Ready?  Here goes…

After sewing the underarm seams, weaving in all of the ends, and stitching on a pair of button eyes, I thought that my Owls sweater could benefit from a wet block to fix some wonky looking stitches.  I found a little sample of Soak that I bought at a yarn store last year, emptied some of the sachet into my bathroom sink, and placed my sweater in the basin for about ten minutes while I hopped in the shower.  After I got out of the shower and changed, I drained the basin and carefully squeezed out some of the water in a towel – boy, did that thing keep in water!  I carefully transported the sweater over to a dry towel on the floor of my bedroom and proceded to lay out the sweater to dry.

But wait a minute – what was going on with my sweater???  My sweater grew three times the size it was supposed to be.


owlfail1


The above picture is a result of my wet blocking.  Just in case you haven’t read about my Owls sweater, the yarn in question is Rowan Cocoon, a very nice, very expensive, Merino wool and mohair blend.  Not a superwash, mind you, which has a tendency to stretch out and grow.  This was wool, which is known for its elastic properties and great memory.  What the heck was going on??  I tried to smoosh the stitches together to make it smaller (I have no idea why I thought this would work) but it was no use.  I told myself, maybe it’ll shrink up as it drys.  So I aimed a fan at it and waited patiently over the next two days to see if there was any change.  Nope.  In fact, it’s still damp.


owlfail2

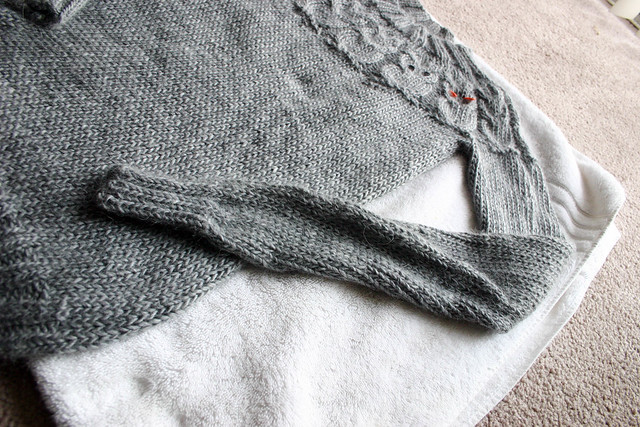
Just for reference, the sleeves measure 30″ long and the body of the sweater is 26″.  Maybe if I was 6’3″ or had knuckles down to my knees it would fit!

Here’s a before and after so you can see in detail how much the stitches themselves stretched out:


owls1

Look at those nice and tidy stitches, that dense knitted fabric.  It’s perfect, it’s on gauge, and lovely!  Now here’s the after-blocking picture:


owlfail3

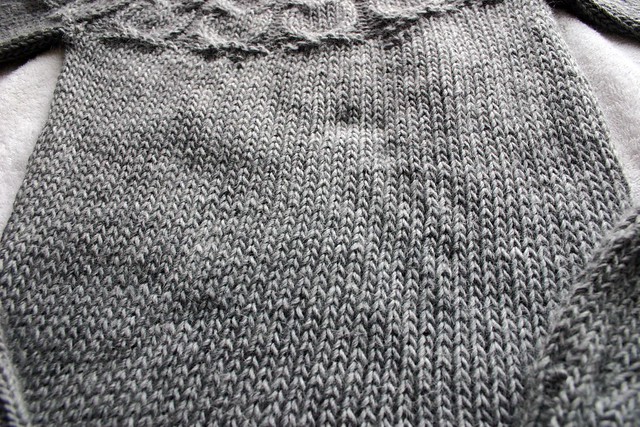
It looks like I knit this thing on US 15 needles when I actually used US 11 needles.  Wowzers.


owlfail4

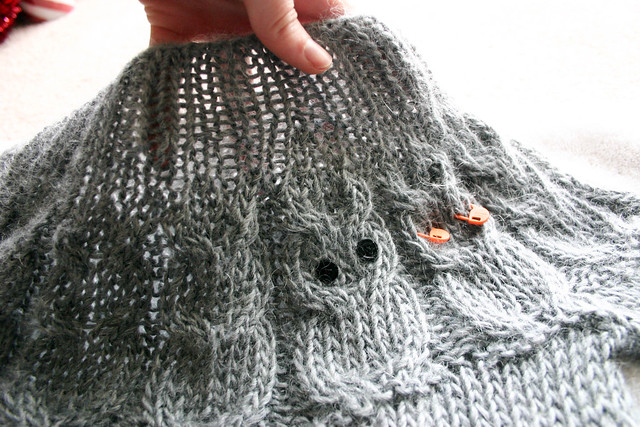
There is no way that you should be able to see through that ribbing, and I’m not even stretching it out in that picture.  I’d have to wear a tank top underneath this sweater so that my bra isn’t exposed since it’s that loose, and I bet you’d see the big mole on my stomach, too.

So what the hell happened??  I know mohair has a tendency to grow over time; my first sweater I ever made was knit out of 100% mohair and the sleeves kept growing each time I washed it.  This yarn is only an 80/20 blend, so it’s mostly comprised of wool.  I tried searching on Ravelry to see if anyone else had this problem with Rowan Cocoon and found only one or two people who had tragedy strike, but that was it.

When I told my friends at knitting night what happened to my sweater, one of my friends asked me, with wide eyes and an incredulous look, “Don’t you wet block your swatches?”  I sat there a bit dumbfounded since the concept of wet blocking a swatch was foreign to me.  I guess I learned my lesson on this project!

Honestly, I’m not that upset about what happened.  As I sat there trying to figure out what the heck was going on with my wet gorilla-sized sweater, I said to myself, “huh, that’s interesting.  Alright then.”  I think it’s due in part to the fact that I wasn’t totally in love with this sweater.  I just wanted to finish knitting it so I could move on to another project (which I have, yay) and so I could wear it to Vogue Knitting Live this weekend.  If the yarn I used should only be steamed blocked, even though the label says “hand wash,” then it’s just as well that it didn’t turn out right because I’d never make a sweater I couldn’t properly wash, eww eww.  And for yarn that’s $16.95 a ball, it better do what I want it to do, dammit.

So a-ripping out I shall now.  There’s six balls of expensive yarn invested in this sweater that I am not letting go to waste.  I’m thinking a big, in-your-face statement cowl like the Gap-Tastic Cowl on Ravelry.

Hold this thread as I walk away…

Follow:

Wisteria Scarf

Wisteria Scarf

Pattern: Wisteria from Twinkle Weekend Knits
Yarn: Twinkle Handknits Soft Chunky – Crimson
Needles: US 35

Wisteria Scarf

It’s mid-December and it still feels like early November in Boston, which makes it hard to believe that Christmas is a little less than a week away (crazy, right??).  I’ve been trying my hardest to wrap my head around that fact and get “in the spirit,” but with my crazy work schedule and the temperatures outside, it’s been a challenge.  So when we *finally* had a seasonably cold day, I knew this red scarf would help me snap out of my mentality and feel festive.

This was the quickest knit of my life – hands down.  Two skeins of Twinkle Soft Chunky and size 35 needles – can you say, “instant gratification?”  I used to own the book Weekend Knits but got rid of it after a bad sweater experience and didn’t want to buy it again, so I actually looked up the stitch pattern and figured out how to knit the scarf without the pattern.  I also opted for no fringe – not a big fringe gal, and the scarf was long enough after I whipped through the two balls o’ yarn.

This is a fashionable monster of a scarf and not for the timid or petite.  I even find it overwhelming at times if I don’t wrap it around my neck properly but boy, what a show-stopper it is.

Follow:

Lil’ Gray Cape

Lil' Gray Cape

Lil' Gray Cape

Pattern: DROPS 116-19

Yarn: Cascade Lana Grande
Needles: US 17 circs
Size: Small

I love capes.  Ever since I saw the pictures from the spring runway shows, I knew I wanted a cape for fall this season.  Yes, they are impractical.  Yes, they trigger images of super heroes or Little Red Riding Hood. But damn it all, I wanted a cape this year come hook or by crook.  And why buy one when you can make one?

My initial plan was to make the Not-a-Poncho City Cape by Wendy Bernard.  It had all the elements of the RTW capes I had seen in stores, with the slits for arm-holes and a chunky ribbed collar.  When I went to my LYS Gather Here, Virginia unfortunately did not have the amount of gray Eco Wool that I needed.  Which was probably just as well; I don’t think I would have been brave enough to rock a giant knitted cape like I originally thought.  So instead I scrolled through my Ravelry queue and found a little DROPS cape pattern that I liked and some chunky gray yarn at the store that fit the bill.

Lil' Gray Cape - Back

I modified the amount of stitches I needed to cast on since my gauge was smaller on the needles I used (US 17 instead of 19).  The rest of the pattern was followed exactly, except I knitted the collar ribbing to 6″ instead of 8″ – it just seemed like it would be too much collar if I knit it to that length.

Lil' Gray Cape

I also used two buttons I had in my stash instead of three like the pattern calls for.  I like the open look just two buttons creates, and the ribbed collar has more of a sailor collar effect than a traditional fold-over collar.

I wore this to work this week since it’s been chilly in the building (seriously, is the AC still on??), but I probably will only wear it around the apartment in the coming months even though I got comments at work on how cute it looks.  It’s like a little woolly blanket that fastens around your shoulders and stays in place.  As much as I love how it looks, it doesn’t replace the warmth and functionality of a coat.

At least I’ve gotten my cape-lust out of my system now.

Follow:

Leaflet

Leaflet

Pattern: Leaflet by Cecily Glowik MacDonald

Yarn: Osprey by Quince and Co. in Nasturtium
Needles: US 11 circs 
Size: Small

Leaflet

Last week we felt our first really “cold” day of autumn in Boston, which reminded me that I needed to block this sweater and wear it before it’s no longer in season.  I love how this sweater turned out – it’s the perfect fall color, the short sleeves make it a great layering piece, and the leaf pattern on the back is a nice surprise.

I had some trouble starting this sweater, as I wrote about here, due to my initial yarn selection.  But once I got over the hump, the sweater flew off my needles and was a quick knit.  I probably would have posted this sweater earlier but I was just too darn lazy to pick up the stitches around the neck and knit the ribbing.  So it sat in my knitting basket, waiting, until one of the girls in my knitting group asked me how my sweater was coming along and wanted to see it the following week at our knitting night.  It was some good motivation to get me to pick up all of those stitches around the neck, which I dreaded doing.

Leaflet

The other nice thing about this cardigan is that there’s no buttons or buttonholes, hooray!  Sometimes that can really ruin the look of the ribbing band around the front of a cardigan.  I picked up a cute shawl pin at Webs  in Northampton, MA that had a leaf decoration at the top, which seemed apropos for the sweater I was intending to use it for.  Even more versatility with this sweater – easy to wear it open or closed.

Follow:

McCalls 6200 Green Swirl Dress

McCall 6200 green swirl dress

Pattern: McCall’s 6200

Size: 8/10
Fabric: Rayon jersey from Gorgeous Fabrics
Boots: Nine West
Earrings: M Style Lab
I really wasn’t sure how this pattern was going to turn out.  I’m so apprehensive about dresses that are “shaped” with a tie-belt: they can be hit or miss in the fit department.  I’ll either love how it drapes and feel super cute and chic in it, or it could be a giant sack and feel like I’m wearing a muumuu.  I’m also not a huge fan of line drawings on a pattern envelope since it’s an ideal representation of the pattern and not a realistic interpretation of how it will truly fit.  But I thought heck, I’ll give this pattern a shot.  At the least, I could make it into a swingy top if I don’t like the dress.

McCall 6200 green swirl dress

1) Sizing

This pattern was a breeze to sew and went together in a matter of hours.  I chose to do View A with the swingy sleeves to bring out the 70’s vibe of my fabric.  I did my usual adjustments from bodice to waist, but went down a size in each of these areas: instead of cutting my usual 10/12, I cut out an 8/10.  These dresses always seem to have so much ease and I didn’t need this being any larger than necessary.  I would strongly advise going down a size in this pattern, I still had room to spare.

McCall 6200 green swirl dress

2) The Sleeves and Side Seams 

I also ignored setting the sleeve in and sewed the sleeve cap in flat using staystitch plus, and then sewed the sleeve seam down through the side seam in one fell swoop.

McCall 6200 green swirl dress


3) The Neckband

The neckband was a little fussy and I wasn’t crazy about hand sewing the facing to the inside by hand, but it went together ok.  I’m really glad there was interfacing for the neckband since it’s so wide to begin with and it really prevents it from stretching out even further.  The only thing to be aware of is that if the neckline doesn’t lay across correctly, it will buckle and gape in the back.  I also had to adjust my bra straps during the day since they kept showing due to the wideness of the neckband.  Maybe lingerie straps wouldn’t be such a bad idea.
4) The Hem
I shortened the hem more than what the pattern called for so that it would look proportionally correct with my boots.  The drawing shows the hem hitting at the knee, which didn’t look right on me, so I took the dress up about two inches to get the correct effect.
This is a really easy, basic pattern that would be an excellent pick for a jersey with a large print.  I could definitely see making this dress with different sleeve options, maybe incorporating the tie in to the side seams and having it tie in a bow at the back, or using contrasting fabrics for the neck and tie-belt.  This pattern is definitely a staple to have in your pattern arsenal.
Follow: