Navy Lonetree Vest

lonetree vest
 

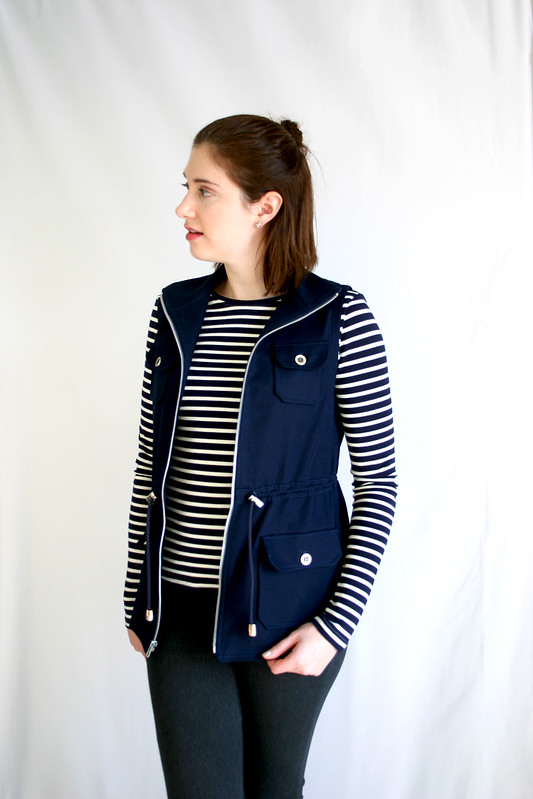
This Lonetree Vest feels like the most RTW garment I’ve made so far in my sewing career.

When I made my wish-list of garments I wanted to sew for fall, I craved some type of utility jacket with pockets and a drawstring, but nothing existed.  It was almost as if Allie Olson read my mind and released her very first sewing pattern at just the right time.


lonetree vest


I didn’t set out to make a navy vest at first, I originally planned in making a black jacket.  However, I realized after cutting out the jacket from fabric I ordered that the quality of the fabric was absolute crap –  into the trashcan it went.  I then decided to switch gears and went on to make a navy twill jumper dress for Thanksgiving (to go with the striped shirt I’m wearing above), but I was sad to discover that I bought yardage for the tunic view of the sewing pattern, not the jumper view, and was short about a yard of what I needed!  I guess all of the above was a comedy of errors, and this navy twill was destined for a vest instead (and Abbey inspired me as well with her navy version!).


lonetree vest
 

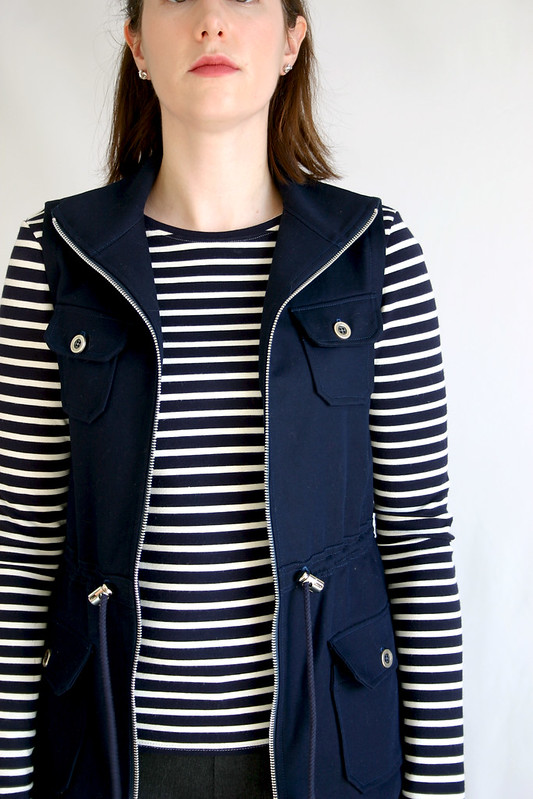
Hat’s off to Allie, this lady has some serious pattern-drafting chops.  Everything came together so smoothly and the directions really walk you through the steps in a clearly illustrated way, the vest looks more complicated than it really is.  The most time-consuming part of making this vest were the pockets and the top-stitching – lots and lots of top-stitching!!  I ran out of thread, which delayed my finished of this vest until right before Christmas.  After attaching the pockets to the front, the rest of the vest went together fairly easily.  I wish in retrospect I top-stitched a little closer to the pocket edges instead of 1/4″ away from the edge to get a bit of a cleaner look.


lonetree vest
 

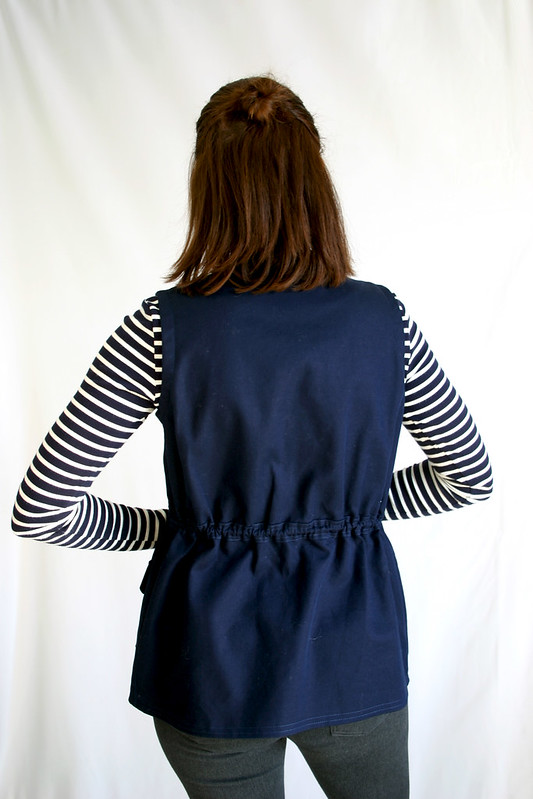
I also top-stitched the cording channel with two rows of stitching instead of just one row.  The fit is great, I like the snugger fit around the armholes and across the back.  If it wasn’t for the fit up top, the vest would end up looking a lot baggier and not as chic.


lonetree vest
 

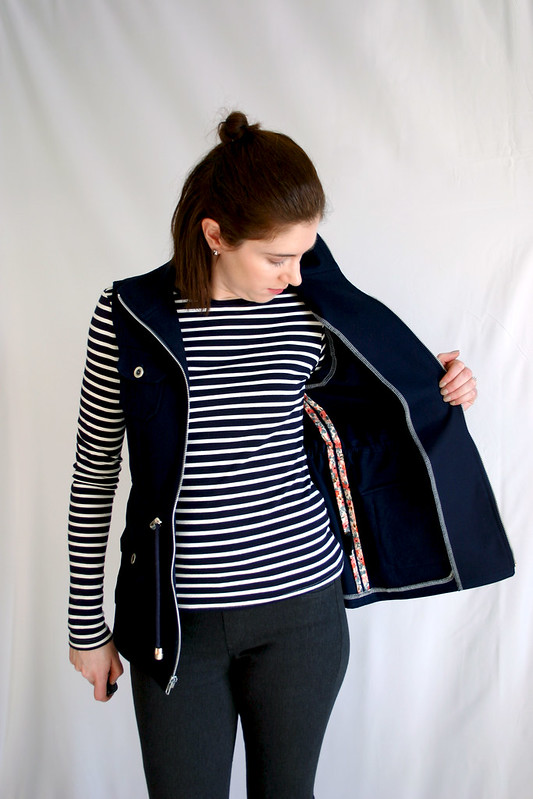
I wanted so very much to use a Hong Kong finish on the inside seam allowances with bias tape.  Being the lazy sewist I am, I ordered some pre-made from Etsy, but sadly I underestimated how much I needed and couldn’t use it for all of my seams.  Here’s a shot of a side seam, the bias tape is from Bessie Pearl Textiles and made out of the Cotton + Steel/Rifle Paper Les Fleurs collection.


lonetree vest 6
 

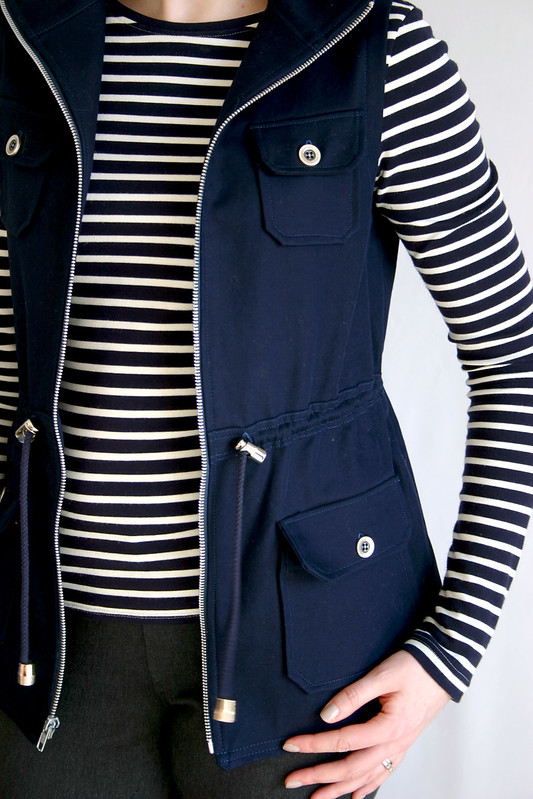
It’s really the accents that make this look and feel RTW, so if you’re thinking about making the vest or jacket, I highly recommend seeking out some quality hardware.  Both the cord stops and cord ends are from Pacific Trimming, the buttons are from Joann Fabrics (shocker!  The button dept in my store is abysmal), and the zipper is from Zipper Stop on Etsy.


lonetree vest
 

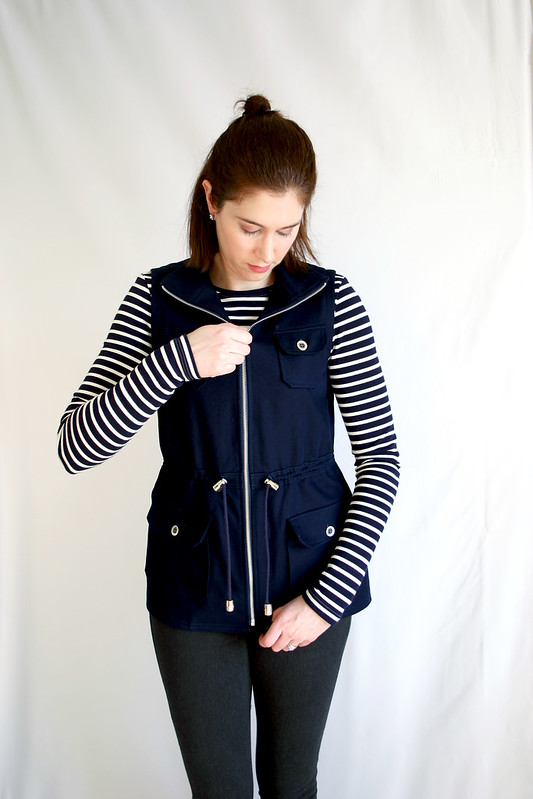
This is my first time taking blog photos inside!  It was 20 degrees outside when I took these photos on Sunday, and I wasn’t about to brave the weather in just a shirt, vest, and leggings (my husband didn’t want to go outside either and play photographer).  I got this backdrop for Christmas from one my brother-in-laws, used the DIY PVC backdrop frame from our wedding, and set up my tripod and umbrella lights in the living room.  Presto!  I just need to smooth out the fabric a little more at the top next time and steam out some more of those stubborn wrinkles.


Pattern: Lonetree Vest by Allie Olson
Fabric: Theory cotton twill from Mood Fabrics
Hardware: Pacific Trimming, Zipper Stop, Joann Fabrics
Shirt: Simplicity 1325
Legging Pants: Uniqlo

This post is part of the Indiesew Blogger Network – pattern or fabric may have been provided by Indiesew, however all thoughts and opinions are my own 

Follow:

Finished Project – Toaster Sweater #2

Toaster #2 Sweater
 

Pattern: Toaster Sweater #2 by Sew House Seven
Fabric: french terry knit from Indiesew (sorry, sold out)

So yeah…this whole “slow sewing” movement is my jam because that’s all I seem to do these days when it comes to sewing.  Sewing time is now few and far between – I started grad school this fall and work kicked into high gear two months ago.  I thought after the wedding I’d have the time to get back into the swing of things with sewing, but I guess not!

(Oh, and I got a hair cut and chopped off 6″ since my last post – I swear my hair is not that poofy IRL)

Since my time is so limited now, I need to really focus on garments that I will absolutely enjoy making (and wearing) or will challenge my sewing skills – no more time to waste on garments that I don’t have 100% of my heart into.

Toaster Sweater #2 was a perfect jump-start to get back into garment sewing this fall.

Toaster #2 Sweater
 

When all was said and done, I made this sweater in an afternoon.  I have a weakness for funnel necks/turtlenecks and jumped on this pattern as soon as I saw it as part of the Indiesew Fall Collection (now I need to check out Toaster Sweater #1!).  The fabric is such a soft, yummy french terry and I just want to wrap myself up in a giant french terry burrito with this fabric.  If you’re thinking about making this pattern, make sure to pick a fabric that has some body to it for the neck to sit correctly, anything jersey-like will result in a flimsy neck and the neck facing may flop open.

I loved the construction of the funnel neck – it’s a brilliant way of drafting the facing into the neckline and constructing the curved shoulder seam in the beginning of making the sweater.  Hard to explain, but pretty cool when you make it.


Toaster #2 Sweater
 

I’m gravitating towards loose-fitting tops and dresses these days and I love the a-line fit of this sweater – see how roomy it is?  The only thing I would change next time is to lengthen the top – I love the split hem and the hi/lo design, but I feel like it’s a smidge too short in the front for my liking.  I’m also wearing a tank top underneath because the splits go pretty high on the side and I would be flashing some skin without an underlayer.

Toaster #2 Sweater
 

The mitered corner instructions were great, too, and made it easy to hem everything in place with professional-looking results.  I used my twin needle for both the sleeve hems and bottom hem, pivoting around the slit opening.

Did you know there’s a Toaster Sweater #1 as well?  I’m itching to try my hand at that one since I love #2 so much – I wore it twice already in the last week!

This post is part of the Indiesew Blogger Network – pattern or fabric may have been provided by Indiesew, however all thoughts and opinions are my own 

Follow:

Pattern Review: Eleanor Cardigan

eleanor cardigan

Pattern: Eleanor Cardigan, c/o Indiesew
Version: mid-thigh length with extra long sleeves
Fabric: ribbed knit from Indiesew (sorry, sold out!)

Boots: Nine West
Top: JCrew
Pants: Macy’s

Perhaps not the most original garment I’ve made (*cough* Allie’s version *cough*), but I absolutely love my new Eleanor Cardigan.  For those of you who subscribe to my newsletter, I committed a few weeks ago that I would be strict about not sewing any other projects until I got a major chunk of my wedding dress completed.  Well, since I’m in a “holding pattern” until next weekend when I can cut out my real dress at my parent’s house, I figured whipping up a little instant-gratification project wouldn’t hurt.

eleanor cardigan

I actually attempted to make this pattern back in September for Selfish Sewing Week, but ended up chucking the project since the grey french terry I used made it look like a bathrobe.  Not a good look, and a sad waste of nice fabric!  It was also too big for my liking; I cut out a small when I made the first version but didn’t like how baggy the fit was or the fact that the sleeve seam was way off my shoulders.  Fast-forward to October and Allie’s launch of a new fabric collection – I saw this fabric in action during one of her Periscope broadcasts and knew I had to have it.

eleanor cardigan

The fabric is pretty nifty – it’s a rib knit that’s white on one side, black on the other.  However, the print of the pattern doesn’t follow stretch of the fabric, the ribs run horizontally across the body.  I had to cut the sleeves so the ribs ran vertically, increasing the degree of stretch like a normal knit fabric, and it changed the orientation of the print on the sleeves.  Not a big deal, but it would have made the sleeves much tighter if the fabric was cut like the rest of the cardigan.  I also had to be a little creative with cutting out the long neckbands, and utilized a section of the print repeat to create a zig-zag look down the front.

eleanor cardigan

The Eleanor Cardigan is a super-fast make and you really don’t even need the directions to make it.  I found Allie’s tutorial on serging bulky knit fabrics really helpful – I had wavy seams on some of my knit garments in the past and it didn’t really bother me, but now I know how to fix that on my serger and prevent it from happening in the future.  Everything lays so nice and flat and neat, it feels very RTW!

Follow:

I Made a Yona Coat!


yona 1

Pattern: Yona Coat from Named Patterns, c/o Indiesew
Size: 6

All Materials For This Coat:

  • Outer fabric – cashmere wool from Metro Textiles
  • Lining – coat-weight lining from Fabric Place Basement
  • Diaper Flannel Interlining – Fabric.com
  • Interfacing (hair canvas, sew-in) – Steinlauf and Stoller
  • Fusible weft interfacing – Fabric Place Basement
  • 1″ Button – Fabric Place Basement

Sweatshirt: Linden (just made, unblogged)
Jeans: Gap
Boots: London Fog
Hat: Topshop

To quote Led Zeppelin, I come from the land of ice and snow…no really, we have seven feet of snow here in the Boston area after this weekend’s little Valentine’s Day storm (10″ more, woof) and there’s major icicles of doom hanging off of every single building.  I had a fear that once I finished this coat, which I’ve been chronicling since early January, the weather would turn and it would become too warm to get some wear out of it this year, kind of like what happened when I made my Anise wool jacket last spring.  Seeing that we’re going to have the coldest temperatures of the season this week (it was 16 degrees in these photos) and there’s, of course, more snow on the way, I don’t think it’s going to turn spring-time with daffodils blooming anytime soon.


yona 6

This is my “I’m tired of this winter shit” face…seriously.

Even though I went through the whole “how to tailor a wool jacket” thing last year with Anise, I still learned a ton more this year making this coat.  I pretty much threw away the instructions after I glanced through them to get a general idea of construction, and exclusively followed my tailoring book for every step of construction.  Sure, you can make the coat following the included instructions, but it may not drape how you want it to, the collar may not roll right, and the lapels could flop around instead of staying put.  There’s really a lot more to making a coat than just sewing the seams together – there’s a lot of secret engineering inside the coat that gives it shape and makes things lay just right.


yona 3

I am so damn happy with the lapels and collar, especially since this is the first time I used hair canvas and padstitching.  Taping the roll line made a world of difference with the lapels laying flat – it’s a little puckery underneath, so I may not have adjusted the ease as best as I could, but you can’t see it so it’s ok.  Adjusting for the turn of cloth of the collar ensured that the seam line doesn’t roll out in the back.


yona 2

With the drape factor of the cashmere, it was definitely a good move to add a back stay and shoulder stays for the raglan sleeves.  The sew-in interfacing didn’t make those parts of the coat too stiff, but there’s noticeable, light support through the back and no sag lines.


yona 5

I drafted welt pockets in place of the patch pockets, since welts are a lot easier to sink your hands into when it’s cold, or for stashing  your keys and phone.  Kinda wish I placed them a bit higher, since the pocket bags are about six inches and hang down very close to the hem.

Yes, let’s talk about the length…it’s three inches shorter than it should be.  This is due to the fact that I didn’t notice that the facing piece wasn’t drafted long enough for the front of the coat…grr.  Because I didn’t want any exposed raw edges inside the coat, and I didn’t want to bag the coat lining, I had to shorten the length of the coat by quite a bit to finish the lining correctly by hand.  It’s not ideal, but at least the coat still keeps my behind covered and warm.

Edit 2/20/15Allie from Indiesew contacted Named Patterns about my feedback – apparently, the coat has a wider turn-up at the hemline than what I used, and that the pattern drafting was intentional.  Good to know if you plan and finishing the hem by hand vs bagging the lining. 


yona 4

For the lining, I called B&J Fabrics in NYC to get some purple samples of their Sunback lining fabric (it’s a rayon lining backed with flannel), but when they arrived, the samples seemed so flimsy and I didn’t think I’d get the level of warmth/insulation I wanted.  Instead, Fabric Place Basement had coat linings that were a thick, heavy rayon fabric with a brushed back that seemed like a good option if I interlined it with diaper flannel.  Testing this coat out yesterday in 16 degree weather with a windchill of -1 confirmed that yes, this is indeed a warm coat!  However, it’s also a really heavy coat because of the weights of all of the coat layers combined.

Something I didn’t take into consideration was the design of the coat vs. the drape of my version of the coat.  Using all of these layers (diaper flannel, heavy coat lining, cashmere wool) made the coat a little thick and fairly structured.  The bulk of the coat didn’t lend itself well to wearing it closed with a belt, as it’s designed – it just looked really awkward and made my midsection look chunky.  Had I known this beforehand, I would have redrafted the front overlap to be wider than 1″ to better accommodate the button closure I had to end up using (I originally wanted to use coat snaps, but they were too big).


yona 7

This pattern has some definite flaws that weren’t apparent when I made my muslin, but if you like the shape of the coat and have a couple of blazers or button-down shirts under your belt, it’s do-able to work through some of the issues.  Morgan wrote a great post on all of the changes she made to the pattern, it’s a great reference that I wish I could have used when I made my coat.

So yeah, I made a winter coat!  Now I can look all cool and stylish like the street-style city girls on Pinterest in their oversized coats, skinny pants, and Stan Smith sneakers (I’ll sub in my Classic Leathers instead).  I also had plans to make the Grainline Cascade duffle coat this winter, but for my mental health, I think I need to start thinking warm thoughts and work, optimistically, on my spring wardrobe.  Thank goodness Chris and I have a trip to Florida coming up in two weeks, we gotta get out of here!

Be sure to check out my other posts for coat construction details and tips:

Disclaimer: I received this pattern from Indiesew as part of being an Indiesew Blogger Team member, but all views and opinions of this pattern are my own
Follow:

Indiesew Fall Collection Blog Tour


indiesew fall collection 1

Summer is over, as much as the current temperatures want to disagree with me.  Kids are back in school, my beach vacation seems like a distant memory, and Indiesew just launched their new Fall Pattern Collection this week.

Oh yes, fall is here, my friends.

Indiesew, my new fave place for discovering independent sewing patterns, put together a curated collection of six patterns that can be mixed and matched to create the perfect outfit for fall, and asked me to create my perfect fall outfit from the collection.  This resonated with me because of the exercises I went through earlier this year with The Wardobe Architect and sewing a wearable wardrobe.  Depending on the fabric selection and styling, these patterns can truly fit any specific lifestyle.


indiesew fall collection 2

What I’ve learned this year through thinking about my personal style and lifestyle is that I need more casual pieces that work well with the sneakers because of the nature of my job and industry.  And with the amount of travelling I do for work, I also need these pieces to be comfortable and pack easily in a suitcase.  So, it’ seemed like a no-brainer to pair the Hudson Pants from the Fall Pattern Collection with the Lane Raglan, and throw in a chic carry-all bag like the Alice Book Bag.

Lane Raglan


baseball lane raglan1

I heart this raglan pattern so much and the way it fits.  My first version of this pattern was made to look more like a sweatshirt, and to differentiate this version, I went for a baseball tee version with contrasting sleeves.  The next time I make a long-sleeved version of this shirt, I’ll shorten the sleeves – they’re a bit long on me, but look cool pushed up and slouchy.  The rayon poly fabric is ridiculously soft, so I’m sure I’ll be reaching for this shirt a lot this fall.

Hudson Pants


hudson pants 1

The Hudson Pants are my favorite part of this outfit, because they’re so different than anything I have in my closet and a much “cooler” silhouette than I usually gravitate towards.  Since I wanted these to pass as ok to wear to the office or on the road, I picked a black cotton knit instead of a casual gray or printed knit – what makes the fabric special are the tonal polka dots knit into the fabric, aren’t they the cutest?  It honestly feels like PJs when I wear these, but these pants would be great for train trips to NYC or informal office meetings.  The only thing I should have done differently is grade down the waist.  I picked my size based on my hip measurement and the waist has a little too much fabric ease for my liking…I still love these pants though!

Also, you know that you’ve made something awesome when your boyfriend or husband hates it (Chris can’t stand these pants).  That’s just a sewing truth.

Alice Book Bag


alice bag 1


alice bag 2

I wanted this bag to be just as cool as the rest of the outfit, and almost bought a beautiful home dec fabric with birds woven all over, but it wouldn’t have fit the vibe I was going for.  Instead, I found this awesome ultrasuede fabric with a metallic underlay – yes, there’s holes punched in the ultrasuede for the metallic underlay to show through!  Thank goodness I had a coupon for this pricey beauty.

This bag was incredibly easy to make, it’s a bunch of rectangle pattern pieces you draft yourself based off of given measurements, and the bottom of the bag has boxed corners.  I opted for the convertible strap option so I can wear the bag on my shoulder or as a cross-body.


alice bag 4

The grommets are a really cool detail, they’re actually curtain grommets!  With the thickness of my fabric, it took a couple of tries to get them to fit, but they’re totally worth it.


indiesew fall collection 3

Thinking about starting your fall sewing?  The Indiesew Fall Collection is a great place to start.  All six patterns can be bought separately, but if you love all six like I do, the bundle can be purchased for 10% off.

Outfit Credits:
Lane Raglan via Indiesew – rayon poly knit from Joann Fabrics
Hudson Pants via Indiesew – cotton knit from Joann Fabrics
Follow: