Indiesew Fall Collection Blog Tour


indiesew fall collection 1

Summer is over, as much as the current temperatures want to disagree with me.  Kids are back in school, my beach vacation seems like a distant memory, and Indiesew just launched their new Fall Pattern Collection this week.

Oh yes, fall is here, my friends.

Indiesew, my new fave place for discovering independent sewing patterns, put together a curated collection of six patterns that can be mixed and matched to create the perfect outfit for fall, and asked me to create my perfect fall outfit from the collection.  This resonated with me because of the exercises I went through earlier this year with The Wardobe Architect and sewing a wearable wardrobe.  Depending on the fabric selection and styling, these patterns can truly fit any specific lifestyle.


indiesew fall collection 2

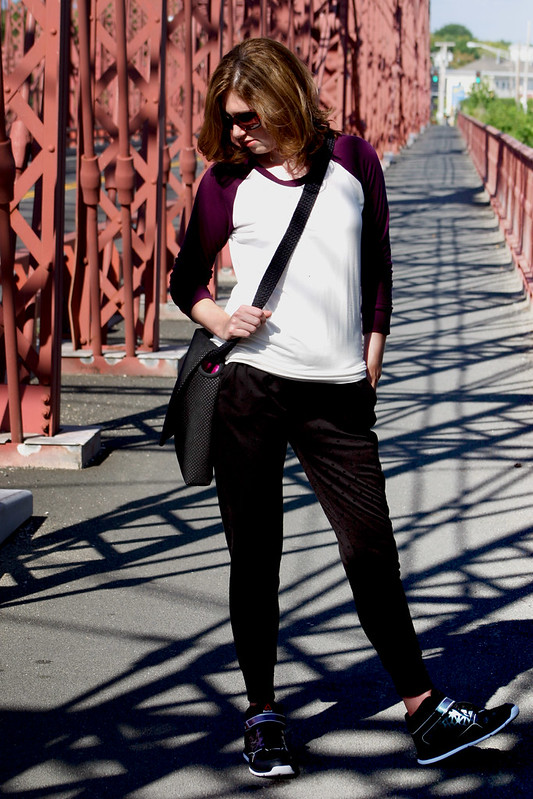
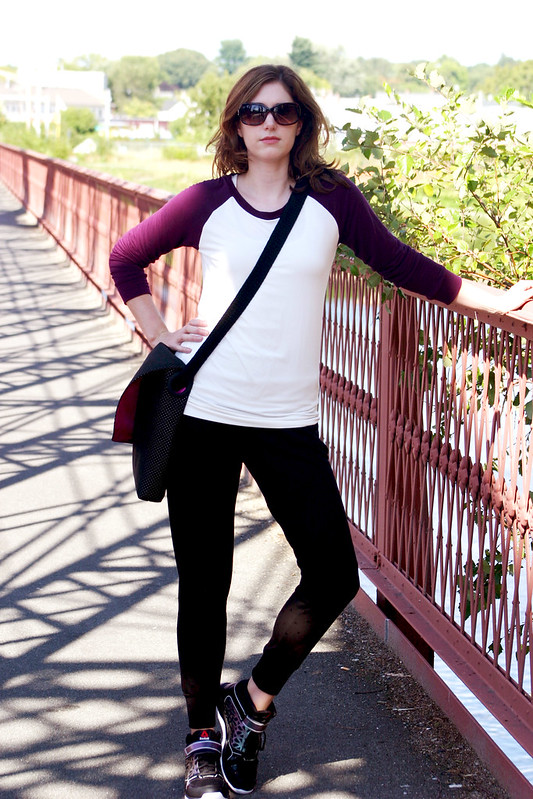
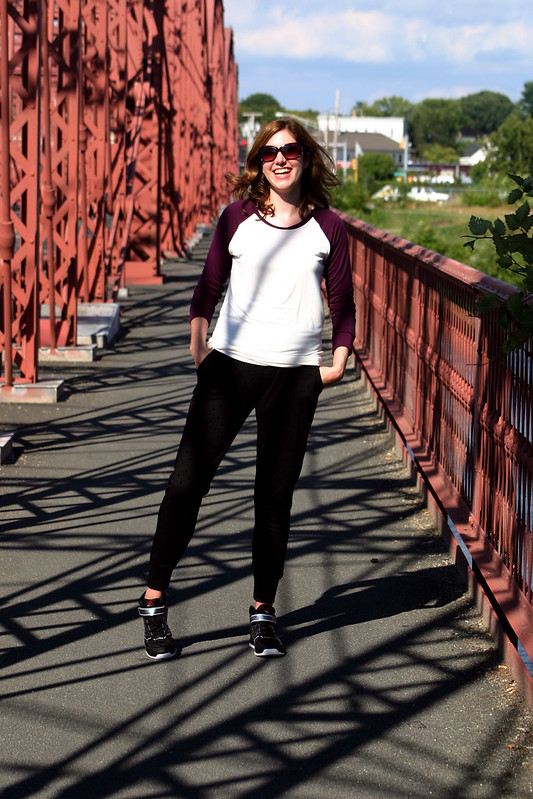
What I’ve learned this year through thinking about my personal style and lifestyle is that I need more casual pieces that work well with the sneakers because of the nature of my job and industry.  And with the amount of travelling I do for work, I also need these pieces to be comfortable and pack easily in a suitcase.  So, it’ seemed like a no-brainer to pair the Hudson Pants from the Fall Pattern Collection with the Lane Raglan, and throw in a chic carry-all bag like the Alice Book Bag.
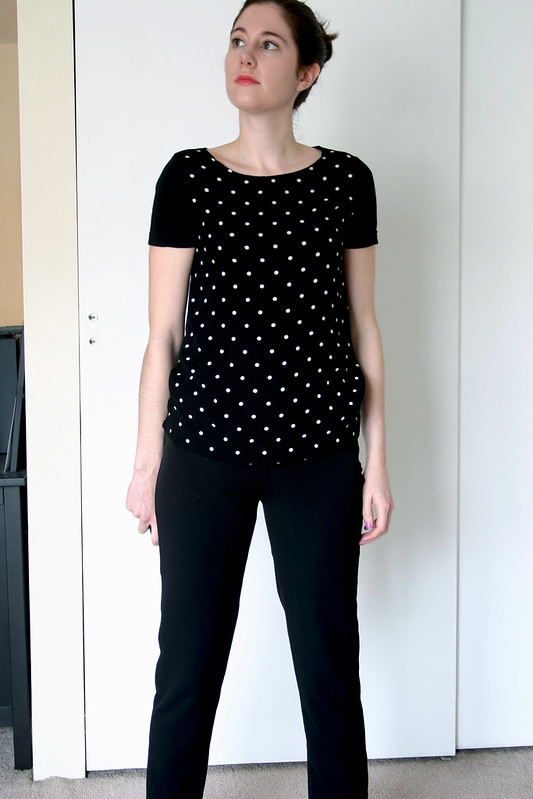
Lane Raglan


baseball lane raglan1

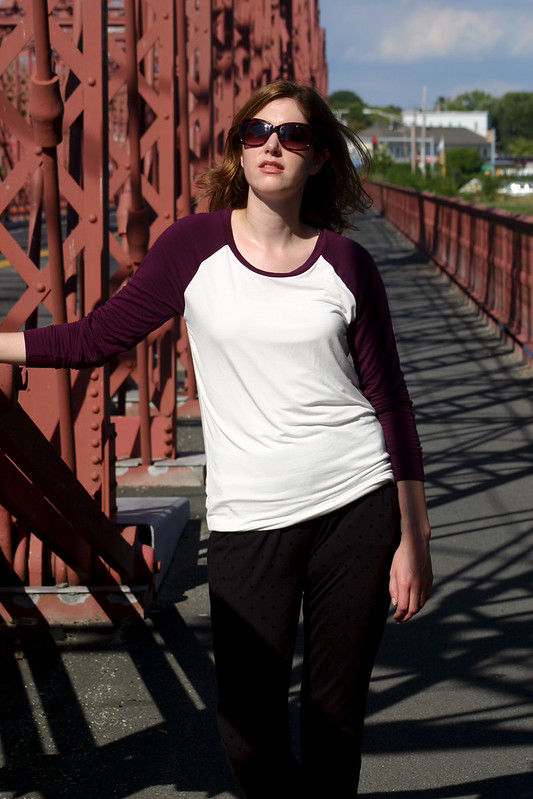
I heart this raglan pattern so much and the way it fits.  My first version of this pattern was made to look more like a sweatshirt, and to differentiate this version, I went for a baseball tee version with contrasting sleeves.  The next time I make a long-sleeved version of this shirt, I’ll shorten the sleeves – they’re a bit long on me, but look cool pushed up and slouchy.  The rayon poly fabric is ridiculously soft, so I’m sure I’ll be reaching for this shirt a lot this fall.
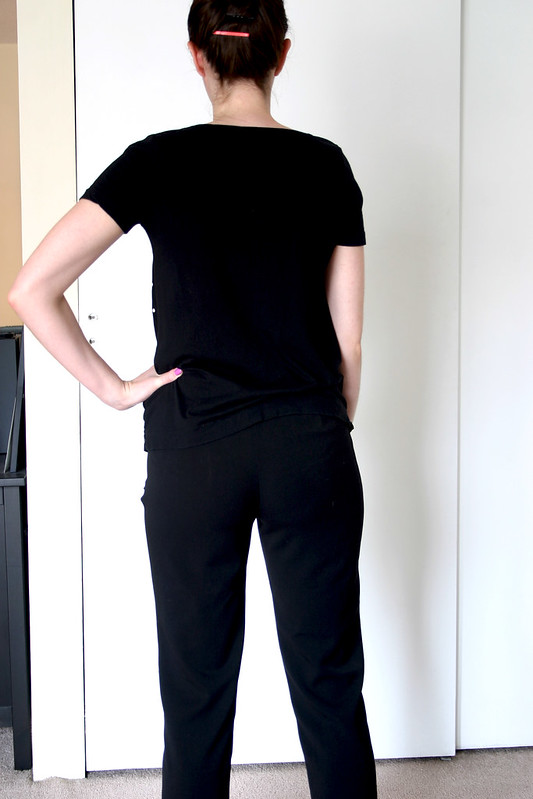
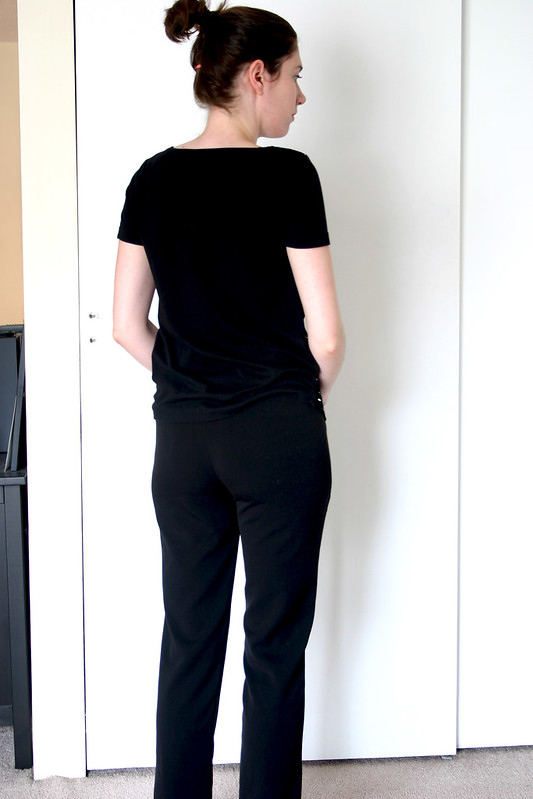
Hudson Pants


hudson pants 1

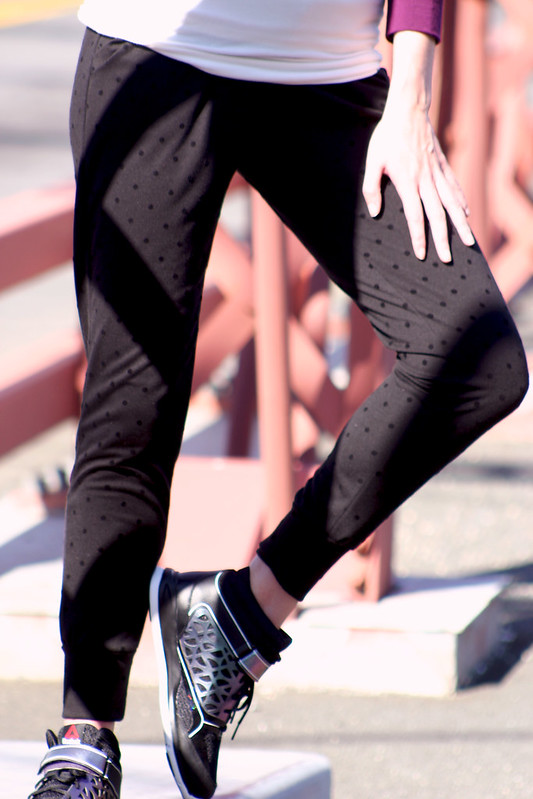
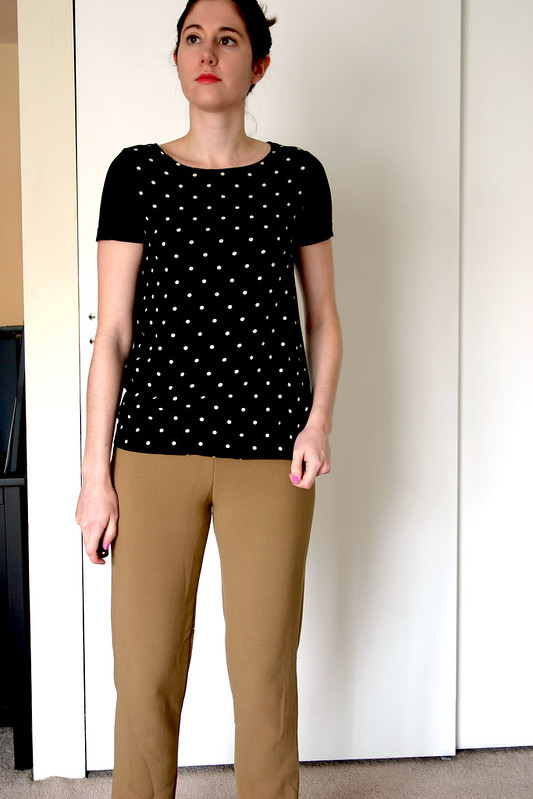
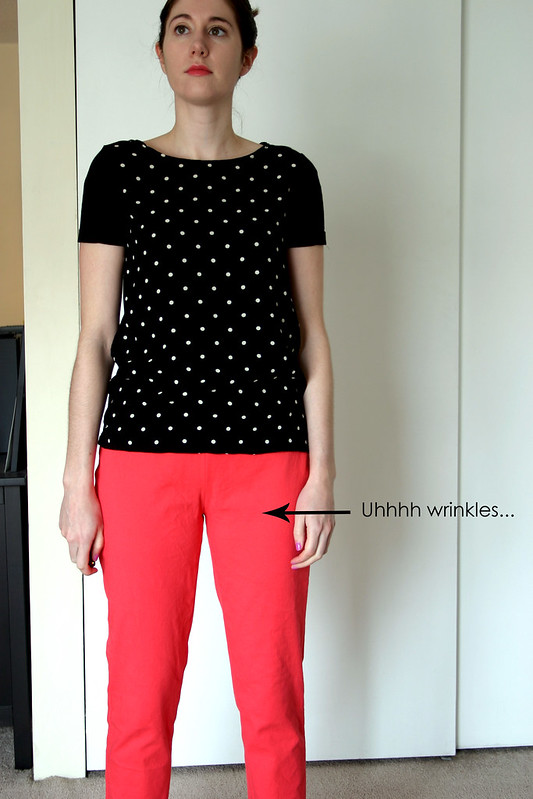
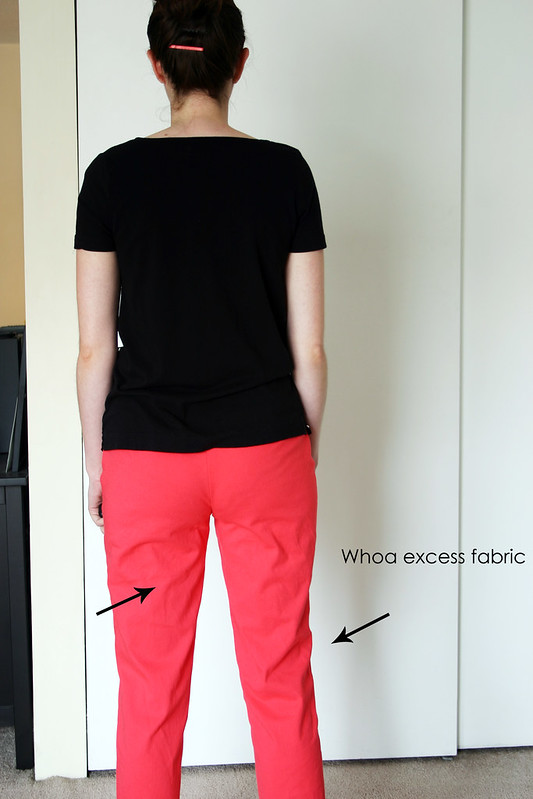
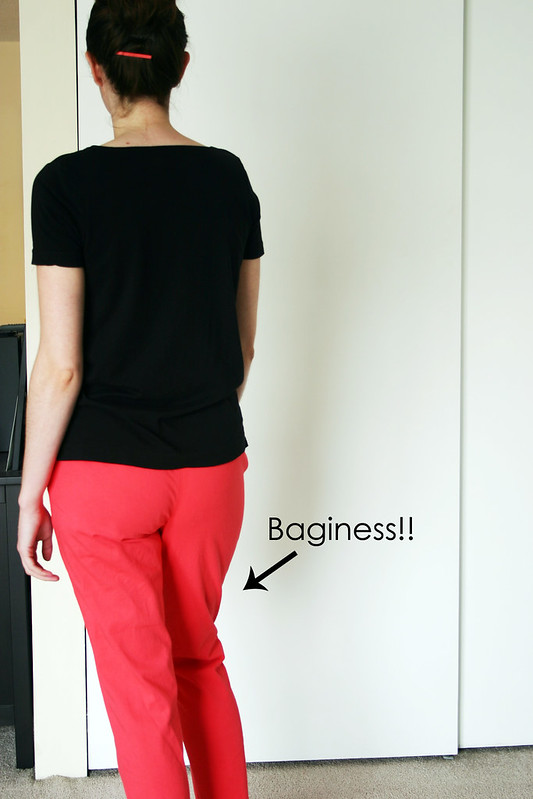
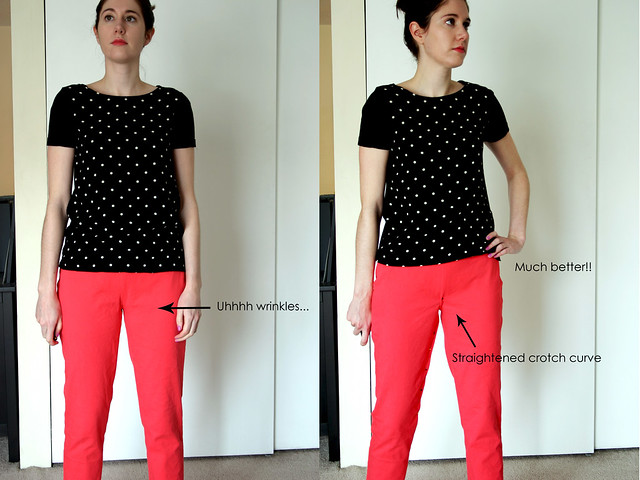
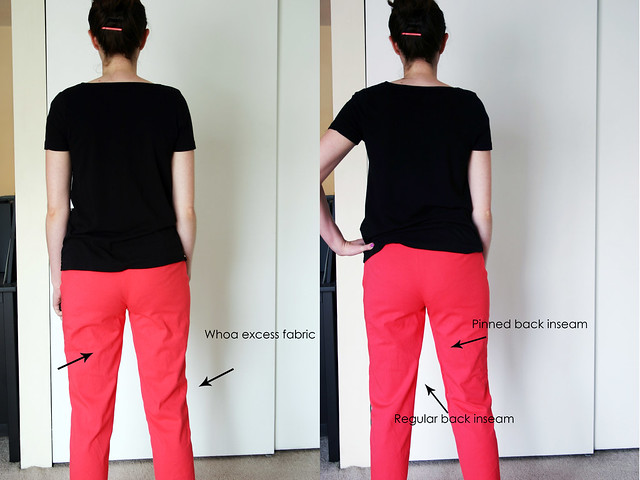
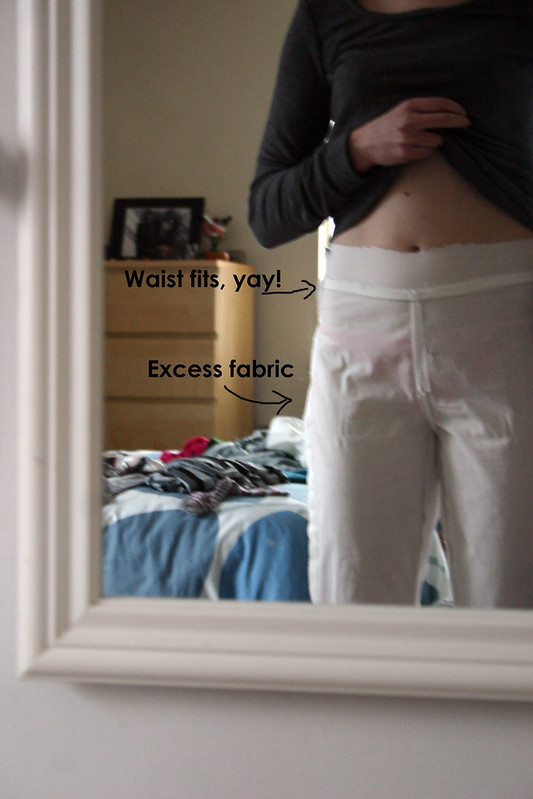
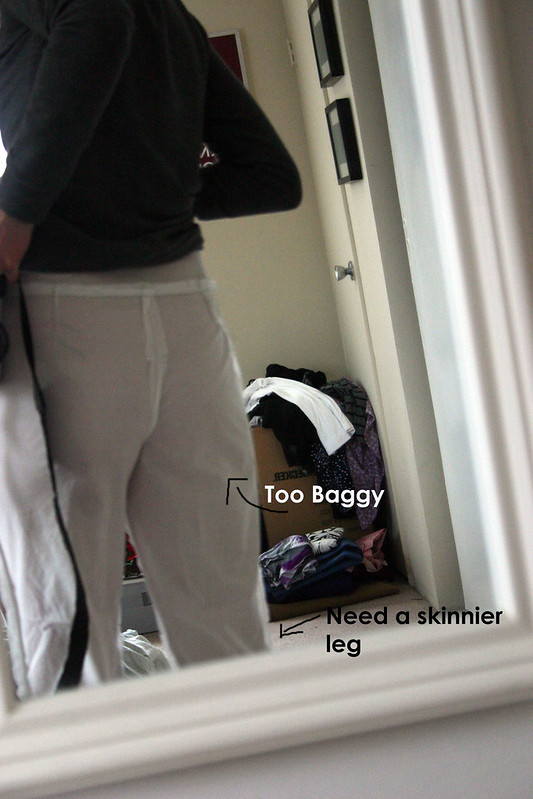
The Hudson Pants are my favorite part of this outfit, because they’re so different than anything I have in my closet and a much “cooler” silhouette than I usually gravitate towards.  Since I wanted these to pass as ok to wear to the office or on the road, I picked a black cotton knit instead of a casual gray or printed knit – what makes the fabric special are the tonal polka dots knit into the fabric, aren’t they the cutest?  It honestly feels like PJs when I wear these, but these pants would be great for train trips to NYC or informal office meetings.  The only thing I should have done differently is grade down the waist.  I picked my size based on my hip measurement and the waist has a little too much fabric ease for my liking…I still love these pants though!

Also, you know that you’ve made something awesome when your boyfriend or husband hates it (Chris can’t stand these pants).  That’s just a sewing truth.

Alice Book Bag


alice bag 1


alice bag 2

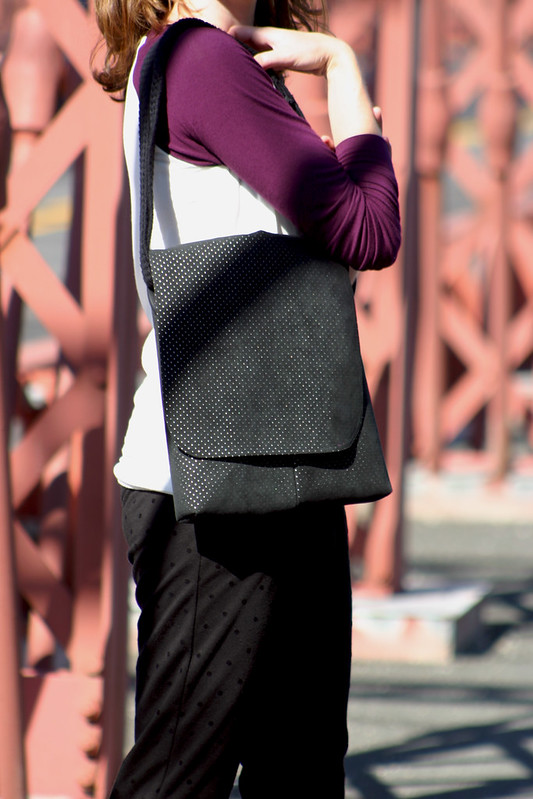
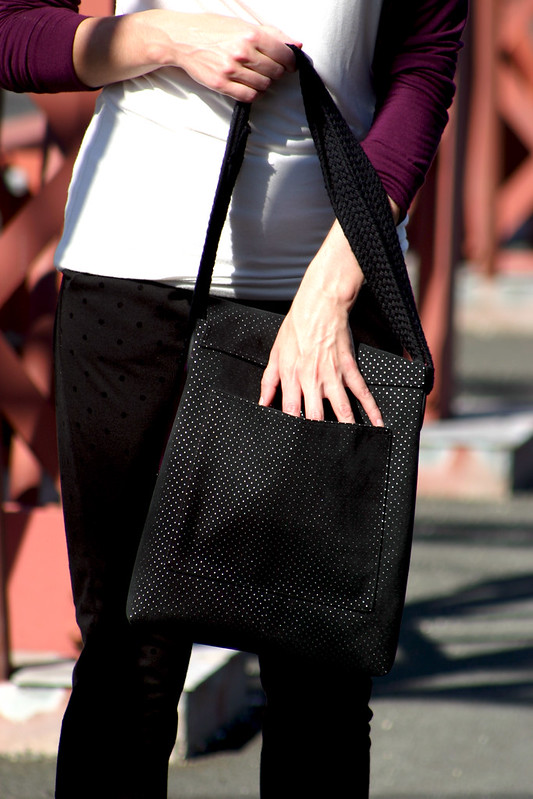
I wanted this bag to be just as cool as the rest of the outfit, and almost bought a beautiful home dec fabric with birds woven all over, but it wouldn’t have fit the vibe I was going for.  Instead, I found this awesome ultrasuede fabric with a metallic underlay – yes, there’s holes punched in the ultrasuede for the metallic underlay to show through!  Thank goodness I had a coupon for this pricey beauty.

This bag was incredibly easy to make, it’s a bunch of rectangle pattern pieces you draft yourself based off of given measurements, and the bottom of the bag has boxed corners.  I opted for the convertible strap option so I can wear the bag on my shoulder or as a cross-body.


alice bag 4

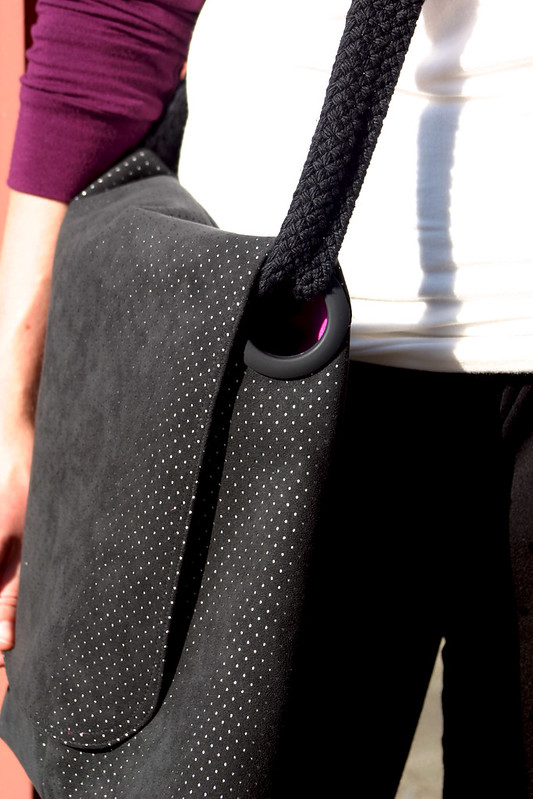
The grommets are a really cool detail, they’re actually curtain grommets!  With the thickness of my fabric, it took a couple of tries to get them to fit, but they’re totally worth it.


indiesew fall collection 3

Thinking about starting your fall sewing?  The Indiesew Fall Collection is a great place to start.  All six patterns can be bought separately, but if you love all six like I do, the bundle can be purchased for 10% off.

Outfit Credits:
Lane Raglan via Indiesew – rayon poly knit from Joann Fabrics
Hudson Pants via Indiesew – cotton knit from Joann Fabrics
Follow:

Pattern Reviews: Belcarra Top and Floral Pants [Sewaholic and Simplicity]


belcarra and floral pants 1

Patterns: Belcarra, Simplicity 1696
Fabrics: top – eyelet from Joann Fabrics; pants – stretch cotton from Metro Textile
Size: top – 6; pants – 10

Sandals: Tahari

Before I share two of my newest makes, I wanted to thank everyone for posting their thoughts on my last post about fast sewing – when it comes down to it, it’s really all about what’s right for each individual sewist, and we should (and do!) applaud each other for our efforts.  Imma do what’s right for me from here on out, ya know?

So yeah – I made pants!  Floral ones, to boot!  The fabric is leftover from the dress I made for my trip to Florida earlier this year and these pants were intended to be a muslin for this pattern, but they ended up being a wearable muslin – even better.


belcarra and floral pants 2


I would say I have the fit about 95% of the way there.  I went down a size than I would normally cut out for pants, based off of the way I wanted the pants to fit and to account for the stretch in the fabric.  The fact there’s different pant blocks based off of body shape is great too, I used the slim block based off of my measurements and the adjusting I needed to do wasn’t anything major.  I took in the inseam quite a bit in the back to get the butt to fit better, and took a small amount in at the front center crotch seam.  I think the waist could still use some adjusting.

Here’s my problem with these pants – the longer I wore them, the more they grew!!  When I left the house in the morning, they were nice and fitted, a bit loose in the waist.  By the time I got to lunch, these pants were huge on me all over – maybe because of my body heat and sitting at my desk all morning?  Luckily I had a pair of jeans to change into (I was travelling that day), otherwise I would have needed a safety pin or something to keep these up.  I never saw a baggier-butt pair of pants in my life.

Why did this happen with my stretch cotton, oh wise sewists of the sewing blogosphere?  I’m planning on making more of these pants in stretch cotton after I tweak the fit a little more.  After I washed the pants, they snapped back to normal, but I can’t always change my pants halfway through the day when they stretch out again, hahahaha.


belcarra and floral pants 3


Can I get a “what what” for faux welt pockets?!  They’re my new favorite sewing detail.  I don’t need real welt pockets in my pants, and I never use my back pant pockets, but I like having the look of a pocket on my backside.  They need to be lowered a bit on the next pair, they’re up a bit too high for my liking.


belcarra and floral pants 4


On to Belcarra – this is my go-to summer top this year.  It’s a beautifully drafted pattern!  The shape is really flattering – I don’t feel like I’m wearing an oversized woven top like some other patterns I made in the past.  Raglan sleeves are always a winner with me as well.


belcarra and floral pants 5


Since I made this, I’ve worn it several times already, and I have plans to make a few more with some variations.  This top goes together so easily (I think it took me two hours max to cut/sew this?) and can be paired with high waisted skirts, skinny jeans, jackets, you name it  – this is a brand new TNT for my sewing pattern arsenal.

Follow:

Fabric Affects Fit – A Comparison of Clover Pants

Last year, I wanted to finally tackle sewing pants.  And yes, I made two pairs of pants, but they never made it to the blog – I still have to fix a zipper in one pair, and the other pair is made out of a brown fabric that I don’t know how to wear.  I want to share these pants, and demonstrate how a difference in fabric can affect the fit of the same exact pattern.

Note: this is a picture heavy post, and I’ll be talking about crotches.  Hey, it’s a sewing term!

I spent a week last year trying to get the fit right on a pair of Colette Clover Pants, and learned a lot about pant fitting by combing through my back issues of Threads, searching for articles online, and reading Pants For Real People.  By the end of the week, I ended up with these black Clovers:


black clovers1


black clovers2


black clovers3

I was pretty happy with the fit!  I took out a lot of bagginess in the seat and back leg by adjusting the crotch seam and back inseam.  The fabric was a RPL (rayon-poly-lycra) I had in my stash from when I thought I’d be sewing clothes for my old job, and it had just the right amount of stretch.  These pants still aren’t finished, because I botched the zipper, but I really should fix them because I love how they fit!

So after I made the black pair, I decided to use some taupe colored poly in my stash from Metro Textiles to make Clover #2 last fall:


taupe clovers1


taupe clovers2


taupe clovers3

I liked the fit of these even better!  The fabric was a little thicker than the RPL of the first pants, and had a nice amount of stretch and recovery.  However, I never finished the hem on these or wore them – the color just doesn’t work for me.  For some reason, this brown reminds me of those polyester pants with elastic waists by Alfred Dunner that old ladies wear to play bingo.  Trust me, the color looks a lot nicer here than in-person.  I can’t find a single thing to wear them with in my closet, which is why they’re all wrinkled looking – they’ve been sitting in a bin in my closet.  But all of that aside, I was very happy with how these fit, more so than the first pair.

Which brings me to Clover #3, which I stitched up last night.  Keep in mind – all three of these pants are cut from the same pattern with the same alterations.


coral clovers1

For these Clovers, I’m using a stretch cotton twill from Mood Fabrics.  And the fact that this fabric is pink, and there were folds of excess fabric in the front…I just kept looking at these pants and getting the idea that I had camel toe going on, even though these weren’t tight!!


coral clovers2

This was completely unexpected as well, look at all of that extra fabric in the back.  Now, I don’t want these pants to be skin-tight, since that’s not how they’re designed, and the instructions warn against over-fitting.  I need to be able to move and sit, but this just won’t do.


coral clovers3

I mean, come on!!!  Maybe if this was circa 1998 the fit would be ok, but not the look I’m going for (I was watching “You’ve Got Mail” the other day, and Meg Ryan’s pants fit just like this in the back…and that movie came out in the late 90’s).

After studying my Pants For Real People book (which I highly recommend), and having a good laugh with Sonja and Neeno, I figured out what kind of alterations I need to make for these to fit.  I’ve got a case of – wait for it – “Crotch Oddities.”

Yes, my friends, it’s a term that I read in my book.  Specifically, I’ve got a front crotch bubble, which can be solved by straightening out the front crotch seam.


front before and after

I essentially pinned out a 1/4 inch of fabric right around where I had the “wrinkles,” effectively straightening the front crotch seam.


back before and after

As for the back, I made the alteration that I did on the original paper pattern: took out leg width via the back inseam.  I pinned about a 1/4″ in from the original seam on the back leg, but still kept the original seam allowance in the front (in the above right photo, I only pinned the right leg with this change, the left leg is the same).  I’m realizing that it doesn’t look like much of a change from the photo on the left, but it really does fit better and look trimmer.  Again, I don’t want these pants to be skin-tight, and I need some ease for sitting.

You know, I ran into this problem when I made my Elisa-lotte dress recently with a stretch cotton fabric.  I’ve made the Charlotte skirt many times, and never had a fitting problem, but when I made it with the stretch cotton, I had to take it in a ton on the sides.  I’m guessing that that’s what I’ll run into when I work with stretch cotton.

So I guess the moral of this story is: just because a pattern fits with one type of fabric, it doesn’t mean that it will fit with another.  These were all stretch fabrics, with a good degree of stretch, but because they had different fiber contents, the fit that I got with all three were different.

Follow:

Clover Muslin, Or, I Will Make Pants In 2013

I decided to take advantage of my “Staycation” this week to catch up on the sewing that I’ve wanted to work on.  If you haven’t been able to tell, my sewing momentum has been lacking in the past couple of months, partially because of work craziness and also because winter is getting to me and I want to make cute clothes for warm weather, not heavy bulky stuff.  I churned out a dress this week from my faux Missoni fabric, gave up on my Beignet (more details on that later), and made a toile (sounds so much fancier than muslin) for a Jasimine blouse.  And since I had the muslin fabric out, I cut out a pair of Clover pants because gosh darnnit, 2013 will be the year that I get over my fear of pants and freaking make a pair already.

So here’s the results from Round 1:


cloversmuslin1

Since the waist and hip measurements for a size 6 are spot on what I measure, and the Ginger skirt I made last year fit perfectly, I cut out a size 6 and crossed my fingers that everything would turn out as good as humanly possible.  I must say, I’m pretty pleased with how the first muslin turned out since it wasn’t as awful in fit as I thought it would be.  The waist is a perfect fit and comfortable, but I noticed that I have some bunching around the crotch area.  Hmm.  I’d like it to be as smooth as possible, but I don’t want to take so much away that I can’t sit comfortably.

Here’s the back:


cloversmuslin2

Shhh don’t look at that pile of clothes and fabric in the corner

When analyzing pull/drape lines in pants, the terms “smile” and “frown” are used since you’re looking for lines shaped just like, well, smiles and frowns.  Smiles denote that more fabric is needed in an area and frowns mean that there’s too much fabric and it needs to be reduced.  Well, I’ve got a frown-y backside wth too much fabric going on, affectionately referred to as a “Flat Derriere.”  Now this isn’t news to me, I know I have, ahem, such a backside – I’m all straight lines and no curves.  And since I’ve run into this problem before with pants, it’ll be good to figure out how to eliminate that problem for future pants patterns.  Also, the legs are crazy baggy on me and nowhere near as fitted as they should be, like on Sarai.

So here’s what I’ve determined I need to do so far:

  • Flat rear adjustment: I’ve seen a couple of different techniques online on how to do this and I also looked through some of my Sew Stylish and Threads magazines as well as some of my fitting books.  I have a some ideas on what to do.
  • Shorten the torso: I’m thinking that may be what’s causing the excess fabric in the front and the back?  Maybe it’s just the crotch depth that’s too big.
  • Thin leg adjustment: seems pretty simple, but it’d be the last alteration I do after I get my butt figured out.  Just tapering in the leg from the crotch seam.

Realistically, I don’t think I’ll have these pants fitted/made by the time I go back to work next week.  But it’s nice to have the time to spend on a project this involved.

Do you have any tips on fitting pants?  I’d love to hear them!

Follow:

On My Cutting Table: Simplicity 2369

WIP - Simplicity 2369


This pattern is one of two patterns that I’m trying this month in an attempt to master a style that alludes me: the surplice top/wrap dress.  To this day I have not been able to find a dress or top, be it in RTW or a sewing pattern, that fits my bust.  The gaping, the droopiness, the excess fabric – I shall conquer it this month.  And it’s so far so good with Simplicity 2369.

This tunic is the start of a conscious effort to start sewing more separates, and I’m happy with how well the test garment turned out (above).  The neckline is going to be pretty low, but I don’t think I’ll have any gaping issues from what I can tell (otherwise I’d try this).  Based on what I’ve read about this pattern on Pattern Review, I’m going to try using clear elastic to stabilize the neckline instead of using a facing.  I figured it would be best to start with the tunic version of this pattern and if all goes well, I’ll definitely make the dress version at a later time.

Yesterday I also cut out and made the pants from this pattern that will go with the top.  I should have tried them on before I trimmed the allowances since I could have done with a little letting out of the side seams at the thighs – I have “frown lines,” an indicator that there isn’t enough room for my thighs in the front.  But I didn’t adjust it and I have some frowny-ness going on and I’m ok with that.  I tried the test tunic on with the pants and it’ll cover that area, so no one will know about it but me.  I also had to crop about two inches off of the top of the pants since I’m not 85 and I don’t like my pants to hit right at my rib cage – why is it so hard to find pants patterns that have a modern fit?  Now that they hit about an inch bellow my belly button, they are the comfiest pants in the world: almost like PJ’s but sewn out of a knit fabric that is socially acceptable to wear in public.

What’s on your cutting table this week?

Follow: