2012 is about to begin and you have a resolution of learning how to sew in the new year. Or, maybe you’ve been sewing for a while now but you’re looking to get more professional results. Regardless of what your situation may be, the key to sewing success is having the right tools for whatever project you want to make. Below are ten of what I find to be the essential tools that every sewer needs in their sewing arsenal.
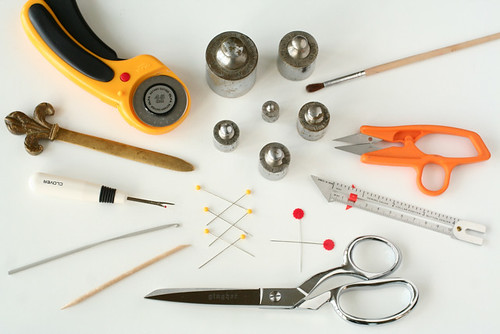
1. High Quality Straight Pins – Your pins are what holds your pattern pieces together when cutting or sewing; without them, it would be difficult or nearly impossible to produce a garment with strong seams that fit properly.
I use quilter’s pins for my sewing: they’re long and never snag my fabric or are difficult to pin when I use them. Find them at Clotilde: 1 3/4″ Quilt Pins
2. Magnetic Pincushion – It’s a lot easier to pull pins out as you’re sewing and throw them on a magnetic pincushion than to stop, pull a pin out, and stick it into one of the tomato-and-strawberry kind. Plus if you end up dropping a pin on the floor and you can’t find it, you can “sweep” the floor with the magnetic pincushion to pick it up.
Magnetic pincushions are easy to find in any sewing store or quilt shop. Mine is a pretty pink color I picked up at Joann: Grabbit Magnetic Pin Cushion
3. Various Sewing Needles – Machine needles, hand sewing needles, you need an assortment of them. Throughout your sewing journey, you’ll embark on projects requiring you to hand-tack a facing down, sew a stretch seam, or maybe you’ll want to do a fancy hem with a twin needle. It’s always a good idea to have a variety of needles at any given moment, because what is more annoying than being ready to sew and not having the needle you need?
I use Schmetz, which is a sewing standard when it comes to needles: Schmetz Universal Machine Needles
These needles have large eyes, which makes them easy to thread: Clover Hand Sewing Needles
4. Reliable Marking Tool – Be it tailor’s chalk, a fabric pencil, or some kind of hybrid of the two, a good marking tool is indispensable. If you can’t effectively mark where that dart ends or the spacing for your buttonholes, it’s going to be hard to figure out where they go on your project.
Out of everything that I’ve tried, my favorite is General’s Pastel Chalk Pencil in yellow and white. The marks are clearly defined and long lasting, but also wash out easily in water: General’s Pastel Chalk Pencil
5. Tape Measure – You’ll use it for everything: taking your own body measurements, checking to see if your grainline is straight when laying out pattern pieces, figuring out the width of your fabric, how long you want your skirt to be – the list goes on.
Depending on your preference, you can buy a retractable measuring tape or a traditional yellow tape measure: 60″ Yellow Tape Measure
6. Dressmaker Shears – Cutting out my projects is probably the least enjoyable part of sewing for me. It would be even less enjoyable if I didn’t have good shears to cut make clean, even cuts in my fabric. Jagged edges or scissors that chew up fabric that you’re trying to cut make it harder in the long run to sew together a garment when edges can’t be lined up or hemmed properly.
I’d love to have a nice pair of these Gingher Shears: Gingher 8″ Knife Edge 8″ Shears
It’s also a good idea to have a pair of snips on hand for trimming thread ends: Fiskers 4″ Mini Craft Scissors
7. Seam Ripper – I’m not perfect, you’re not perfect, and that’s ok: that’s why we have seam rippers. I can’t tell you how many times I use a seam ripper to rip out sewing mistakes in each of my projects, but it’s a lot. I’ve even gone so far as breaking the handle on some seam rippers because I use them so much. A sturdy one with a good handle is a must for me.
I love the Clover seam ripper since the handle is substantial and easy to grip: Clover Seam Ripper
My mom uses a steel seam ripper, which is way hard-core and precise: Surgical Steel Seam Ripper
8. Light Source – Unless you have eyes like an owl and can see in the dark, a light source is going to help immensely when sewing. That light on your sewing machine is only going to do so much good when it comes to seeing how your stitches look, and if you’re working with dark fabric, good luck trying to rip out that mistake you made.
I swear by my portable OttLite. I don’t know how I sewed for so long without a good light source, but my eyes thank me now that I have one: OttLite High Definition Table Lamp
9. Sewing Gauge – Seam allowance is such an important principle in sewing. If you don’t have the correct seam allowance, the entire fit of your garment will be off. Or, if you’re quilting, even a fraction of an inch off of what your seam allowance should be can ruin a finished project (I should know!). A sewing gauge is a handy tool to make sure your sewing is on track and accurate. It’s also a handy tool for marking hems for pants, skirts, dresses, etc.
This is the same sewing gauge I’ve used for the past 15 years: Dritz Sewing Gauge
10. The Best Sewing Machine You Can Buy – At the end of the day, a good sewing machine is going to be your most important tool. Mine isn’t anything fancy: it’s a Bernina 1005 from a high school that discontinued their home-ec program (the name of the band “Slipknot” is etched onto the side of my machine). It’s not the fanciest and it’s not the most current with all the bells and whistles of many machines on the market today. But it does one thing really well: it sews my projects and I get great results from it. Nothing is worse than a machine that eats your fabric, constantly jams up, or doesn’t meet your sewing requirements. Out of everything listed above, this is the one non-negotiable tool that you must have.
What are some of your essential tools for sewing?
Image by Saídos da Concha.