Pattern Review: Coppelia Cardigan [Papercut Patterns]


coppelia5

Doing my best ballerina pose


coppelia2

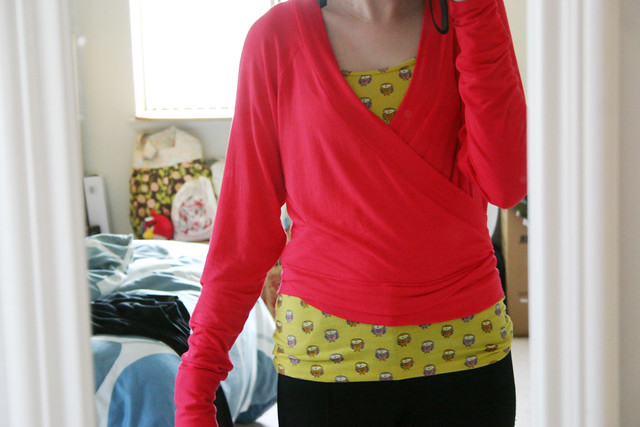
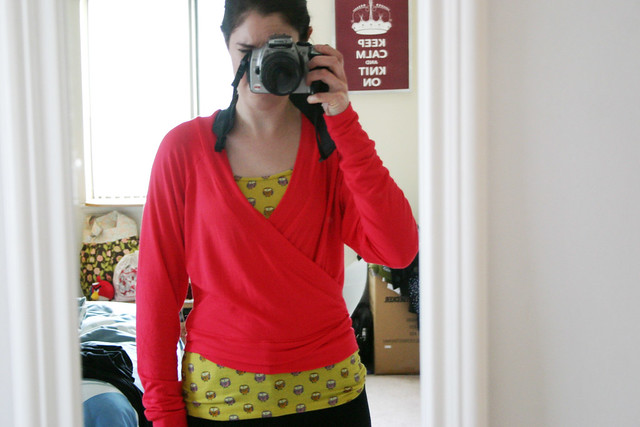
Pattern: Coppelia Cardigan from Papercut Patterns
Fabric: Rayon jersey from Metro Textile in NYC
Size: XS with modifications

Tank: Old Navy
Skirt: Tommy Hilfiger

Leggings: Guess
Boots: Sporto
Lipstick: NARS Funny Face

Lauren beat me to it, but here’s my rendition of the fabulous Coppelia Cardi by Papercut Patterns.  For those of you not familiar with Papercut Patterns, it’s an indie sewing pattern line based out of New Zealand.  The designs are fresh and modern without being too trendy – a lot of the patterns remind me of pieces I covet in the upscale boutiques on Newbury Street in Boston.  I can see these patterns getting a lot of rotation in my closet since they’re great wardrobe staples and beyond.

As a side note, when I asked my boyfriend to take pictures of my new cardi, he was confused because he thought I bought this.  Yesss, mission accomplished!


coppelia3

Explained in a post earlier this week, I needed to make some size modifications after I finished the cardigan and tried it on for fit.  It didn’t fit anywhere as closely as I wanted it to, even though I was making an XS, and I ended up shaving off about two inches from the raglan length and tapered in the sleeve and side seams quite a bit.  I could have shortened the sleeves as well since they’re on the long side, but I don’t mind the pushed-up sleeve look.  Plus, they keep my hands warm!  Lauren mentioned that she took out an inch in the width of the back piece of her cardigan, and I definitely think I could have benefited from doing that alteration as well since I have a small back.  For future cardis, since I have a nice white jersey that would be perfect for this pattern, I’ll cut out the XXS and go from there with any pattern alterations.


coppelia4

My favorite way to tie this cardigan shut is by wrapping the ties around the back, like how the model is wearing it on the Papercut Patterns website.  I don’t know why it’s so hard for me to understand how to tie wrap tops/dresses/anything, but this was the only way I could get the cardigan to look ok.  I don’t really notice the knot in the back when I sit down either, which is a plus.


coppelia1

The pattern was easy to sew together even though the fabric I worked with was fluid and didn’t have a lot of body.  I stumbled at the hem facing section of the instructions because a) I was tired and b) logic was not on my side at the time, so if it wasn’t for those two factors, I could have finished this project in an afternoon.

All in all, get this pattern!  It’s definitely a “cake” piece and will get lots of wear in your closet with dresses, skirts, and jeans.

Follow:

Why I Love Sewing With Knits


coppelia2

This is my finished Coppelia.  I was disappointed with the fit when I first tried the ballet cardigan on – look at how baggy it is!!  I cut out an XS, which matched my waist and hip measurement and had a slightly bigger bust measurement, but never expected the ease to be so dramatic.  If I wanted a loose, casual fit I wouldn’t mind how this turned out, but I was picturing a fit more like on the model.  I want to wear this over cute dresses this spring.


coppelia

Here’s another view with my arm down.  Look at the pooling of fabric at the underarm!  There’s a lot of excess going on here because the raglan depth is too large.

So what’s a girl to do?  Whip out her french curve and flexible ruler, roll up her sleeves, and get down to business.


coppelia3

I tried the cardi on inside out and pinned the left sleeve and side to how I wanted it to fit.  After I took the cardi off, I marked with a chalk pencil where I placed the pins and used my curved ruler to “connect the dots” and smooth out the new sewing line.  After trying it on after sewing, to make sure I got the fit right on the left side, I used my flexible ruler and shaped it to mimic the new stitching line.  Then, I lined up the shaped ruler on the opposite side of my cardigan.  A little tracing, some more stitching, and boom – I took out all the excess fabric and got the fit I wanted.  It was a good two inches I took out of the underarm, can you believe it?

And that’s why I love sewing with knits – I don’t think I could have done a fit adjustment this easily with a woven garment.  Can you imagine correcting the armscye?  Not to say it’s impossible to do, but correcting ease is much simpler in a knit garment. The stretch nature of knit fabric is so forgiving and it’s easy to get the fit just right.

I’m sitting on my couch wearing my new cardi as I type this post.  I can’t wait to share pictures of the finished garment!

Follow:

Pattern Review: Sewaholic Renfrew


refrew original 1

Pattern: Sewaholic Renfrew
Size: 6
Fabric: Sweatery knit from Metro Textiles in NYC

Skinnies: Tommy Hilfiger
Shades: Tommy Hilfiger
Flats: Aerosoles
Lipstick: MAC Russian Red


refrew original 2

What’s there to say about Renfew that hasn’t been said already? This pattern has been reviewed by so many sewing bloggers and even though it’s a basic garment (think cake, not frosting), it seemed like a great wardrobe builder and has the potential for many design possibilities.  Plus, Tasia’s patterns are well-drafted, wonderful to sew with and she offers tips on her site on how to make her patterns.  And that’s why indie pattern companies rock – there’s all sorts of extra goodies like pretty packaging, well-written and clear instructions and illustrations, and an online community of support.

Following the sizing on the envelope, I cut out a size 6, which was almost spot on with my measurements.  My finished top ended up fitting a little looser than I like for my knit tops, but that’s ok for this rendition – I wanted the fit to feel like a sweatshirt.  For the next Renfrew I make (and oh yes, there will be more), I’ll probably cut out a 4 and grade it to a 6.

Stitching it up was a breeze as well, talk about instant gratification. I made it up in the morning and wore it out to go yarn shopping later that afternoon.  Win!


refrew original 3

The fabric – can I say yum?  It’s a thick, buttery knit that’s almost sweater-like, but feels like a luxurious sweatshirt.  I originally hoped that I had enough for the cowl version of this top but a only a yard and a half, I could only squeak out the scoop neck version.  It’s such a dream to wear and I feel comfy but don’t look like a grungy college student – it’s sweatshirt chic.

If you haven’t sewn a Renfrew: DO IT.  There’s a reason everyone raves about this pattern!

Follow:

McCall 6559 – Swirly Ruffled Sundress

Swirly Sundress

Pattern: McCall 6559, altered
Fabric: rayon poly jersey from Gorgeous Fabrics
Size: 8-10?

Wedges: Born Concept
Sunnies: Rayban

Swirly Sundress

This dress originally started out as a maxi dress, but now, as you can tell, it looks nothing like the dress on the pattern envelope.  Why?  Call it a happy accident: I cut out the dress thinking it would fit me just fine (I mean come on, it’s a simple knit tank dress) and when I finally tried it on, the neckline was indecently too low.  Like, my-bra-peeking-out-can’t-cover-it-up too low.

Hmm.  What to do.

That’s when I got the brainstorm for this cute little ruffled number!  You could use any simple maxi dress pattern, but here’s how I altered mine:

Untitled-5

1 – After I sewed the side seams (and took them in quite a bit…the 10, which is usually what I cut, wasn’t as tight as I liked it), I chopped off the top of the dress right underneath the armholes.  This gave me a long, tubular dress shape.

2 – Then, I cut about 5″ off of bottom of the dress and set that fabric aside for the bust ruffle. Since there was going to be a lot of skin showing up top, I opted to make the hem a modest knee length.

3 – Taking the reserved bottom of the dress I just cut off, I turned a narrow hem at the widest end (the bottom) and ran gathering stitches around the top (narrower than the bottom). With the wrong side of the ruffle facing the right side of the dress, I then eased the gathers of the ruffle around the top of the dress and stitched it in place using a 5/8″ seam.

Untitled-8

4 – I turned the raw edges of the top of the dress to the inside and stitched a 1/2″ wide elastic casing.  I cut the elastic snugly and threaded it into the casing and stitched the casing shut.  Also, stitching in the ditch is your best friend when it comes to elastic!

5 – I made long, narrow tubes of fabric for the halter straps and attached them to the front of the dress where I thought they looked best.

Swirly Sundress

It’s as easy as that!  I’m really happy with how this dress turned out – it could have been a disaster if I hadn’t come up with a solution to my poorly fitting maxi dress, and a waste of such nice fabric.

Follow:

Pattern Review – Simplicity 2369

simplicity 2369

Pattern: Simplicity 2369
Size: 10 graded to a 12
Fabric: Knit ITY from Joann Fabrics

Jeans: Mek Denim
Sunnies: Bulgari
Necklace: birthday gift!
Wristlet: Michael Michael Kors (birthday gift to myself!)

simplicity 2369

I’ve had this top finished and in my closet for about a month and realized that I never had an opportunity to share it here, partially due to my “photographer” not being available when I was as well as the hours I’m working for my new job (I got a promotion!).  It was cool in Boston on Sunday and I wanted to feel comfy but look cute for my birthday mini-golf outing – it was definitely a jeans and tee kinda day.

Yes, it was my birthday!  I noticed a fine line forming on my forehead in the bathroom that morning and my roots need to be colored since my grays are showing through.  Hooray.

Construction

I was apprehensive about how this top was going to fit since wrap tops are always too big on me due to the cross-over piece being too long.  This isn’t a “true” wrap top since it’s only a half piece that wraps across the front, and I think that attributed to the correct fitting of this top.  I did my usual mods, a 10 graded out to a 12 from waist to hip, and I think I could have gone a bit smaller up top.  But I was too lazy to re-cut the top and take in the sides, it wasn’t that major of a fit issue.

My machine, however, did not care for the ITY I was sewing with.  I never sewed with an ITY before, even though I have heard rave things about them and it seems to be quite the fabric in the knit fabric world, but I’m not sure I would sew with it again.  I love my little Bernina 1005 but it had a hard time stitching consistently and kept skipping stitches, zigging when it should have zagged.  I changed the stitch length, even switched to a straight stitch and stretched while I sewed, but it didn’t like that either.  Maybe someone reading this has insight into this problem?

simplicity 2369

I decided to do a neck band instead of a facing for this top, figuring I could benefit from additional fabric being added to an already low neckline.  I followed the instructions to make the binding and opted not to turn it to the inside.  The only downside is that since I didn’t plan ahead to do this, I have raw edges on the inside.  I also have to tie this top pretty tight and watch the neckline during the day, but having worn this top twice now, I haven’t had any gap-age issues.  Whew, what a relief!

I loved this pattern – I made the pants to go along with this top as well – and I definitely want to make the dress, too.  Since I already attempted to make a test garment for a wrap dress that failed, I bet this pattern will be the pattern I pick to make the wrap dress off of my 12 in 2012 list.

Best of Patterns

Follow: