Tutorial: DIY Sweater Art


main

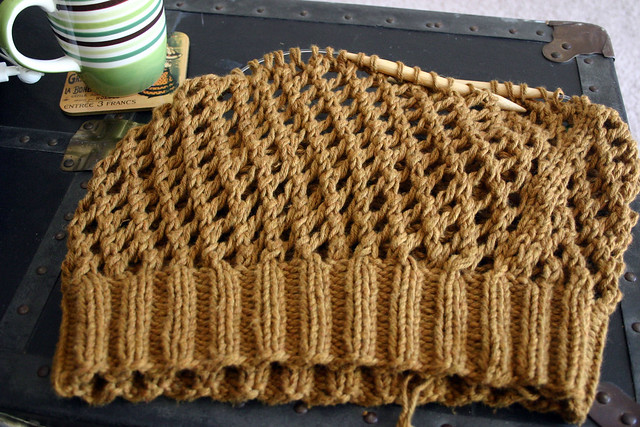
All knitter’s have one: that sweater that you tried so hard to “make it work,” but all that ever resulted from it were tears, frustration, and wasted yarn.  I’ll admit I have a couple of those hidden in knitting bags in the back of my closet, destined to never to see the light of day again.  But as I was settling into my new digs and decorating my craft room (aka my bedroom that also houses my sewing machine and yarn stash), I came across some unused picture frames and thought up a way to bring those unwanted, failed projects back to life: knitted art!

Materials:

Sweater or knitted item (must be large enough to frame)
Picture frame
Fabric chalk or pencil
Thread (optional)
Needle (optional)
Fray Check
Packing tape
Fabric scissors

Directions:


2

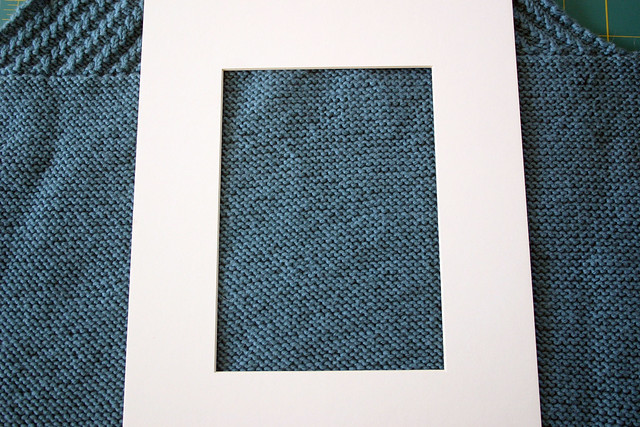
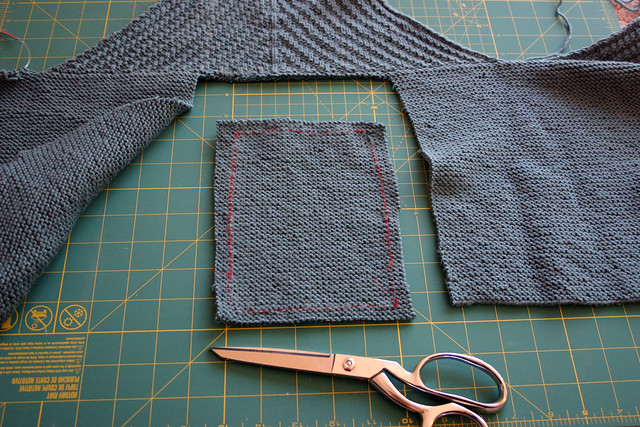
Step 1. Use the mat of your picture frame (mine is an Ikea Ribba frame) to determine what section of your knitting you’d like to highlight.  Keep in mind that you’ll want to have enough for a “seam allowance” around the framed section that can be secured onto the mat.  Otherwise your knitted piece won’t stay in place once framed.

With your fabric chalk or pencil, trace the inside perimeter of the mat onto the knitted fabric.  These marks will be the guideline that you’ll cut around for your knitted art.  You should get something that looks like this:


3


4


Step 2. This step is optional, as I realized after my first attempt at framing knitted fabric, but I thought I’d include it anyway.  Using a needle and thread, trace the chalk outline by backstitching around the perimeter of the markings.  This step is designed to secure the knitted edges from unraveling, but doesn’t *have* to be completed if you don’t want to.  You rebel you.


5

Step 3. Using sharp fabric scissors, cut out your knitted swatch, leaving a reasonable margin around the original chalk markings/stitching lines.  Sweater sacrilege!  I’ll admit, I was a little nervous doing this step.


6

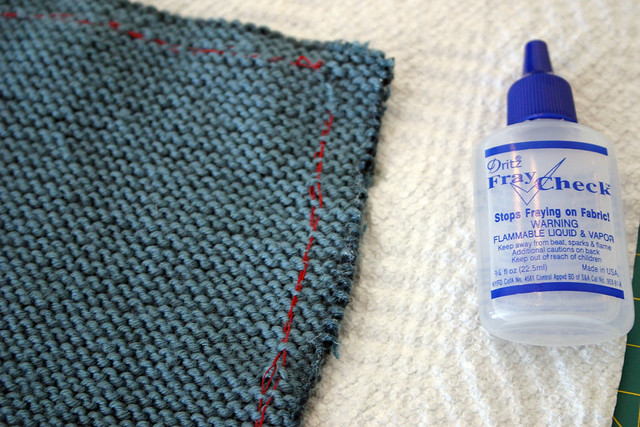
Step 4. Apply Fray Check to all edges of your knitted swatch.  Make sure it’s enough to saturate the entire thickness of your swatch – don’t be shy.  This stuff is really what’s going to keep those knit stitches from coming apart.  Allow to dry for a few minutes before continuing on.


7

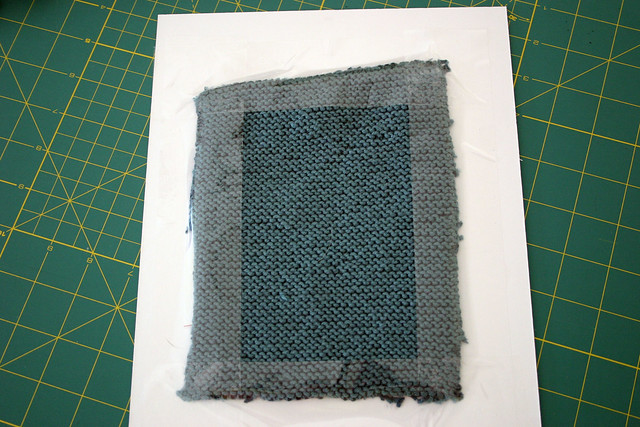
Step 5. With right side facing down, Position and center the knitted swatch over the opening of the picture frame mat – make sure that the chalk lines and/or stitching isn’t exposed on the right side when the mat and swatch are flipped over.  Use packing tape to secure all four edges of the knitted swatch to the mat.  Pop the mat into the picture frame and you’re done.


8

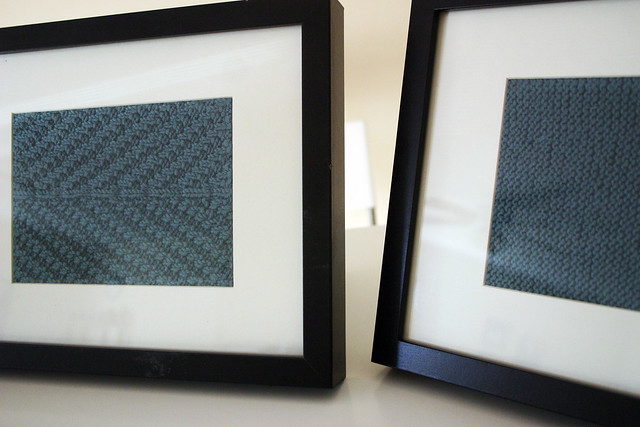
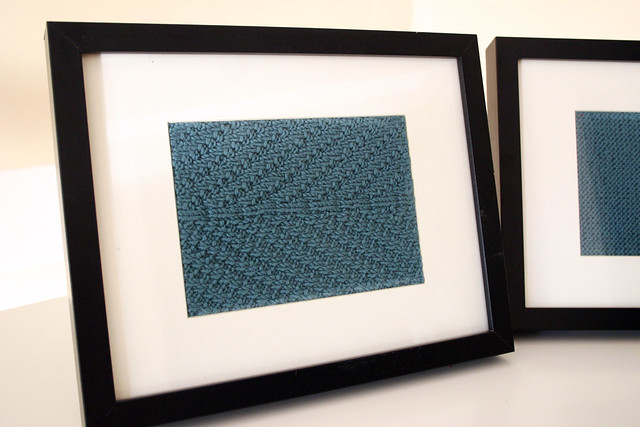
My failed sweater had two different stitch patterns I wanted to highlight, so if you have enough left over, make a matching framed swatch to create a “gallery look” on your walls.

Follow:

A Weekend of Knitting and Baseball

It felt like the last weekend of summer this past Saturday (ok well, technically it was not, Saturday was actually the first day of fall).  It started out cool but got hot and sunny around noon, just in time for attending my last Red Sox game of the season with the boyfriend (my birthday gift to him).  And I got sunburned on my arm, too!  Didn’t see that one coming…


redsox

The game was a bust but we had a blast, eating Fenway Franks and slurping down over-priced beers.  Around the eighth inning we got up to walk around and hang out at the section behind home plate.  One of the security guards was nice enough to take our picture…we always take pictures of us for each game we go to together.  Three so far!

My Carnac sweater is so close to being done, and if I could have, I would have brought it to the game.  It would have been a little messy with mustard and peanut shells…plus the knitting needles may not have made it through security.  Anyway, the body is done and I’m on to the sleeves now.  I was a bit miffed that the pattern only called for “circular needles” and didn’t give a specific length.  Try as I might, I couldn’t do Magic Loop with the lace stitch pattern and had to run out to get size 10 DPNs and a 16″ US 15 circular.  So my goal this week is to have the sweater done and on my back by Saturday, which seems completely realistic based on how fast it knits up.

How was your crafty weekend?

Follow:

On the Needles: Carnac Sweater [WIP]


carnac

Apparently, there are hazards in talking to my sister on the phone (aka The Stitcherati).  We’re crafty ladies and like to dish on the projects we’re currently making, things we’ve seen on Pinterest, and stuff we want to make.  Well, last Sunday, she told me about a sweater she started to knit that she saw over on the Anthropologie Knits board on Ravelry.  I may have squealed in delight into the phone when I looked up the project on my iPad while talking to her.  This was a must-knit sweater, and I had to knit it now.  Which is why I paid extra for shipping on Knit Picks because I wanted that yarn to knit that sweater NOW.  Get the picture?

The pattern is Carnac by the oh-so-awesome Heather Dixon of Army of Knitters.  I’ve always said that I’m “lace-challenged” in that even the most simple of patterns always seems to make me stumble and screw up my knitting.  Once I got the hang of the constant yarn-overs, which make this sweater look almost like crochet, I started to breeze through this pattern over the weekend while watching a marathon of “Murder, She Wrote” on Netflix.  Oh, Jessica Fletcher…it’s a shame Cabot Cove isn’t a real place in Maine because I’d move there.

I’m planning on seeing my crafty sis when she comes to visit me in October and I hope we can both wear our Carnac sweaters while she’s here.  I’m trying to crank mine out as fast as I can to wear in time for the impending fall weather, and I can’t wait to see how hers turns out!

Follow:

What Makes a Good Knitting Bag?


knitting bags

The topic of knitting bags came up at “knit night” this week with my friends, specifically, what components are necessary in a knitting bag.  The general consensus was that compartments are important but it’s the placement of them that matters.  Pockets that are on the side of a bag aren’t as effective as a nice, middle compartment.  Zippers are great for keeping things from falling out.  The list goes on and on.

It made me looking at my knitting bag collection, and it seems that I’m not as picky about compartments, zippers, and doo-dads as some of my knitting friends.  Depending on what the project is, I have a rotation of three bags: two tote bags, an Amy Butler Birdie Sling, and my Ravelry project bag in lieu of a real knitting bag for tiny projects.  Sometimes it just works out better to throw that bag into a large handbag instead.

The question is: have I been happy with these compartment-less bags?  Hmmm, I guess so.  I use a small zippered bag to store my notions (scissors, tape measure, stitch markers, etc). in my bad and that usually suffices.  I almost want to try out a bag tricked out with all sorts of pockets and places to stash stuff to see if I like it better since I really don’t know if I would.  I’ve always used a tote bag for craft projects, like cross stitch or embroidery.

Then there’s the “designer” knitting bags from Jordana Paige, Lexie Barnes, and Tom Bihn – beautiful, but pricey.  I owned a “real” knitting bag several years ago that I purchased from Namaste, similiar to the Cali Laguna (pictured above).  It was great in that it had a large zippered pouch in the center of the bag and looked like a fancy purse from the outside, but it was huge, lime green (poor choice on my part), and I lost things so easily inside.  It went to Goodwill last year when I was going through my stash and downsizing.

So maybe I have yet to find the ideal knitting bag…

What makes a good knitting bag for you? Does it need to be roomy? Lots of pockets and zippers?

Follow:

Yes, You Can Knit at the Beach


You can knit at the beach!


I was told that knitting at the beach was “impossible” and “icky” because of the sand, sunblock, and surf spray.  Being that I’m stubborn by nature, I was determined to prove everyone wrong!  Here’s my tips, based on my recent vacation to Maine, on how to knit at the beach:

1. Knit with something “non-wooly” – Cotton, hemp, or linen are great choices for beach knitting.  They’re perfect summer fibers and won’t stick to your sunscreen or skin in the heat.  I used some Rowan Cotton Glace I had leftover from a previous knitting project (hey hey, stash busting!).

2. Pick something small, portable, and simple – Since my project wasn’t going to be large like a sweater, I threw a small Ravelry project bag in my beach tote that held my yarn, needles, and a zipper pouch with scissors and a tape measure.  Even though my knitting project was a mesh lace bag, it was easy to remember a four row repeat and not have to fuss with instructions blowing all over the place.

3. Sand and sunblock will get in your project – That’s why I chose to knit something that wouldn’t matter to me if sand and sunblock got in/on my project, such as a reusable mesh tote bag.  I found it helpful to use hand sanitizer to clean my hands and make them less slimy and slippery when I knitted.  I didn’t notice sand sticking to my cotton yarn that much, but I’m sure it’s there.  Not a big deal to me.

4. Use something to hold your yarn in place – The cup holder on a beach chair was quite handy to keep my yarn from tumbling out of my lap and rolling down the beach.  It was also pretty windy most of the days we were out on the beach, so I was grateful that my yarn was kept snug and in place at my side.  A yarn bra or yarn keeper would be nice alternatives if your beach chair doesn’t have cup holders.

5. Leave your Addi Turbos at home – My cheap Boye needles were exposed to salt water, sunblock, and were lost in the sand several times.  I would never want that to happen to my expensive Addis!  The same goes with other treasured knitting notions (or yarn) that you wouldn’t want harmed.

Have you ever knit at the beach?

Follow: