Star Crossed Beret

Star Crossed Beret

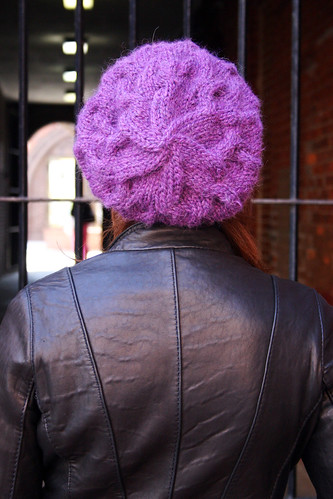
Pattern: Star Crossed Slouchy Beret by Natalie Larson
Yarn: Cascade Baby Alpaca Chunky from Gather Here
Needles: US 9 and 11 16″ circs
Size: OS

Star Crossed Beret

My sister came up to visit last weekend from NYC and I wanted to show her some of the places that make the Boston area great: the Harpoon Brewery (tour tickets were sold out, dang), Grendel’s Den in Harvard Square, and Gather Here in Cambridge.  After finishing my Odessa hat last week, and not being too pleased with the outcome, I decided I need to whip up something – fast – to help me get over my hat failure. So taking a cue from what I learned about that hat, I found some yarn at Gather Here to make the Star Crossed Slouchy Beret.  My sis?  She bought some yarn for the Blue Sky Alpacas “Sporty Mitts” pattern, her first Fair Isle project.

Star Crossed Beret

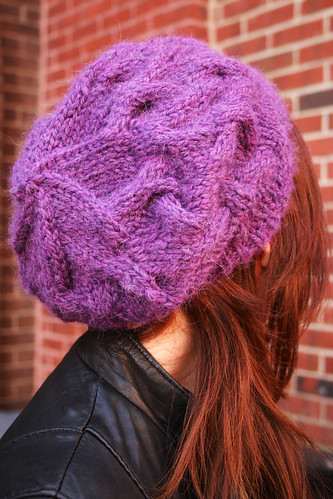
After about four episodes of catching up on Downton Abbey, my hat was finished!  Started it Saturday night and finished it Sunday afternoon.  I decided to use US 9 circs for the ribbing since I didn’t have any size 10 dpns or circs like the pattern called for, and then switched to US 11s for the rest of the hat.  I’ve made a couple of berets over the years and this one is definitely my favorite by far.  I love the shape of the hat – it’s more fitted at the crown than other beret patterns I’ve knitted, and the drape starts at the right point, not too soon after the ribbing ends.  It lays nicely and doesn’t need to be constantly tugged at or pulled on to make sure it’s not falling off of my head.  I highly recommend knitting this pattern for a no-fail beret/slouchy hat/tam project.


I think I’ve got my hat-knitting groove back.
Follow:

Odessa Hat

Odessa Hat

Pattern: Odessa Hat by Grumperina
Yarn: Rowan RYC Cashsoft DK
Beads: Size 6 seed beads from Webs Beads
Needles: US 4 and 6 16″ circs
Size: OS

Odessa Hat

I wanted to love this hat, but the truth is, I just can’t.  Don’t get me wrong, I loved knitting it and discovered that knitting with beads is addictive and fun (I want everything to have beads in it now!).  I had such high hopes for it because it looked so pretty on my needles as I kept knitting the swirling stockinette pattern.  But I’m not a beanie girl, have never been a beanie girl, and so I don’t like how it looks on my head.  I deliberately posted these three pictures on the blog because they don’t really give a full look as to how the hat looks head-on.  But I wanted to show how the hat turned out and say that it’s a great pattern, just not for me.

Odessa Hat
(This was the only straight-on picture that looked ok)

Every project is a learning experience.  You learn what you did wrong so that you can improve on it next time in a new project.  Sometimes you also learn what works and doesn’t work for you – case in point this hat.  I learned that I like loose fitting hats, pretty much of the tam or beret variety, and that thinking back, I never owned a single beanie that I liked.  It’s that whole hair-smooshing thing I think, as silly as that sounds.  And light, neutral colors wash me out.  I need some bright colors going on for my hats!

Oh well.  Knitting, like any other craft, is full of mishaps.  I used to get upset when something didn’t turn out right, but now I just use it as a point of reference going forward, and learn not to make that mistake again.  No more beanies for me.

Follow:

On My Cutting Table: Simplicity 2369

WIP - Simplicity 2369


This pattern is one of two patterns that I’m trying this month in an attempt to master a style that alludes me: the surplice top/wrap dress.  To this day I have not been able to find a dress or top, be it in RTW or a sewing pattern, that fits my bust.  The gaping, the droopiness, the excess fabric – I shall conquer it this month.  And it’s so far so good with Simplicity 2369.

This tunic is the start of a conscious effort to start sewing more separates, and I’m happy with how well the test garment turned out (above).  The neckline is going to be pretty low, but I don’t think I’ll have any gaping issues from what I can tell (otherwise I’d try this).  Based on what I’ve read about this pattern on Pattern Review, I’m going to try using clear elastic to stabilize the neckline instead of using a facing.  I figured it would be best to start with the tunic version of this pattern and if all goes well, I’ll definitely make the dress version at a later time.

Yesterday I also cut out and made the pants from this pattern that will go with the top.  I should have tried them on before I trimmed the allowances since I could have done with a little letting out of the side seams at the thighs – I have “frown lines,” an indicator that there isn’t enough room for my thighs in the front.  But I didn’t adjust it and I have some frowny-ness going on and I’m ok with that.  I tried the test tunic on with the pants and it’ll cover that area, so no one will know about it but me.  I also had to crop about two inches off of the top of the pants since I’m not 85 and I don’t like my pants to hit right at my rib cage – why is it so hard to find pants patterns that have a modern fit?  Now that they hit about an inch bellow my belly button, they are the comfiest pants in the world: almost like PJ’s but sewn out of a knit fabric that is socially acceptable to wear in public.

What’s on your cutting table this week?

Follow:

Pattern Review: Vogue 1020

Vogue 1020

Pattern: Vogue 1020, View C (OOP)
Size: 10 bodice graded to a 12 skirt
Fabric: Rayon jersey from Gorgeous Fabrics

I did the unthinkable.  I swore I’d never do it again.  But I did: I sewed a pattern that I already sewed three years ago and failed miserably at.  The reason? It fit terribly and I hated how I looked and felt wearing it.

So why in the world did I try it again?  This was the right fabric for it this time around.

Vogue 1020

1) The Fabric

I mean come on, this is a pretty funky fabric.  And I felt that the print was so crazy-wild, it would distract from any fit issues I had around my stomach.  I loved that the pattern layout created a bias across the bodice and then caused the print to straighten out at the skirt – this was a design element of the pattern that would be missed if I decided to use another plain knit this go-around.  The weight of the fabric was perfect for this dress too; it was lightweight but draped well and had the right amount of stretch to it.

Vogue 1020


2) Grading

I’ve learned over the years of sewing how my body is proportioned and what works and doesn’t work.  Learning from what I did before on this pattern, I didn’t cut a straight 12 – I cut a 10 for the top, guessed where the waist was (it’s really not clear on the pattern where the waist is located because of the side gathers…the left side is super long), and graded it out to a 12 to where I believed the hip started.  It worked much better this time and I ended up being a lot happier with the fit.

Vogue 1020


3) Construction

The directions were straightforward and I think I referred to them once or twice, but pretty much did things based on instinct.  I opted to use clear elastic at the shoulder seams and at the left gathered side seam instead of seam tape – much more RTW looking.  No zipper used either since this fabric is so stretchy it’s not necessary.  And thank you to whoever invented the twin stretch needle because for those of us who don’t own a serger, it’s a miracle.  I used it to hem the bottom of the dress and sleeves as well as the neckline, and it looks so much more professional than a regular straight stitch.

4) Proper Undergarments

Don’t get me wrong: this is still a really tight dress and I have to remember to not slouch when I’m wearing it.  But I found that wearing something underneath, like my DKNY Smoothies Leggings, really helped to smooth out my stomach and prevent bumps from my underwear from showing (I told you, it was a lightweight knit fabric!).  I wore them the first day I wore this dress, which was to give a presentation at Ignite Craft Boston, and it helped to control everything all day and I felt good.

Now that I’ve finally conquered this pattern, I’m looking forward to tackling that top again.

Updated: I’ve mentioned this particular pattern in a new blog post about Vogue’s “Figure Flattery” guidelines here.

Follow:

Sideways Cloche

Sideways Cloche

Pattern: Sideways Grande Cloche from Boutique Knits
Yarn: Plymouth Yarn Baby Alpaca Grande, color 1285
Needles: US 10, 9, 8, 7
Size: One size, altered to fit smaller

Sideways Cloche

It’s sad but true: I own very few hand-knitted “cold weather” items.  I guess it’s partially because I tend to gravitate towards bigger challenges like pullovers and cardigans, and I see scarves and hats as kind of boring.  Or, maybe it’s because I haven’t had success in that area of knitting.  I’m not a big fan of hats, and since my head is on the small side (“pin-head”, as my sister would say), I’m usually let down with the finished product since it’s way too big for me to wear.

One thing is for certain though and that is the love I have for this hat.  LOVE IT.  It’s deceptively complicated looking but in actuality a beginner could make this hat.  The construction is straightforward: knit a long ribbed fabric like you would a scarf, pick up some stitches on one of the long sides and knit the crown, sew up the side seam, and then pick up and knit two straps that twist together and connect at the crown to form a faux cable.  Easy!

Sideways Cloche

A word of caution, though – this hat does run large.  Many knitters on Ravelry adjusted the pattern and casted on less stitches than what the pattern calls for.  I followed their advice and casted on 33 stitches so that the length of the hat (which is essentially the width of the fabric piece when you’re knitting) wouldn’t cover up my eyes.  That happens with hats, when you’re a “pin-head.”

Follow: