Simplicity 2657 – Sew Stylish Sundress

Simplicity 2657 - Sew Stylish Sundress

Pattern: Simplicity Sew Stylish 2657, View C

Size: 8/10 for the bodice, graded to a 12 in the skirt

Fabric: Cotton Twill from Joann Fabrics (an awesome find)
This pattern has been in my stash for two years since it was the feature pattern in the Spring 2009 issue of Sew Stylish Magazine, a younger and hipper version of Threads Magazine geared towards the sewing newbie. When doing research on this pattern before I committed to making it, I was surprised on how few people had made this pattern. There were the few sewers who made alterations to this pattern for maternity wear, which wasn’t exactly a turn-on, but I decided to give it a try. I figured once I mastered the fit on this dress, I’d have a great base for a sundress for future dress projects.

Simplicity 2657 - Sew Stylish Sundress


1) The Bust
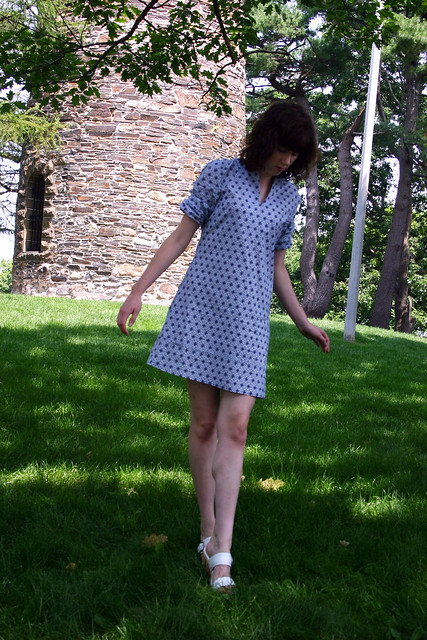
If you’ve been reading my blog, you know that I’m challenged when it comes to fitting the bust in any type of top/dress pattern. This pattern was featured in the issue to show how to fit a bust using princess seams. Amazingly, the bust fit perfectly on my muslin and I didn’t have to do any type of alteration to the curve of the seams. Instead, I added on to the bodice pieces for more coverage; I added about half an inch on to allow that I can wear a regular bra and not a strapless. Somehow when I widened the front, and consequently the straps as well in the same amount, it created a different neckline than the original pattern, which I like better. The points at the top of the bodice pieces create an unintentional retro look. I swear I did my math right; I have no idea how it happened!
I also need to tack down the surplice, it’ll make the top more smooth looking than in the pictures and prevent it from gaping open slightly.
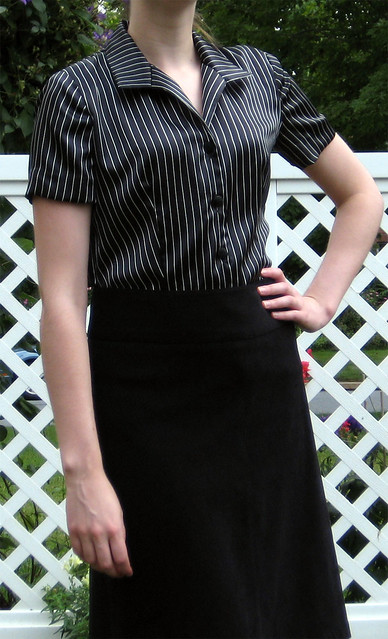
2) The Straps
Because I widened the front pieces, I had to widen the straps as well. I’m glad I did so since I can wear my normal bras with the dress and not worry about an strappage peeking out. If I really wanted to, I could have made lingerie straps to secure my bra straps in place. Of course, I was too lazy to do so.
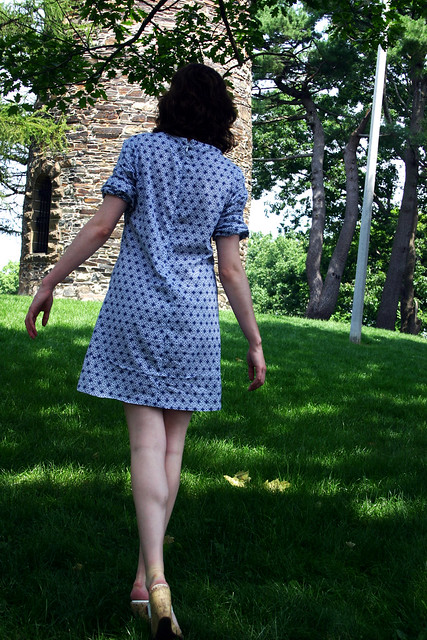
Simplicity 2657 - Sew Stylish Sundress

3) The Back
I’ve never had this happen before: the back piece was almost two sizes too large. Like I said, it’s always the front that is an issue to fit, not the back. Solution? I cut an 8, instead of a 10, for the back piece. Plus, I had to grade it in slightly as I got to the waist seam where the skirt joins the bodice. But after I did so, it fit perfectly.

Simplicity 2657 - Sew Stylish Sundress

4) The Zipper
A side zipper – yikes. I’d never put one in before until this dress and wasn’t a fan of the fact that it was a standard zipper the pattern called for, not an invisible zipper. Side zippers seem to be really popular now on RTW dresses since they’re hidden in the side seam and don’t destroy the continuity of a pattern’s design; it’s a hidden construction element. I disregarded the instructions for the regular zipper and assembled the front and back skirt and bodice pieces to each other, installed the invisible zipper, and then sewed the side seams. I also made sure that the zipper stop went all the way to the top of the side seam so I wouldn’t have to sew a hook and eye (dislike), and tacked down the facing in the inside to the side seams.
So summer is coming to an end, I’ve already started thinking about my fall sewing wish list, and I probably won’t look at this pattern again until next year. I can definitely see myself making this pattern again, either as a maxi dress or as a cute tunic top. Once I got the fit down, this was a breeze to sew.
(Pictures are at Ogunquit Beach in Ogunquit, ME)
Follow:

Simplicity 8741 – Peasant Blouse

Simplicity 8741

Pattern: Simplicity 8741 (discontinued)

Fabric: Embroidered cotton eyelet from Gorgeous Fabrics
Size: 10? I think?
Shoes: Target (Merona Brand)
Watch: Citizen
Glasses: Zenni Optical
I’ve had this fabric in my stash for about two years and had a hard time trying to find a pattern that would complement it. It was lightweight, a little transparent, and had such a cool embroidered flower pattern that I knew I didn’t a pattern that would break up the design. Something loose and breezy…a peasant top!
I actually made this top in 2010 and for some reason didn’t get around to hemming it until this year. It’s a pretty straightforward pattern – no changes or modification necessary. I’m pretty sure I made a 10 and didn’t grade it at the waist out to a 12 like I usually do…since it’s such a loose fitting top style-wise, I wanted it to be as fitted and trim as possible. A lot of times there’s way too much ease it tops of this style: see this babydoll top I made in 2008 as an example. So I took my chances and this top fit the bill.
Simplicity 8741

A new technique I tried with this top were french seams, a seam finishing technique commonly used on sheer and lightweight fabrics to conceal raw edges. Since this fabric is a little on the sheer side, I opted to finish all of my seams, even the armhole seams, using this technique and I loved it. The inside is so professional looking, and even though it was a little more time consuming, it was worth it. I’ve washed the top a few times and it’s held up nicely. Plus, if I hadn’t done that, my seam allowances would be visible from the right side. That wouldn’t look nice at all!
Simplicity 8741

I am such a cheesball sometimes.

All in all, a pretty simple, go-to top for something like this. I would use it again if I’m looking for a peasant style top since I know it:

a) won’t make me look prego with billowing gathers of fabric
and
b) is a snap to stitch up.

Just a nice, straightforward, easy-breezy top for summer. And on hot days like today, that’s a necessity.
Follow:

Simplicity 2584 – Cynthia Rowley Tunic/Dress


Cynthia Rowley 2584

Pattern: Simplicity 2584

Size: 10 graded into a 12 from waistline to hipline
Fabric: Cotton lawn from the Lisette Collection at Joann Fabrics
Shoes: BOC Born Concept
I bought this pattern over a year ago, and when trolling through my stash last month, it stood out as something I had to make this summer. Lindsay T has made it several times in different variations/combinations and it inspired me to give it a go. I’m so glad several sewers have made this before me since their tips helped me to figure out the changes that I would have to make to this pattern to get it to work for me.


Cynthia Rowley 2584

1) The Bust Darts

I’m bust challenged, I admit that. From sewing, I’ve also realized that my bust is higher than drafted for RTW clothes as well as sewing patterns, which makes it difficult to find fitted dresses or tops in stores that have darts and shaping that hit at the correct bust point; they’re usually too low. Looking at this pattern I could see that this would be a problem for me and I was correct when I tissue fit the pattern on me. So using my handy dandy The Perfect Fit book (which is awesome for pattern alterations!), I moved the bust dart up to where my bust point was on the pattern. Tah-dah, no dart issues and I have a fitted top to a pretty shapeless shift dress/tunic.
2) The Neckline
After reading Lindsay T’s recommendations as well as from others on Patternreview.com, I realized the neckline slit would be waaaaay to long for me, like down to my diaphragm long! No thanks. Easy change, just didn’t cut the slit all the way down. I also didn’t make the yoke overlay since I figured with the busy pattern it would just get lost. Plus, it made it quicker to sew, yay!
3) The Length
This may be the shortest dress I own, and adding my “fake tall” platform wedges makes it seem even shorter. It was a risk to make it this length…but I’m glad I did it. I even added the tuck near the bottom, which isn’t noticeable except from the back since it gets all funky looking when I sit down.


Cynthia Rowley 2584

Whoops, wrinkles from sitting!

4) The Zipper

This cotton lawn fabric, which I absolutely love and is so breezy on hot days, is quite flimsy and concerned me when I wanted to install my invisible zipper. I used a technique from Sandra Betzina’s Power Sewing book: interface the seam allowance where the zipper is going to be installed to add stability to the seam. I think it actually makes the zipper open and close much easier now and the fabric doesn’t buckle or sag at the seam.
5) The Sleeves
I also read that there’s a lot of ease in the sleeve caps. I hate set-in sleeves, I always have a hard time distributing the fullness of the gathers around the cap. So again, I referred to Power Sewing and learned a new technique: Staystitch Plus. It made it so easy to insert the sleeve and I had no problem with the extra ease. I also decided to wear this dress with the sleeves pushed up like how it’s styled on the pattern envelope, but it also looks cute with the sleeves down. I can see this dress layered with a chunky cardigan or jacket for a spring/early fall look.
I definitely would make this pattern again, maybe using the yoke overlay the next go-round, but I have way too many things to make in my queue right now. Highly recommend if you’re looking for a simple, not too fitted, dress-like tunic for summer.
Follow:

What I’m Working On – Simplicity 2652

On a better note, here’s a muslin that worked out and is now moving into final construction stage:

Simplicity 2652 – Inspired by Project Runway. There’s all sorts of options to change this little jacket up, like different sleeve lengths and collar details. I’ll be sticking with the cropped jacket and short sleeves, but I had a bit of difficulty attaching the collar. I’ll probably go with the neckband instead.

This jacket looks even cuter on in real life than on the mannequin. The back looks a little funny in the photo since it forms an elastic casing, which pulls in and shapes the back.

I especially love the darts on the sleeves, front, and back of the jacket. It gives it an extra dash of interest.

I’ll be cutting out the real fabric for this tonight, a bright pink linen blend with some nice drape and body. And then, if this one turns out nicely, I’ll make another one for work.

Follow:

Pinstripe Work Shirt

Pinstripe Shirt

Pattern: Simplicity 7086 (out of print, I think)
Fabric: Polyester
Size: 10-14

Pinstripe Shirt

This material was a devil to work with. Of course, it didn’t help that I didn’t line up my stripes correctly (I’ve never worked with stripes before). So the darts look funny because the stripes aren’t even on both sides. I also lengthened this about two inches on the pattern because I knew it would be too short for me to tuck in to pants and have it stay put. I feel pretty meh about this, because I should have picked a better fabric to work with. For now, I’m saying “no” to slippery fabrics until I get some more confidence in my sewing.

Follow: