Finished Project: Archer Popover [Grainline Studio]


polka dot popover3

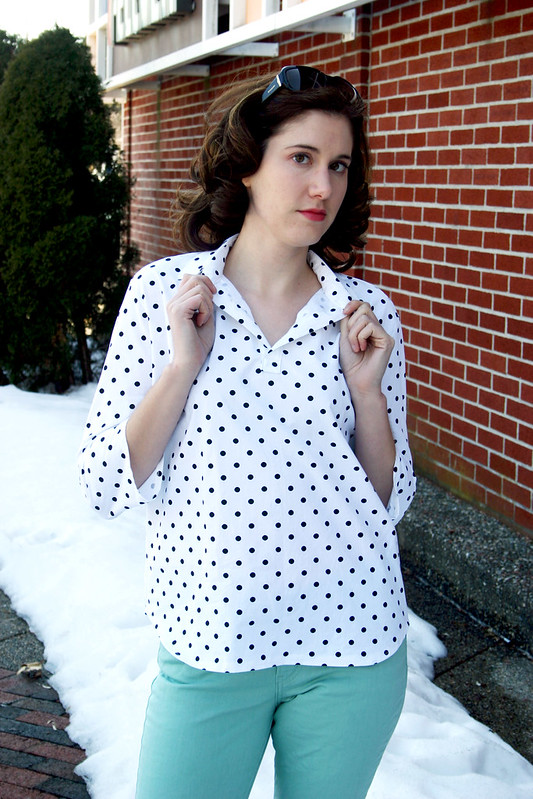
You guys, I made a popover, wooo!  The lazy girl’s answer to a collared shirt!

Pattern: Archer from Grainline Studios
Fabric: cotton shirting from Mood

Jeans: Levi’s
Jacket: Michael Kors
Sunnies: Bulgari


polka dot popover2

Oh man, there are so many more of these in my sewing future.  When Jen posted her popover version of the Archer Shirt last December on Instagram, I literally squealed out loud – it was the perfect solution to the J Crew shirts that I love so much but are outrageously priced (plus, I’m trying to make all of my clothes now…so there).


polka dot popover4

I whipped this up pretty fast the night before Chris’ annual family gathering, which is always so much fun (actually, I was planning on making this for the blogger meetup in NYC but I changed my mind and wore something else last minute!).  Not sewing buttons made it go together even faster, and because I’m super lazy, I decided to not make cuffs and instead made the sleeves shorter.  The only problem I ran into was, yet again, the collar – but I’m getting better.  Honestly, it was so stupid on my part.  I forgot to staystitch the neck and was so excited to try on the popover after I made the placket, and I must have stretched out the neck when I tried it on.  Sigh.  There was some creative problem solving when I attached the collar stand, but it all worked out ok.  Next time I will have a perfect collar, I know it!


polka dot popover5

This was a pretty easy pattern hack – I’m thinking about doing a tutorial (it’s been a while since I wrote one!) on how I added the placket to my Archer shirt.  I don’t think it’s the “proper” way to add a placket, but once I figured out what to do with the fiddly bottom part, it went together smoothly, almost like fabric origami.  And honestly, you can make your placket any length you want!  Maybe make it a bit longer and wear it over a cami, or be a saucy vixen and don’t wear a cami, ooooo.


polka dot popover

I’m thinking my next Archer Popover will be out of a green voile I bought from Mood on Black Friday.  I was going to save it for a button-down Archer, but I’m envisioning: slightly longer placket, cropped sleeves, waist ties that tie in the back for a more fitted look, and no collar.

Do you like popovers?  They’re so easy to wear, and look great with skinny jeans or pants!

Follow:

Pattern Review: Elisa-lotte Dress [By Hand London]


elisalotte 1

Pattern: Elisalex Dress and Charlotte Skirt combo from By Hand London
Fabric: stretch cotton from Metro Textiles
Size: Bodice – US 6; Skirt – US 8

Originally, I planned on making the new Georgia Dress by the BHL ladies for vacation, but I got a bad cold one week and it completely fouled up my vacation sewing plans.  I knew the Georgia Dress was going to require a bit of time to fit, and time wasn’t on my side, so instead I turned to a dress pattern I’ve been clinging to for awhile: the Elisalex Dress.  I knew the simple princess seam bodice would be easy to fit, and it was!


elisalotte 4

I cut out the lining first and used it for a test fit to see if I would need to make any fit adjustments.  At first, I thought the 6 would be fine since the bodice would hit above my waist.  When I pinned the bodice shut in the back, (do you know how hard that is to do on yourself??) I could tell I needed some more room and graded out the last two inches of the bodice to a size 8, which corresponded with the skirt that would attach.

The skirt attached perfectly to the bodice.  I didn’t bother moving the darts to align with the princess seams because of the busy print, but I would consider it if I used a solid fabric or smaller print.  What I found to be interesting about making the skirt this time, and I’ve made quite a few already, is that I had to take the sides in quite a bit!  I’m not sure if it had to do with the fact that the fabric I used had some stretch in it, but when I tried the dress on once it was sewn to the bodice, it wasn’t nearly as fitted as I wanted.  To get it to fit, I took off roughly the equivalent of the seam allowances.  Weird, huh?


elisalotte 3

Also reflecting back on the skirt, I think I should redraft the darts on subsequent garments – maybe take them in a little more.  The skirt is designed for a gal with more hips than me, so there’s a good amount of room in the pelvis that I should try to get rid of.  However, it is helpful for eating big meals, like the dinner I had wearing this dress at the Hard Rock Cafe!


elisalotte 2

The back is my favorite part!  The scoop adds a little bit of “back interest” to this somewhat demure sheath dress.  I made sure to understitch the neckline and underarm of the bodice to keep the lining from rolling out, instead of topstitching as the pattern suggests.


elisalotte 5

Obligatory high fashion pose!  You know how those models hunch and round their backs for those designer photo shoots, hahahaha.  Anyway, I feel so chic in this dress, and can’t wait to wear it more this spring and summer.

By Hand London gals, a big kiss from me to you!  Keep those fantastic patterns coming.

Follow:

Fabric Score!


Hello, Missoni and Prada, found at @fabricplacebasement #splurge #knit #wool

What you’re looking at, my friends, is some honest-to-goodness designer fabric I bought today at my local fabric store (a little bit of a splurge!  But I had a coupon).  Say hello to Miss Missoni, on the left, and Madame Prada, on the right.  These lovely ladies begged me to take them home, and I was more than happy to oblige.

The Missoni is a very loose knit fabric – the colored yarns are a loose ply, and a thin black yarn knit throughout gives the fabric some stability.  I have plans to make a cardigan out of this lovely, but I’m contemplating how to finish the neck and hem – self-fabric would be too much; I could do a contrast knit binding but it would have to be the right weight fabric.  I have some other ideas in my head, but let me know what ideas you have!

The Prada is the most deliciously soft wool I think I’ve ever felt before.  Earlier this week I was in and saw just a red wool, went home and thought about it, and then came back in today to buy it.  But hark!  There was a purple wool I never saw!  It was love at first sight.  I’m kind of over red right now, since it feels like I’ve been knitting and sewing a lot with it, and my thoughts are turning to spring now – this purple is perfect for early spring.  I’m planning on making this into a wool Charlotte skirt lined with acetate (there’s a wool/cashmere blend version I did that I need to post on here, coming soon), very chic.

I’ll disclose how much these were: $19.99/yd for the Missoni and $39.99/yd for the Prada.  Though it hurt a little at checkout, even with a 20% coupon, there’s no way I would ever walk out of Neiman’s with a $40 Missoni cardigan or a $40 Prada skirt.  The quality of these fabrics was well worth the price I paid, and I can’t wait to share what these fabrics turn into!

Follow:

Pattern Review: Blue Beignet Skirt [Colette Patterns]


beignet1


beignet2

Pattern: Beignet from Colette Patterns
Fabric: Blue cotton twill from Metro Textile in NYC
Size: 6

Top: Jasmine

This skirt was a long time in the making.  Back in January I attempted to make a Beignet skirt from some luscious green wool I bought on a shopping trip to New York.  There was my first mistake – the wool was way too heavy/bulky for this kind of skirt.  It was a matter of romance with the color: I envisioned a sleek, sophisticated moss colored skirt with light green buttons.  Sadly, the skirt looked like a big sack and the buttonholes were a nightmare, mostly because I wasn’t using the right techniques for sewing buttonholes and buttons in place.  Twelve buttonholes are not for the faint of heart.

Fast-forward to early April – I’m visiting my parents during Sewcation and using my mom’s sewing room to try my hand at this skirt again.  I omitted the lining (didn’t feel it was necessary and didn’t want to risk the bulk issue again) and sewed the skirt together pretty easily.  And then, it was just me and the buttonholes…


beignet3

I’m laughing because I conquered those bastards!

The automatic buttonhole feature on my mom’s Bernina has now forever spoiled me.  Helloooo…it remembers the buttonhole length for all the buttonholes you need to sew!!  No guessing or crossing your fingers (bad to do when sewing anyway), just press the button, guide the fabric, and voila.  Perfect freaking buttonholes.  It’s hard to go back to my hand-crank four-step buttonhole sewing machine after that little bit of sewing heaven…

I also learned the hard way that it’s more exact to make tailor tacks rather than use chalk to mark the holes.  I think that also helped out a lot in getting nice, straight, even buttonholes.

And then there’s the cutting open of the buttonholes.  I posted a video tutorial on the best way to open buttonholes when I made this skirt and really, it’s pretty great if I do say so myself.  There were no seam ripper nightmares on this skirt!


beignet4

Overall, I’m pretty happy with this skirt.  The fit isn’t as sleek as I’d like and seems to stand out more than other Beignet skirts, like Rachel’s from House of Pinheiro.  If I had been more concerned about the fit at the time, I would have taken in the seams a little bit in the front (it dips in slightly) and sides.  I feel like the waist should fit a little tighter…maybe it would fit better if I paired it with a belt (I didn’t like how it looked with the fabric belt at all).

Would I make this skirt again?  Maybe…it was a big time investment in making the buttonholes and sewing the buttons down (a trick I’ll try to share on here sometime).  I like Andrea’s version with no buttons – that seems more like a realistic repeat to me. But there’s other button skirts on my radar, too…(hello Kelly skirt). Only time will tell!

Follow:

Pattern Review: Hollyburn Skirt [Sewaholic]


hollyburn2


hollyburn1

Pattern: Hollyburn by Sewaholic Patterns
Fabric: Art Gallery Pure Elements Cotton in Empire Yellow, purchased at Grey’s Fabric
Size: 6

Cardigan: Coppelia
Tank: Gap
Boots: Nine West
Nails: Essie Bikini So Teeny

I don’t know why, but I’ve been on such a “loud color” fabric kick lately with what I’ve been buying.  I mean come on, look at how I paired this outfit: hot pink and lemongrass yellow, whoa!  And did you see the lime green for my Laurel dress?  Maybe it’s because the weather is hinting at warmer temps and things are starting to bloom.  Whatever it is, I’m tired of dreary, dark colors and am ready to embrace the brightness of spring.


hollyburn3

This skirt was one of the three I sewed while on Sewcation 2013 two weeks ago, aka “Skirt Week.”  I took three skirt patterns and fabric to my parent’s house in PA and spent the week using my mom’s sewing machines and whipping up skirts for spring.  Gotta say, Sewaholic Patterns are so flattering and simple to make.  Even though I skew more towards “rectangle” in body shape, the garment measurements fit me perfectly and I rarely have to make fit adjustments.

What’s there to say about this skirt…oh, that it’s my new favorite silhouette and I can’t wait to make more???  Seriously, who doesn’t love a fun, twirly skirt?  And there’s pockets, too, and they don’t gape open!  I couldn’t stop putting my hands in my pockets as I wore this skirt.


hollyburn4

I’m really proud of the sewing I did on this skirt, from the top-stitching at the waistband to the machine stitching on the hem.  But note to self – stop making skirts out of quilting cotton, they wrinkle too easily.

The only change I made to the pattern was using an invisible zipper instead of a standard zip.  I didn’t want it to be obvious in the center back seam that there was some zipper action going on.  I get it if you’re a beginner and you’re scared about zippers, because really, this is a beginner pattern, but I find invisible zippers waaaaay easier than regular ones.  I also finished the edges of the waistband the same as how the waistband edges are finished on the Ginger skirt…hard to explain how that is on here, but if you have the pattern, you know what I mean.  Much easier than hand stitching the zipper tapes down in place.

Looking at these pictures, I didn’t realize how short this skirt is (for me, at least).  I definitely see more of these skirts in my future since it’s a great “cake” garment; maybe I’ll try the knee length one next time.

Follow: