Lots of Lark Tees

lark tees
 

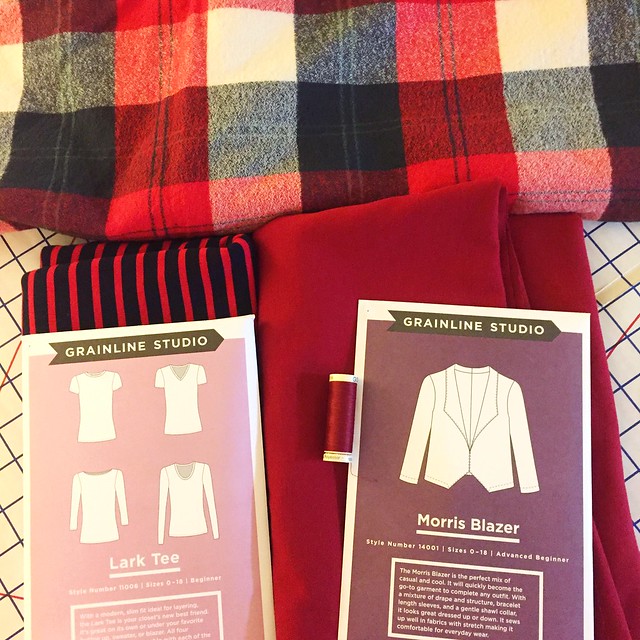
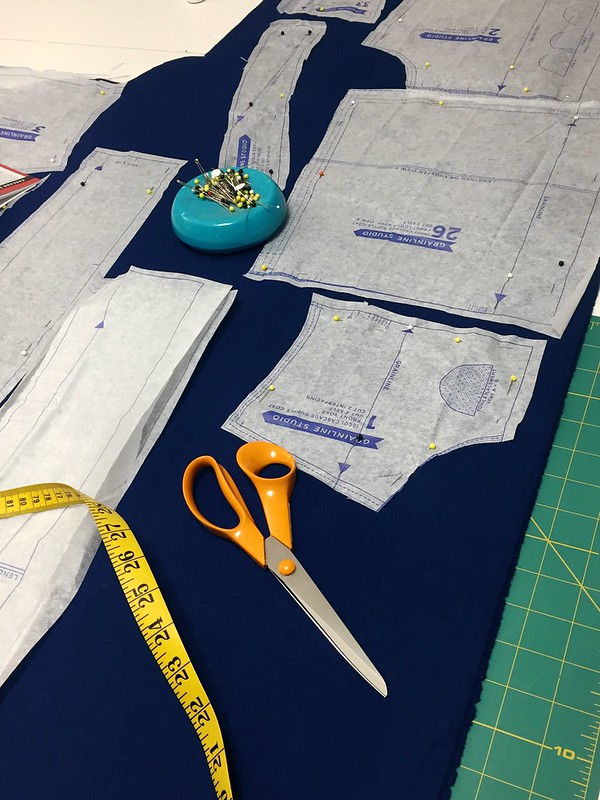
In my last post, I mentioned how I’m using sewing hacks to make my sewing time more productive.  Well, here we are: three Lark Tees that I cranked out in the course of one weekend, all cut out at the same time and sewn assembly line style!


long sleeve lark tee
 

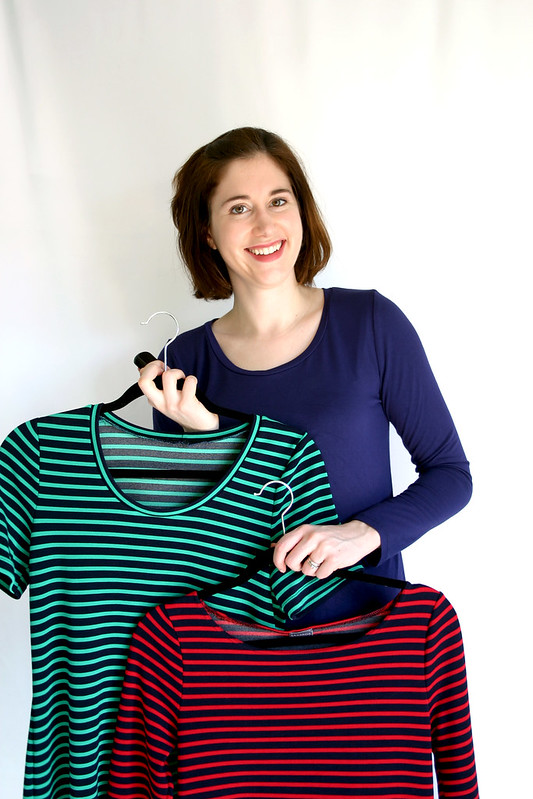
For my first version, I used a lightweight rayon knit from Metro Textiles and cut out the long sleeve/scoop neck variation.  As you can see, it’s a bit wrinkly from not taking it out of the dryer in time!  I love the fit of the pattern, it’s not too tight but fitted where it needs to be, and will be my new go-to pattern for a basic tee.  However, I was surprised with how long the length of the tee actually is and will probably shorten it in future versions.


short sleeve lark tee
 

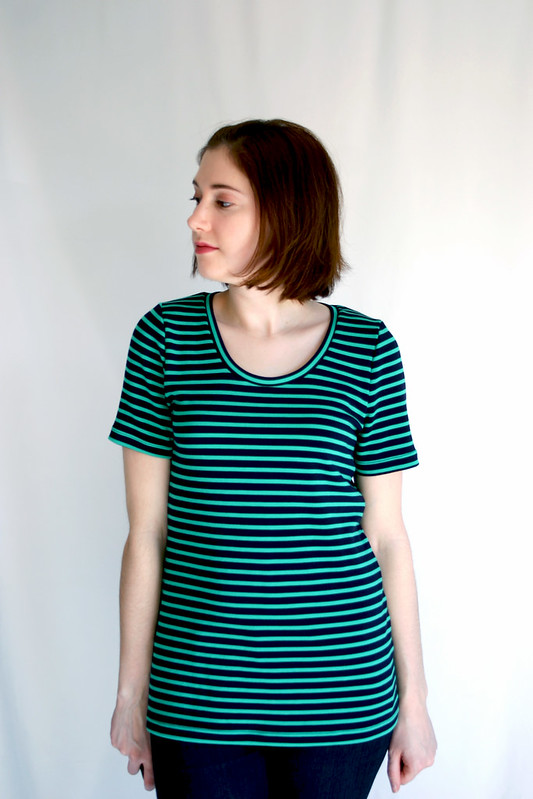
For my second version, I tried the short sleeve/scoop neck variation in a St. James striped double-knit from Mood.  This version is my least favorite because of the length…I don’t know what it is, maybe it’s the proportion of the sleeves and body length, but it just seems too long for me.  It’s also interesting how a different weight of fabric gives the tee a different fit, this one is much looser and less clingy than the long sleeve rayon tee.  I’m loving how the neck band turned out, look at that even stripe!  I probably should topstitch the seam allowance down around the neck to allow the neck band to lay flat, it tends to flip out a bit.


boatneck lark lark tee
 

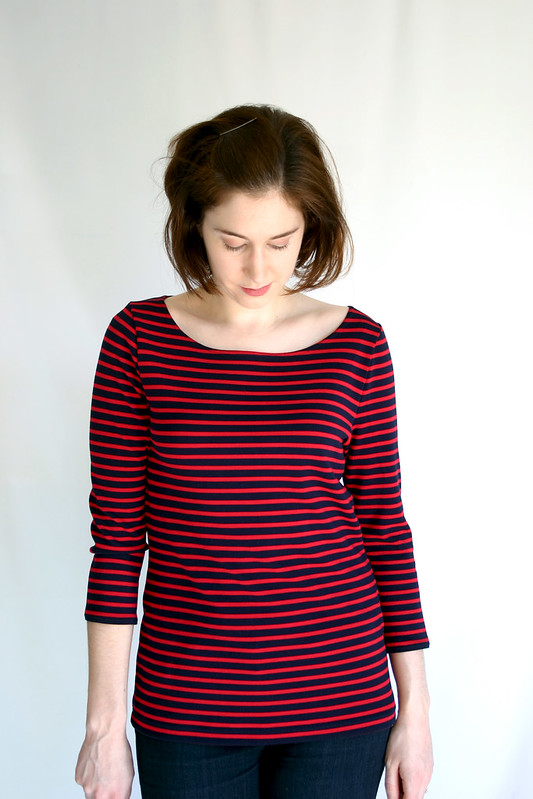
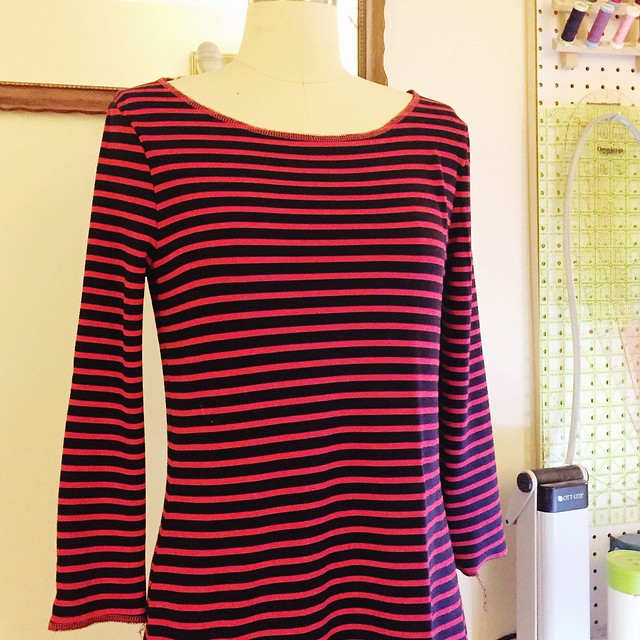
The boatneck 3/4 sleeve version is my favorite!  Like the short sleeve version, this is another St. James double-knit from Mood – I love me a good stripe and there’s no such thing as too many striped tees.  While the description of this version is a boatneck, it feels more like a wide scoop than a boatneck to me; I’m used to boatnecks coming up to my neck.  I would also make a facing next time for the neckline, like Teri did, turning in the seam allowance 1/4 inch and top stitching it looks so-so and a facing would give the tee a much nicer finish.  This version is also slightly shorter than the other two, and I like the length.  This is due to me not cutting the stripes evenly across the bottom (no idea how that happened) so I chopped off about a 1.5 inches to even everything out.

Renee pointed out on Instagram that this is like the Kate Middleton/Vogue magazine shirt – I had no idea!  I love the vertical stripe pocket, that could be a cute addition to a future stripe Lark Tee.  Taking some styling cues from the duchess, I wore this top with dark jeans and brown riding boots when I went out last weekend and felt very chic.


boatneck lark tee
 

Pattern: Lark Tee by Grainline Studio
Scoop and boatneck version with various sleeves
Fabric: rayon from Metro Textile, St. James stripe knits from Mood (1) (2)

Follow:

Sewing Hacks

Untitled
 

Do you use any “sewing hacks” to make your sewing more productive?  With the spring season coming (not soon enough!) and a long list of garments I want to add to my wardrobe, but limited free time between work and school, I’m trying to find ways to make it easier to get some sewing in when I have a few minutes here and there.

One of my new favorite hacks is batch cutting, which I guess isn’t that novel of an idea and stems from the idea of assembly line sewing.  The above are three garments that I cut out over the course of a few hours on a Saturday night: a longsleeve Lark Tee, a Morris Blazer, and an Archer Popover.  My thinking is that if I have my cutting mat and weights out, I might as well use that time to cut out multiple garments since I’m in a “garment cutting mindset.”  Now when I have a few minutes free, I can sit down an sew a couple of seams and gradually work my way towards finishing a project.


Longsleeve Lark Tee
 

This is my third Lark Tee, I made a short sleeve scoop striped version and a short sleeve solid scoop version a few weeks ago.  I used assembly line sewing when I made those two tees and even though it seemed like it took longer to make them, I ended up with two new tees in one evening.  Something funky happened when I cut out this navy and red fabric, maybe I didn’t line it up correctly, but I can’t hem the sleeves and bottom hem with the stripes going evenly across the bottom.  Oh well, maybe I can just trim it a bit to make it look better.  I love stripes, but sometimes they give me a headache.


Toaster Sweater 1
 

So far, my sewing hacks are working; I’m actually behind with photographing some new projects I want to share.  Hopefully next weekend I can set up my camera and backdrop in the living room and get some projects photographed (fingers crossed it stays sunny!).

We went away to the White Mountains in NH for the holiday weekend and I wore my new favorite top, the Toaster Sweater #1.  I love it so much that I wore it twice last week!  I used a beautiful navy ponte from Metro Textiles that was so soft and wonderful to work with that I called Kashi and ordered more for a Morris Blazer.  I’m definitely having a navy moment, more and more navy is creeping into my wardrobe and I have a feeling it’s going to be my new core color for spring as I plan out my sewing queue.

Follow:

Grainline Studio Cascade Duffle Coat

cascade coat
 

After a two years of sitting in my sewing queue, I can finally check the Cascade Duffle Coat by Grainline Studio off my list.  I knew this project was going to be a major time investment and the only way I could make it for this winter was to work on it during break between semesters – and boy was I right, I’m drowning in finance homework!  No way I could work on a project this size right now with grad school in session.


cascade coat
 

I’m obsessed with this coat – I’ve worn it non-stop in all kinds of weather since it came off of my machine.  If you haven’t read my earlier post, the shell of the coat is a delicious wool melton and the lining is a warm-back coat lining, both from Britex Fabrics.  I was skeptical at first that these two layers alone would make a coat warm enough for Boston weather, but I was pleasantly surprised with how toasty I felt wearing this coat in 20 degree weather.  Melton is a very thick, dense wool, and the warm-back satin lining has a nice flannel feel on the wrong side and a tight weave.  Both of these layers prevent cold air from cutting through the coat.  I wouldn’t want to add any other layers to this coat, like an interlining, because this coat is heavy enough as it is!  I’m also surprised at the amount of drape in this particular wool melton, I always imagined melton to be a stiff wool fabric.  You can see in some of the photos how fluid the fabric is based on how I’m standing or positioning my hands in the pockets.


cascade coat


Like all of Jen’s patterns, this came together in a snap.  The sewing itself isn’t hard at all, it’s just the amount of pattern pieces and layers of fabric you need to sew through that make this project a bit challenging.  Plus, if you make this out of a plaid, that’s a challenge on another level!  The only regret I had was not reading through all of the tutorial posts on the Grainline blog before cutting out the pattern; I missed the errata post about the length of the front band and had to fudge/guess the correct length and make the adjustment.  It worked out fine in the end.


cascade coat
 

It’s honestly dumb luck that I got the plaid on the zipper band to match – I cut the plaid contrast lining out haphazardly thinking that it wouldn’t matter at all if the plaid didn’t match in the hood!  Completely forgot about the zipper band, hah.


cascade coat
 

I love that the plaid peeks out from the hood in the back.  The hood is a nice size as well to keep the elements out of my face (and hair).  It would look super cute with a fur trim around the edge.  The construction of the hood is clever, too, with the facing, although I found that there’s too much lining fabric inside the hood for my liking.


cascade coat
 

The lining is where I got hung up on a big, silly mistake, of all places.  I goofed when I cut out the lining somehow and the lining extended 1.5″ too far past the coat facing once the facings were attached.  I didn’t think it would be that big of a deal, and bagged the lining per the directions (which is a brilliant way of lining a coat/jacket/blazer, I need to do that in the future).  When I tried on the coat, everything fit beautifully except that you could see the gold lining hanging out around the bottom of the coat.  No big deal, I ripped out the stitching, carefully trimmed the lining, and sewed the bottom lining hem in place.

Umm…well, that would have worked, except that I trimmed the lining too short this time and ended up getting all sorts of weird pulling across the outside of the coat since there wasn’t enough ease in the lining length!  My fix for this problem, after futzing around for awhile (about three episodes of Poldark, actually), was to attach an extension piece of lining to the area where the lining was too short and with trial and error try to determine the appropriate amount to turn the lining up without getting weird pulling on the outside of the coat.  You can’t see it in the picture above, but there’s a pieced sliver of lining fabric across the bottom of the center back hem.  It’s not pretty, but it solved my problem and no one is really going to see it or know it’s there but me.

I also tried to add some plaid bias around the coat where the facing meets the lining for an extra little detail  – it’s barely visible, I didn’t calculate correctly where I needed to baste it vs where the seamline stitching would be.  Whoops.


cascade coat
 

I love everything about this coat – the flannel-lined patch pockets, the leather toggles, the bright blue wool, and the big, oversized hood.  I’d love to make this in the shorter version for spring out of a waxed canvas or some kind of rain coat fabric.  Well, maybe not this spring, I need some recovery time from this coat!

Pattern: Cascade Duffle Coat by Grainline Studio
Fabric: wool melton and warm-back lining, both from Britex Fabrics; plaid flannel from Mood
(psst! Looks like Britex is having a 20% off sale on wool until 2/6!)
Leather Toggles: Bias Bespoke
Sweater: Lane Raglan (blogged here)
Jeans: Paige Denim

Follow:

Talvikki Sweater

talvikki 1
 

Two years ago, a sweater that fit like this would have been out of the question for me.  Baggy, oversized tops?  No way.  I was all about the snug-fitting, body-conscious tees, tops, and dresses.  Maybe it’s just me changing with the trends, maybe it’s because I realized tight-all-the-time isn’t that flattering (and it makes it challenging when you eat a big meal!), but I’m all about the loose and comfy these days, yet still looking chic.


talvikki 2
 

I’m in lurrrrv with this sweater – the pattern is the Talvikki Sweater from Named (my second garment from them this year, I made an unblogged Paola Turtleneck last week).  What drew me to this pattern is the funnel neckline, which is formed by darts across the front and back of the sweater.  Rachel’s vintage Vogue top from a few years ago with a funnel neck had me on the lookout for contemporary patterns with this design detail, and the new collection from Named has just that.


talvikki 5
 

It’s silly how quickly this went together – it’s four pieces total.  The darts around the neckline probably took the more time to sew than actually serging all of the seams.  There’s also a neckline facing that gives the funnel neck a little more oomph to stand up, it’s interfaced and tacked down at the shoulder seams and dart seams.  I used a fusible tricot interfacing for the facing, but it doesn’t have a whole lot of give and it’s challenging to take this sweater on and off over my head.


talvikki 3
 

The dropped shoulder sleeves add to the overall coziness and relaxed fit of the sweater.  Named styles this sweater on their site with the sleeves rolled up, but I actually like them as-is and a little bit long over my hands.  Also, the length in the back of the sweater is great for wearing leggings and not having your bum exposed, hooray!  (I’ve relaxed my stance on “leggings are not pants” over the years, but still…)


talvikki 4
 

The hi-lo split hem doesn’t bother me nearly as much as I thought it would (le trend, sigh) and I even debated shortening the back to be even with the front when I cut out my fabric.  I’m glad I left it as is, I think it really adds to the overall style of the garment.  The split goes up fairly high on the sides, so I’ll definitely wear this with a tank underneath for modesty and extra warmth.

This pattern is the perfect winter afternoon project!


Pattern: Talvikki Sweater by Named
Fabric: sweater knit from Metro Textiles
Legging Pants: Uniqlo
Hair Clip: J Crew

Follow:

Cascade Duffle Coat Progress

Cascade duffle coat layout
 

What better time than Christmas vacation to cut out a major project like the Cascade Duffle Coat.  Last Christmas, I cut out my wedding dress, hah! This pattern has been on my “want to sew” list since it came out, but I never seemed to get around to making it in past winter seasons.  My friend Karissa’s coat is really what kicked me into gear to make this project, she made one out of plaid and it’s fantastic looking!

There’s a ton of pieces with this coat (hello, 40!), and I knew it would be a big time investment once I got started.  It took about two afternoons of cutting out all of the outer fabric, two types of lining fabrics, and interfacing.  Whew!

The fabric I’m using for the coat shell is a wool melton from Britex – I totally splurged on the materials for this project when they had their Cyber Monday sale in November (kind of made it my Christmas gift to myself, haha).  I’m also using a gold warm-back coat lining so I don’t need to add any additional bulk with an interlining layer to make the coat warm


Plaid zipper band
 

I opted for a contrast hood and zipper band lining fabric, and this plaid in my stash from Mood is a pretty close match to my shell fabric.  I didn’t think I’d need to match up any plaid at all when I cut out my fabric and I lucked out with how closely the plaid matches across the zipper band.  Eeeek!

Now, onto the trouble I had with the DIY toggles….


cascade toggles
 

Yuckyuckyuck!!!

I had a hard time sewing these…I don’t have a teflon foot for my machine and I wasn’t about to put tape on the bottom of my blind hem foot, so I used my walking foot to attach the toggles I made.  I’ll be honest – I don’t sew curves well, especially small curves, and I found it almost impossible to stitch close to the edge evenly on these tiny leather pieces with my walking foot.  The stitching should really be more like edge stitching and the above stitching is about a 1/4″ from the edge.  Ugh.  This coat was looking so nice and professional until I added on these crappy toggles.  Plus, I think the leather I used to make the toggle was too thin.

Not to worry, I found a solution:


cascade toggles
 

So much better!!

Etsy is seriously my favorite place to shop for sewing notions and supplies these days.  I bought these beautiful Italian leather toggles from Bias Bespoke and they are absolutely perfect – each point of the toggle has two pre-punched holes for easy sewing.  I’m embarrassed to tell you how long it took me to get all of them aligned evenly across the front because I already removed my tailor tacks and the toggles are longer than the pattern’s toggles…but I eventually got them just right after several attempts.  Hooray!  Those other toggles ruined the effect of the duffle coat.  After all, the toggles are really the defining element of a duffle coat.  Can’t have them looking like crap!

I’m planning on finishing the coat this weekend (maybe squeezing out another project as well, hooray for long weekends) since this is my last weekend of “freedom” before the spring semester of grad school starts next week.  It’s been a good month off from school, hopefully I can still find some time here and there to sew in the next few months.  I missed it so much!

Follow: