Avoca One-Piece Swimsuit

Avoca 5
 

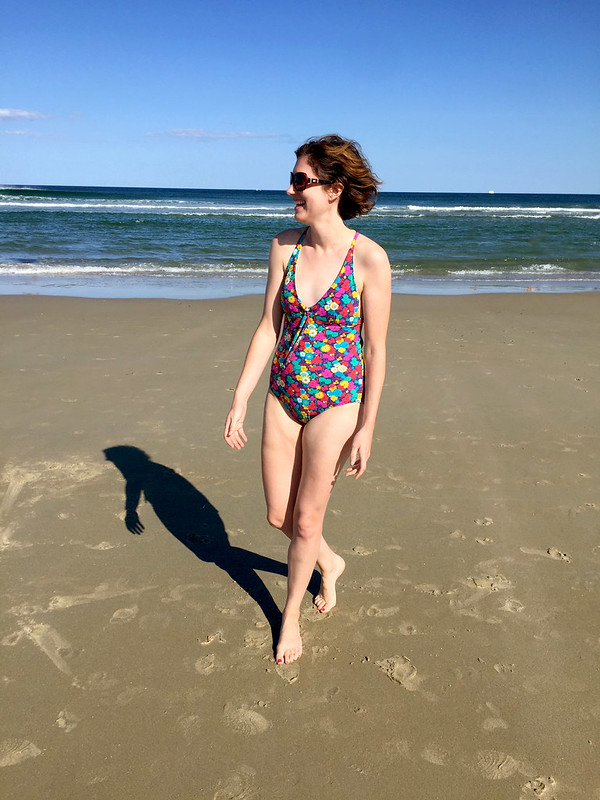
I really didn’t think I was going to make a swimsuit this year. Don’t get me wrong, I love sewing swimwear, but there doesn’t seem to be a whole lot of cute one-piece swimsuit patterns out there – I’m no longer a bikini/two-piece kinda gal these days. But when Swim Style Patterns released their Avoca swimsuit pattern, I instantly fell in with the lace-up detail of the scoop back and the cute lace-up front, and it jumped to the top of my sewing queue for the summer.

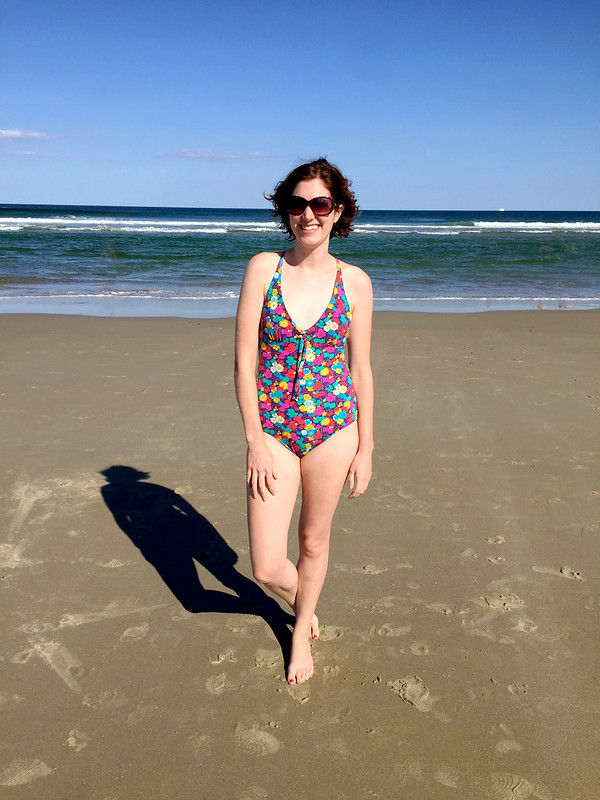
Before I jump into sewing this swimsuit – omg, isn’t this spandex so freaking pretty?? This is a much sought-after Liberty London spandex that I found online from The Fabric Store in New Zealand. I honestly couldn’t find their spandex anywhere else, even when I went to the Liberty department store in London earlier this year! It was really hard to choose a print to use, but I love the vibrancy and colors of this floral print and thought it would pair nicely with this pattern.

I’ve never sewn with Swim Style Patterns, and to be honest, if you’re just starting out with sewing swimsuits, I’d recommend starting with a Big 4 pattern to learn swimwear construction techniques and then move to Swim Style. I think in the sewing community we have a tendency to be “nice” in our reviews of indie pattern companies and to not hold back when reviewing the Big 4 (or, at least, this is what I’ve seen), but my goal is to be as transparent as possible and provide guidance/help/advice for anyone thinking about trying out any particular sewing pattern – and I think this is why a lot of us got into blogging. With that being said, I overall was perplexed as to the “why” for constructing the suit in the manner that it was, and there’s quite a bit that I would change in my next version of this pattern.  I also found the written instructions to be a little funky and relied a lot on my prior swimsuit sewing knowledge to make this suit, but referred to the instructions for the placement of straps and other details like that.


Avoca 1
 

.

First things first: I’m not certain of how supportive this suit would be for larger-busted gals. I don’t have a lot going on up top (ahem), and there are some suggestions in the instructions on ways to add more support that I opted not to do (like adding piece of elastic around the underbust and along the sides of the cups), but I found myself regularly adjusting the straps to make sure I felt secure when jumping around in the waves and such. Maybe if I added the elastic underneath the bust it would be different? Not sure, I might give it a go the next time.

One thing that I wish I did when sewing the bust cups: construct them the normal way by stitching elastic along the edges of the cups, and then turning the seam allowance to the wrong side and stitching in place. Every RTW suit I ever owned is made this way, and every suit I made thus far is made that way. So, why not this one? What I found super annoying is that even though I under-stitched the lining per a reviewer’s suggestion on Pattern Review, it still managed to peek over the edge of the cups a bit and was visible when wearing the suit. If the bust cups were sewn the normal way with elastic and raw edges turned, this would not have happened! I think part of the reason why this instructions weren’t this way may have had to do with trying to create less bulk at the center front where the loops are added for the front lacing, but I would have been ok with a little bit more finagling with that part of the swimsuit vs having the lining showing. The instructions also call for top stitching of the cups, and maybe that would have helped to control the lining from coming out, but I couldn’t get the top stitching to look nice on the bias edge of the spandex cup, so I gave up.

The pattern includes a separate piece for a swim cup pocket – it’s a nice addition if you’re not a fan of using swim cups in swimwear and want the cups to be removable, but I would personally eliminate it and just insert the cup between the main fabric and the lining for simplicity.


Avoca 2
 

I’m really glad I made a mock-up of this pattern out of some spandex scraps in my stash before cutting into my Liberty spandex, because the rear coverage felt pretty skimpy to me. I ended up merging the bottom pattern from the Vogue 9192 suit I made with the torso of this swimsuit pattern, and got the fit and coverage I like and feel comfortable with.  So, beware if you make this suit and you like a more modest fit!

I also ignored the instructions on how to apply the elastic to the back and legs and did it my normal way: attach it to both layers of the suit (lining and main fabric) on the inside of the suit with my serger, turn the raw edges to the wrong side, and top stitch with a zig-zag stitch.


Avoca 3
 

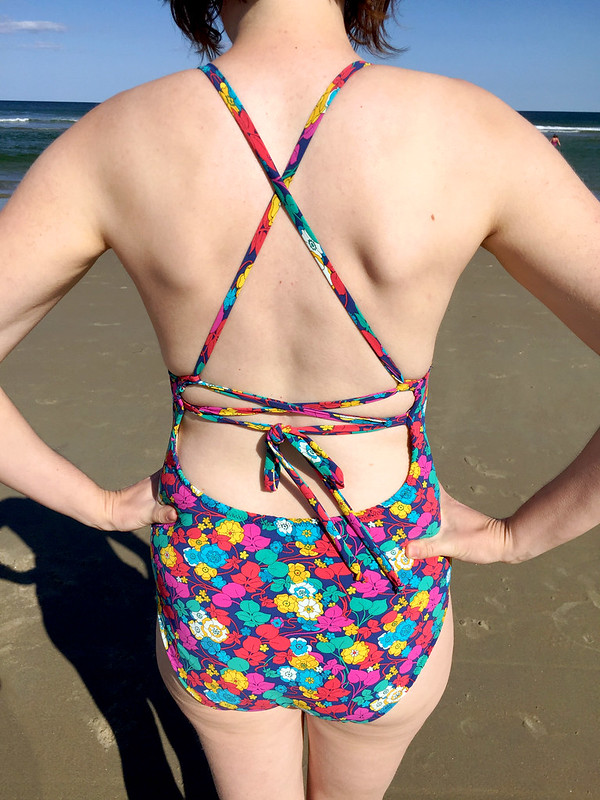
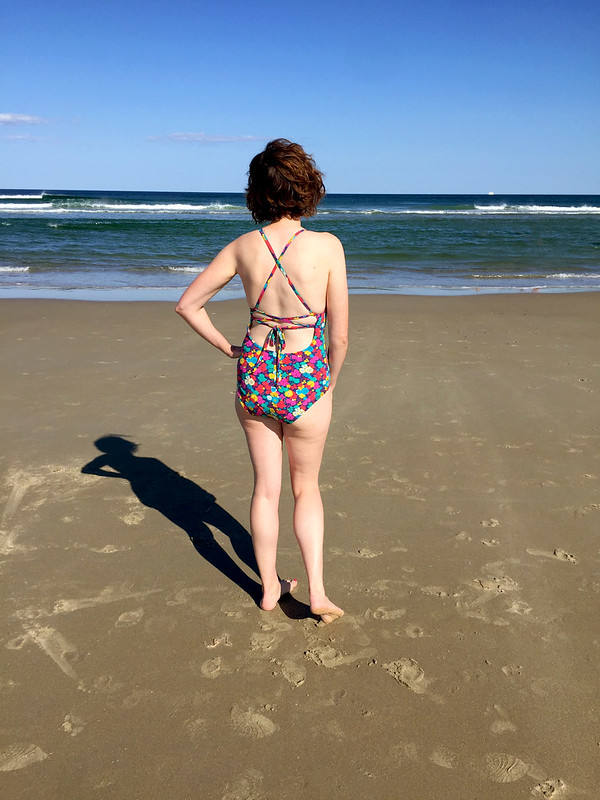
Like I mentioned earlier, the back is what sold me on this pattern – isn’t that lacing detail a great design element?? Something I would change next time that may give the straps a more supportive role in the fit of the suit is to use elastic inside of the tube straps. I did this when I made a Maison Fleur bikini top, and when I wore the suit, the fit felt very secure and the elastic gave the straps more recovery. When wearing my Avoca suit on vacation, I had to really really pull and adjust the strap lacing and tie it super tight, otherwise there was too much slack in the simple spandex tubes. With this being such a key part of getting the fit right and keeping the suit in place, it’s worth a try to see if it improves the overall functionality.


Avoca 4
 

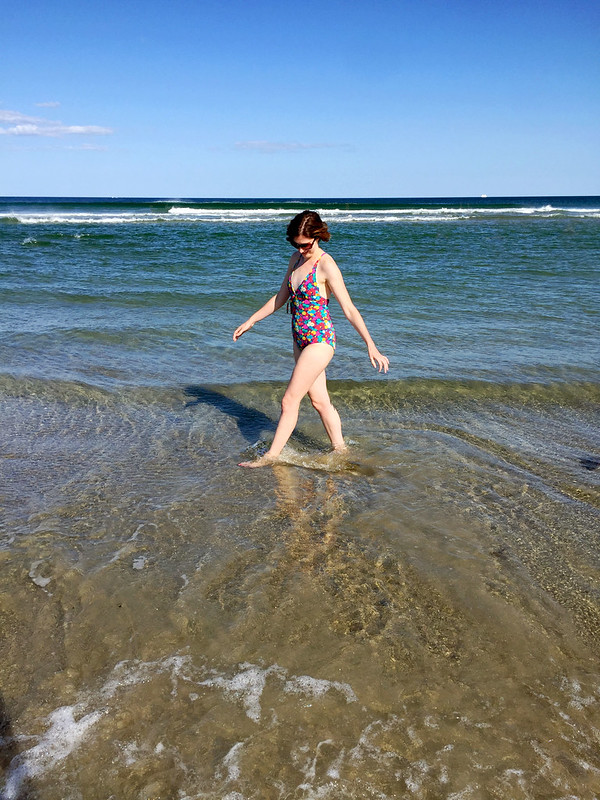
Overall, I really enjoyed wearing this suit on vacation last week to Ogunquit, ME and it checked off all of the boxes when I look for a one-piece suit: cute and stylish, on the somewhat modest side, but not too mumsy/mature looking. Despite my challenges with the pattern and things I wish I had done differently, I would make this again (or any patterns by Swim Style) but make sure to use the construction methods I know that work instead.


Avoca 6
 

Pattern: Avoca One-Piece by Swim Style Patterns
Fabric: Liberty spandex from The Fabric Store

Follow:

Linen Alder Shirtdress + Bronze Espadrilles

Linen Alder 1


You guys, I made a thing! Now that I’m done with classes for the semester, I finally finished my Alder Shirtdress that I started almost two months ago.

I’m trying to stash-bust this year and sew through the fabrics I accumulated over the past few years when I frequented NYC several times in a year for work. I picked up this striped linen on an impulse from Metro Textile last summer – Kashi said to take it and make a dress out of it, and it sat in my closet until some hot weather came our way and it seemed like a natural pairing with the Grainline Studio Alder Shirtdress. This linen is outside of my normal palette of colors and prints that I wear, but I absolutely love how it turned out.


Linen Alder 2
 

I previously made two different versions of this dress: a long sleeve shirtdress out of a chambray rayon and a tank version of this dress, both made last year. It seemed only natural that I should try making the original pattern! After making the tank, I realized that I needed to raise the bust dart since it was hitting way below my bust point. I raised it about an inch, but it could have gone up more since it’s still not quite where I need it to be.  But it’s not too noticeable, so I’m ok with it.


Initially, I was nervous I wouldn’t have enough fabric to match the stripes up across the front and back, but I lucked out with having just enough.  I’m so happy with how well everything matched up! I purposely tried to have the black stripe hit around the waist for a slimming effect instead of the thick band of white at my midsection.


The other thing I find interesting about this dress vs. the long sleeve version that I made is that I really like how this dress looks as-is and don’t feel that it needs to be belted or cinched in at the waist like I do for the long sleeve dress. My guess is because the Alder is more fitted across the chest than the pattern hack I did with the long sleeve dress, where I took the top part of the Grainline Archer Shirt pattern and combined it with the skirt of the Alder dress. My personal style is changing as well and I’m gravitating towards more loose fitting garments, and I’m less inclined to make and wear more fitted styles. So, the fit of this dress is now exactly what I’m looking for – especially when it’s hot outside.


Linen Alder 3
 

The back yoke and button band were both cut on the bias because there was no way I was going to even attempt to match those stripes up. I also opted to not use a lining piece for the yoke and serged the seams instead when joining the yoke to the back of the dress as a finishing option. I’m not even sure that I would have had enough fabric to line the yoke if I wasn’t lazy, which, confession: I was.


Linen Alder 4
 

Say hello to my new beauties! After making two pairs of sandals this summer and looking for inspiration on Pinterest for what to kind of shoes to make next, espadrilles seemed like the easiest and most beginner-friendly style to attempt next.  I found these soles on Etsy and they came straight from Spain, where authentic espadrille soles are made.  What I like about these soles is that they have a rubber bottom and heel, which makes them more durable and wearable than soles that are 100% jute. I also have a pair of espadrille wedges that I think I’ll save for next summer, I just don’t have the time (or materials) to make them this summer.


Linen Alder 5
 

I drafted this pattern off of a wide sandal strap pattern I had, but hand-drew the shape of the vamp based on a pair I saw at Nordstrom. The upper is made out of an Italian goat leather with a foil treatment to give it a metallic look, and lined with a light brown Nappa lamb. Using a leather roller foot, I stitched the lining and upper together along top and the vamp, and then hand-stitched the upper to the sole using a special cotton espadrille thread and needle. The machine stitching is far from perfect and it’s going to take some time to get used to sewing leather on my Bernina, but I’m please as punch with how these turned out! It’s almost as if they’re made for this dress.


Pattern: Alder Shirtdress by Grainline Studio
Fabric: linen from Metro Textiles
Sandals: self-made, own pattern

Follow:

Leopard Fur Coat – McCall’s 7257

leopard fur coat
 

This is my dream coat – I always wanted a leopard fur coat! They remind me of old Hollywood actresses like Jean Harlow, and it adds a certain kind of glamour and swankiness to any outfit…even with my jeans and sneakers. When I got an email alert from Mood that this leopard faux fur, which I wanted for over a year, was back in stock, I immediately snatched it up and started planning the type of coat I wanted to make.


leopard fur coat
 

There aren’t a lot of faux fur coat patterns out there right now, and I dug around online to find some vintage (aka 80’s) pattern inspiration. I ended up using McCall’s 7257, which was in my stash, but wanted to add a collar to the neckline based on an older pattern I found – it just felt like it was missing from this coat pattern. Drafting the collar wasn’t hard, it’s pretty much a rectangle folded in half and attached to the neckline, but I used my pattern drafting book to make sure I took the neckline measurements correctly when drafting the collar and marking notches.


leopard fur coat
 

The pattern itself isn’t hard, but this being my first time working with faux fur, I took my time and used some different techniques to work with the fur. For starters, all pieces were traced onto the wrong side of the fur, a knitted backing, with a sharpie and cut in a single layer. However, you can’t cut into faux fur like you would any other fabric, otherwise the fur will look like it got a really blunt haircut. Instead, you make tiny snips through just the knitted backing, which gives the fur an angled look, and these longer lengths of fur will make it easier to disguise the seam line after you sew. If you’re working with faux fur, make sure you have a vacuum with a nozzle attachment handy! After cutting out each piece, I vaccumed any loose fur on my cutting mat and carefully went around all of the edges of my cut piece, sucking up anything else that came loose during the cutting process. It didn’t 100% prevent fur from flying around while I made my coat, but it definitely cut down on the mess, and my husband was appreciative that our bedroom didn’t look like a muppet crime scene as I worked on the coat.


leopard fur coat
 

I used a walking foot as I sewed the entire coat; since the backing fabric is knit, there’s a tendency for faux fur to stretch, and the walking foot prevented that.  I also used Clover Wonder Clips for holding the seam allowances together because the fabric was so bulky and they were easier to use than pins. As I sewed, using a long zig-zag stitch, an awl came in handy to poke the loose bits of fur back into the seam allowances.  Then, I used the awl once the seams were sewn to free the bits of looped fur ends stuck in the seam allowances (I also read that a comb is useful for this as well if you don’t have an awl). Some people trim the seam allowances down to a 1/4″ before they sew or shave the fur from the seam allowances, but I opted to forgo those techniques and instead trimmed the seam allowances down after sewing and finger-pressed everything open. That’s pretty much how everything was constructed!


leopard fur coat
 

My only sticking-point with this coat is the size of the pockets, I wish I thought to make them bigger. They’re comfortable for just a hand, but when I put my iPhone 6 in the pocket, it’s on the verge of being too small and almost sticks out of the pocket. On top of that, the pockets feel like they’re set back so far because this is an oversized coat, so I have moments of panic where I can’t tell if my phone is still in my pocket or not. In the future, I need to check pocket sizes on coats and re-draft if necessary.

For the finishing touches, I added five brown coat hooks placed exactly as the pattern describes: one at the neck and then each subsequently placed 5″ apart. If you’re using coat hooks, which are pretty large, make sure to tack down the end of the hook close to the bend and on either side of the loop part of the eye. Otherwise, your hook will pull away from the front of the coat and when the coat is worn, it will pull and the lining will be exposed. If you tack down the hook and eye in this way, the coat will stay neatly shut.

I also hemmed the coat by hand at the bottom instead of by machine, which is what the pattern recommends, since the fabric was a little wonky and stretched out. I believe I took the hem up about 1.5″.


leopard fur coat
 

This coat is super warm, too! The faux fur is dense to begin with, which helps, but I lined it with a brown flannel-back satin lining and interlined it with lambswool to make certain that I could wear this in cold winter weather. On a recent 20 degree day in Boston, I was toasty-warm waiting for the train!


Pattern: McCall’s 7257
Fabric: faux fur – Mood; satin coat lining – Britex; lambswool – Steinlauf and Stoller

Follow:

Boucle Kochi Kimono

boucle kochi kimono
 

One more Kochi Kimono to share before the year runs out! This time, out of a bright pink wool boucle.


boucle kochi kimono
 

Abby made a cozy-looking version that inspired me to try out this pattern in a boucle, and it does not disappoint. For this version, I cut out view 3 for a simple, loose jacket that slightly overlaps in the front.


boucle kochi kimono
 

The size small definitely feels oversized, but I like it this way. I mean, look at how large the back is! But for something woolly and cozy like this, I like how it fits.


boucle kochi kimono
 

This one came together even faster than the first version since there were no pockets or ties to sew. As a shortcut, I serged the edge of the neckband instead of turning under the raw edge, folded the band in half to the inside, and topstitched everything in place. All the edges were serged before stitching as well, to prevent any unravelling.


boucle kochi kimono
 

I’ll be wearing this a lot this winter, it’s a great layering piece! Just goes to show how a pattern can look so different in different types of fabrics.

Pattern: Kochi Kimono by Papercut Patterns
Fabric: wool boucle from Mood Fabrics

Follow:

Floral Kochi Kimono

floral kochi kimono
 

I guess I’ve been on a sewing tear lately! I like to keep a running list of patterns I want to sew by season, and I made just about everything I wanted to for “early” fall and the fall season (blogging about all of them is another story, hah). I had some tough classes this semester as well, but by taking just one at a time instead of doubling up (they were both accelerated, half-semester classes), I had much better work/school/life balance than in the past. Now, to enjoy the month off between semesters, ahhh….

Anywho, I wanted to share my first Kochi Kimono that I made a few weeks ago! The Sakura Collection released by Papercut Patterns earlier this year is full of fabulous designs and this is the second pattern I made from the collection (the first being a pair of un-blogged Nagoya pants).


floral kochi kimono
 

floral kochi kimono
 

For my first version of this pattern (the next one will be on here next week!), I cut out view A since I loved how the ties looked and the different ways you can wear this. In my experience, Papercut Patterns run on the large size, but I opted to cut a size small because I wanted that boxy, oversized look with this top – I think I got that! This top was super-easy and quick to make, but I was puzzled on the instructions for attaching the ties and couldn’t understand how the heck I was supposed to tie this with the way the ties are sewn on to the side seams, so I made them so that the ties tie inside on one side and outside on the other side. Maybe that’s what you’re supposed to do? Dunno, it was hard to tell from photos on their site and I just rolled with it, plus it ensures that the top stays in place and you don’t have to worry about constantly adjusting the underlap.

I also really like how you can wear this in two different ways. On the first day I wore this, I started the day off wearing it as you see above, crossed over like a kimono jacket. After going to the gym and changing, I switched to wearing it like I did in the very first picture of this post, just like a haori jacket I made waaaay back in high school in 2004.


floral kochi kimono
 

What makes this kimono top/jacket even more special is the fabric – I bought this in October during a work trip to Madrid. I originally planned on using this floral poly for some kind of dress, but once I got home and looked through my patterns, the Kochi Kimono and my new fabric just clicked together!


floral kochi kimono
 

Pattern: Kochi Kimono by Papercut Patterns
Fabric: poly crepe from Ribes y Casals (Madrid)

Follow: