Living in Lindens


floral linden1

Pattern: Linden from Grainline Studios
Fabric: floral scuba knit from Metro Textiles, black fleece from Fabric Place Basement
Size: 4

Jeans: Paige Denim
Sneakers: Reebok

Happy New Year!  It’s the first Monday after the holidays and the winter “blahs” are setting in for me…temps are dipping waaaay low this week (12 degrees tonight, brrr), the snow we’ve avoided in New England so far this winter arrived last weekend (with more to come this week), and spring feels very far away.  So what’s a gal to do but hunker down with some tea and whip up some cute sweatshirts!


floral linden2

As the title of this post suggests, I’ve been living in a couple of new Linden sweatshirts I recently made over the past few weeks.  At first I wasn’t sure about the pattern – the fit is much boxier than garments I usually wear and felt like I was wearing a big, shapeless sack for a top.  But since I kept reaching for my first version over and over again, made out of a navy striped double-knit, I knew that the style grew on me and I really liked how easy it is to wear!


floral linden3

Like a lot of Jen’s patterns, the Linden is versatile and can change in look and feel depending on what kind of fabric you use – heck, I wore my gray version for New Year’s Eve with some sparkly necklaces and skinny black pants.  For my third version, my favorite, I paired a floral print scuba knit (aka neoprene) for the front with a super soft black sweatshirt fleece for the rest of the sweatshirt.  I like that the floral makes it a little dressier and special than a regular sweatshirt, sort of unexpected.  When I was sewing this, I kept getting flash-backs from the 90’s of a floral shirt and leggings set I wore in elementary school!

I made all of my Lindens on my serger, which made them a fast sew.  Like, criminally fast, even for someone as slow as I am.  The only change I made was to lengthen the neckband pattern piece by about 5/8″ since it was too difficult to stretch correctly on my first version.  The longer length fit better around the neckline, and I didn’t get any puckering as a result.


floral linden4

I never miss an opportunity to take a cheesy photo.

In all honesty, the Lindens I’ve been making are just “sewcrastination” – I keep putting off prepping for my Great Coat Project of 2015.  I have one more project that I’m just about finished with (which will be my first finished garment of the year!) and then I’ll start.  Pinky swear!

Follow:

Plans for 2015


Sharing these two new patterns I bought today that I'm really excited about: a DKNY coat (in the January @threadsmagazine) and a blazer pattern (hard to see the line details with the plaid but its's cute, I swear!) #bpSewvember

Christmas is less than a week away, can you believe it?  I have the luxury of being able to visit my parents in PA and work from their house, and in the evenings this week I’ve been planning out some projects that I’ll start when I get home after the holidays.

A few weeks ago I posted plans for a Gerard coat out of Italian wool from Mood Fabrics.  Well, I learned my lesson: order fabric swatches before buying online.  The wool arrived later that week and looks and feels absolutely gorgeous, but it in no way, shape, or form is it suitable for a coat, like it was classified on Mood’s website (since ordering, they’ve changed their search menu classifications).  Looking at the fabric description now, it says it’s a medium weight and would be good for a suit or dress, which I agree with.  So, I’m now going to use it to make a blazer.  I bought the above Vogue pattern for the jacket and made a muslin this week, but I think I’m going to look for a different pattern option – the Vogue blazer is completely cut on the bias and I have some fitting issues in the back that I don’t want to deal with.  Hoping the Simplicity pattern I bought for Pam Howard’s Modern Jacket Techniques class on Craftsy fits the bill!

As a side note, have you seen Sonja’s kick-ass Gerard??  Seriously, that girl has skillz.  And a lot more patience than I do to get the PDF pattern assembled!

And now, on to what will be called The Great Coat Project of 2015 – I present to you my fabric selection for Vogue 1365:

coatplans

I found a beautiful cashmere coating fabric and coordinating rayon lining at Metro Textiles this month on a recent NYC trip – purple is a color I’ve been gravitating towards a lot this year, and the thought of a deep purple winter coat made me swoon.

As I’ve been sourcing my materials for this mega-project, there are some things I’ve been trying to take into consideration.  Cashmere, it turns out, needs to be underlined to give it structure and support when tailoring.  I’m thinking about using flannel for underlining (plus it’ll serve as interlining for extra warmth), but I’m scared that even after I preshrink it, it’ll shrink further.  I also invested in two different weights of hair canvas at Steinlauf and Stoller (so I can try different options), additional sew-in interfacing (just in case), shoulder pads from Sil Thread, and a buckle kit and coat snaps from Pacific Trimming.  And I’ve been reading up a storm: combing through my tailoring book for bits of info and tips, reading a new tailoring book Chris gave me for Christmas, scouring various blogs for tips on coat making, digging through Threads magazines, and so on.  I want to be as prepared as I can be to make this coat a success!

That’s pretty much it going on around here…the rest of the year will be pretty quiet.  I did bring my serger with me with plans to sew up some clothes for my sister this weekend, which I’m looking forward to!  More on that later 🙂

Follow:

Pattern Review: Butterick 5454 [DVF Dress]


DVF Wrap 1

Pattern: Butterick 5454, view B
Fabric: ITY knit from Fabric Place Basement

Watch: Michael Kors
Boots: Bandolino
Lipstick: Nars Funny Face (my fave color!)

I wanted to call this post “flat girls can wear wrap dresses, too!” because yes, with a few alterations, it’s possible to get a wrap dress that fits and doesn’t gape open.  Originally, I attempted to make a version of this dress back in 2012 with no success and a lot of gaping – I just didn’t have the energy or motivation to fix yet another dress that was too big in the bust for me.  I wrote off wrap dresses as one of those cute dresses that only girls with a chest could wear and would never grace my closet.  However, after getting sucked into a marathon of “House of DVF” reruns and seeing all of the beautiful wrap dresses gracing the contestants, the idea of making a wrap dress consumed my sewing thoughts
and I needed to conquer my fitting challenges.


DVF Wrap 2

Ladies of the small-busted variety, here’s our fitting challenge when it comes to wrap dresses: the surplice length of the wrap is usually too long.  We don’t need a lot of fabric to cross over and cover our chest, which leads to the excess neckline length and extra fabric drooping near the tie.  Sure, we can try and tie the dress tighter, but we still don’t get the secure fit of a neckline laying close to the body, or we have to wear a cami underneath the dress for modesty.

Threads Magazine #168 from September 2013 is a great resource for fitting wrap dresses and really helped me get the fit of my dress correct.  Here’s what you do: on your pattern, make a small tuck along the neckline above the bust, and another small tuck below the bust – I made two 1/2″ tucks for a total length reduction of 1″.  That’s it – excess length is reduced.  For more modesty, I also gradually raised the neckline 1/2″ to ensure better coverage and that this dress would be work-appropriate. 


DVF Wrap 4

Bias can be tricky to work with, but when you have bias with a knit fabric, watch out – chaos can quickly happen if that sucker isn’t stabilized asap.  To get a stable neckline, I used a technique from Sandra Betzina’s Power Sewing book – 1/4″ twill tape.  I measured the neckline length on my altered pattern piece and cut two pieces of twill tape that exact length for each side of the neckline, plus one for the back neck (note: she recommends different lengths depending on your bust size).  Then, with the knit fabric against the feed-dogs of the machine and the twill tape on top, I eased the neckline onto the length of the twill tape on the wrong side of the bodice front.  I was pleased as punch when I tried the dress on, wrapped the neckline, and had zero gape.  I feel like I achieved the impossible!

The other part about this pattern I liked, versus other wrap dress patterns that are out there, is the fact that there are no pleats underneath the bust near the ties like with Vogue 8379 or Vogue 8784.  With pleats comes extra volume and fabric, and I’m not sure how easy it would be to get that design element to fit on a small bust and not cause gaping.


DVF Wrap 3

The skirt on this dress has a slight flare, but is more of a straight skirt style than an A-line skirt seen on some other wrap dresses.  There’s some pleats in the skirt in the front and the back, which I didn’t mind since you don’t see them with the pattern of the fabric.  Now that I got the bodice to fit, I want to try to match different wrap skirt styles to get different looking dresses – maybe even turn the pleats in the skirt and bodice into gathers?


DVF Wrap 5

There’s a whole world of dress options open now, this is just the beginning of wrap dress sewing!  I immediately earmarked some jersey fabric that’s been in my stash for a while as new wrap dress projects, and I cut out a turquoise merino wool knit fabric the other night for a winter-ized version.  Wrap dresses are like secret PJs: polished looking, but so comfy and easy to wear.

Follow:

What’s Next – Gerard Coat


Ok, now I want to sew all the things, this could be my new way to plan out my sewing. #bpSewvember

After finishing my Alisha Dress (I need to take pictures!), I felt kind of stuck with what I wanted to make next.  Don’t know about you, but I feel less inspired to sew when the weather gets cold, and it’s been pretty nasty cold this past week – all I want to wear right now are hoodies and sweatpants.  Last night I pulled out my Fashionary for the first time and started to sketch and color some ideas, based on some cute outfits I saw on Pinterest and what was floating around in my head.

I fell in love with an oversized, tweedy wool coat I saw – the girl in the photo paired it with skinny black pants and purple Hunter rain boots, topped off with a black slouchy hat.  Maybe it’s because I was freezing my butt off last night in my apartment, but a big, oversized coat feels like the perfect next to make for the impending winter weather.  And I absolutely love coats!  Living in the Boston area, I have quite a collection of coats and jackets for all weather.  Since winter seems to last forever here, a variety helps to make the winter a little more bearable.


gerard coat plan

I hemmed and hawed and looked at a lot of options, but the Gerard Coat from Republique du Chiffon is the best pattern choice I could find – the styling is just right, and I may lengthen it a bit for more booty coverage.  I’d like for this to be a coat I can wear in moderate cold weather (around the 25-30 degree mark), so I’m debating whether to use flannel or Thinsulate to interline it.  Never using Thinsulate before, I’m not sure how thick it is or how it will change the drape of the wool; I’ll have to wait for my fabric from Mood to arrive to make a decision.

Hopefully the fabric will arrive by the weekend!

Follow:

Learning About Lace – How To Work With a Couture Fabric


Alisha Dress sneak peek

Pssst – here’s a sneak-peek of what I’ve been working on over the last few weeks.  When I decided to make a dress completely out of lace fabric for a friend’s upcoming wedding this weekend, I didn’t anticipate the challenges that would come along with working with such a, well, see-through and airy fabric! 

Ladies, there’s a reason why those lace wedding dresses on “Say Yes To The Dress” are wicked expensive – sure, the name on the label inflates the price of a wedding dress, but working with lace is very time and labor-intensive, and to achieve a seamless-looking garment, there’s a lot of couture sewing techniques that need to be used.  Of course, none of this occurred to me until I sat down with my sewing books and did a little reading about how to work with lace fabric.  Here’s what I learned and how I made my dress.

Lace needs to be cut in a single layer

To get a seamless look, each pattern piece needs to be a full pattern piece (no half pieces) and cut on a single layer of lace.  This allows you to match up motifs when planning out how to cut out your garment so the lace pattern can continue through the garment without any interruption at seam lines.  Then, cut around the motifs that extend beyond the edge of the paper pattern, which will be appliqued on top of the joining garment piece at the seam line (this only needs to be done on the garment front pieces, not both front and back.  You’ll see why later when we sew the seam).  My lace pattern was so busy that I didn’t need to worry about matching up motifs.

Also, did you know that lace doesn’t have a grainline?


Thread tracing on lace is hard work. #sewing #couture #fancypartydress

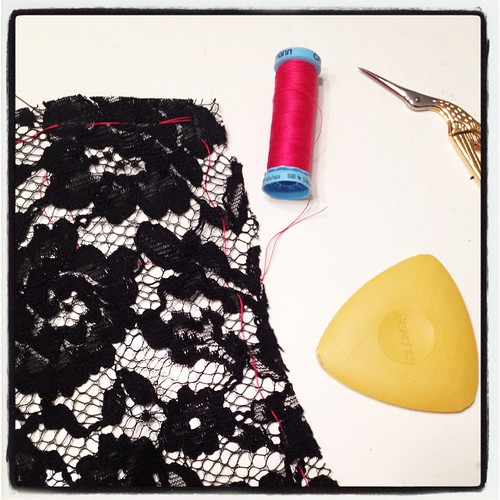
Mark all seam lines and notches with silk thread

After the garment pieces are cut out, seam allowances need to be thread-traced.  For my dress, I used hot pink silk thread and basted the 3/8″ seam allowance line.  Silk thread is great for lace since it slides smoothly through the fabric and is easy to remove after the machine stitching is in place.  I also used tailor’s tacks to mark darts and notches.  I tried to use tailor’s chalk, like in the picture above, but it was too difficult to accurately mark where I needed to mark because of the openness of the fabric.

Are you with me so far?  All of this prep work took about two nights to complete, whew!


A new technique for #bpSewvember - lace appliqué seams. No ugly seam allowances showing through on my lace dress! I was super nervous about working with lace, but this is pretty easy to sew. Plus, my print is pretty busy so I didn't worry about matching u

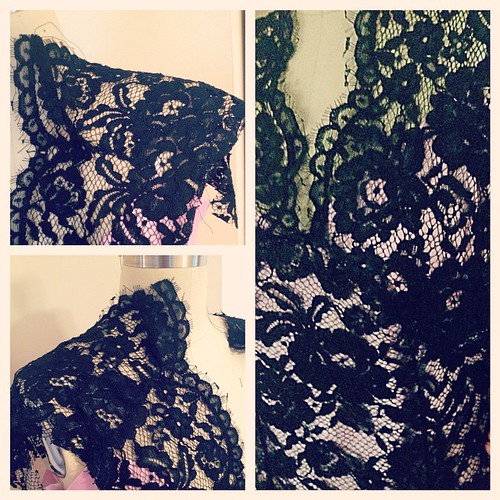
Applique seams for a seamless garment

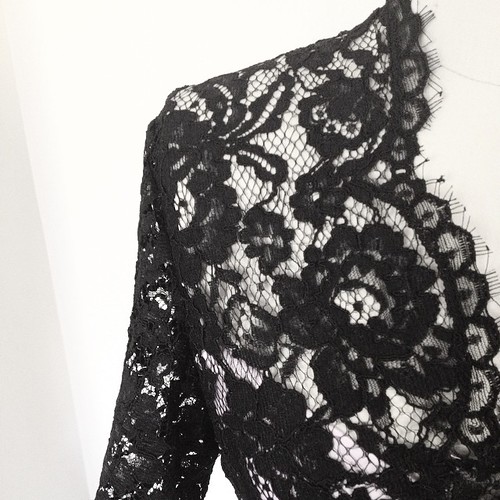
Since lace is see-through, seam allowances showing through is not the most ideal look.  You could sew French seams, but the seam will still be visible through the lace, and some lace is too bulky for that kind of seam treatment.  To get the illusion of a seamless garment, like in the photos above, I used applique seams.


applique seam

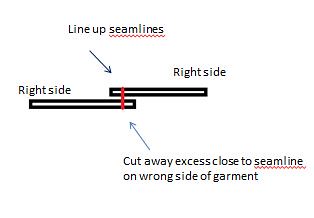
To explain, I’m going to reference sewing a side seam in a dress.  Layer the right side of the dress front over the right side of the dress back, lining up the seam lines – this is where the thread tracing comes in handy!  There will be excess extending from the seam allowances on the top layer because of the motifs that we cut around beyond the seam allowance.  Then, using a narrow zig zag, sew around the motifs along the seam – you may end up sewing pretty far away from the original seamline, but that’s ok.  When you’re finished sewing the entire seam, use your applique scissors to cut away the excess fabric underneath on the wrong side, close to the seam line.  Voila – seamless looking seam!  I also needed to cut away some of the fabric on the right side of the garment, close to the stitching.  If you’ve ever appliqued in quilting, sewing applique seams is a very similar technique.

I found this video really helpful when I tried to wrap my head around applique seams.  The only seams that I didn’t applique for my dress were the sleeve seam, because it was so short and no one will see it unless I lift my arms up, and the armhole seam…because that would be way too hard.  If you don’t want the armhole seam to show through, you could bind it with a bias strip of silk close to your skin color.

Applique seams also helped me out of a bind – I thought my muslin for the dress fit me fine in the hips, but when I sewed the side seams in my lace garment, it was too tight.  Like, I couldn’t sit down!  I have my theories on why this happened (I think it had something to do with a tuck of fabric I took out in the bust/waist), but I cut open the side seam where I had fitting issues and appliqued what was essentially a lace gusset to get more room in the hips:


Untitled


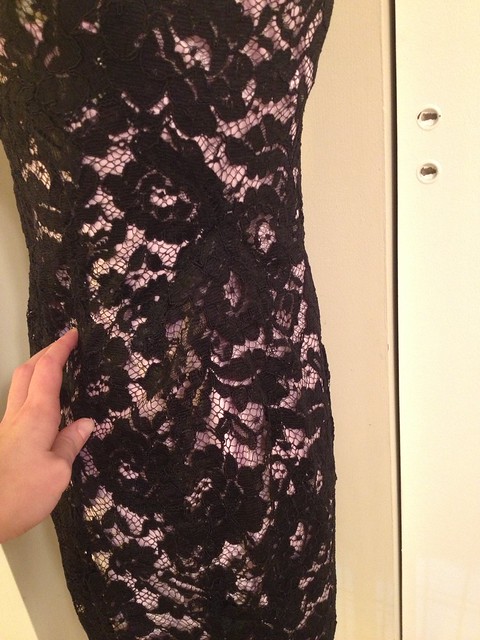
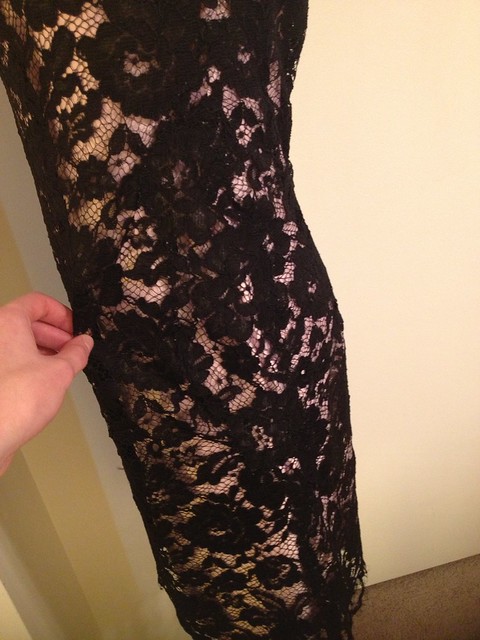
I can tell where I inserted the gussets (and maybe you can, too!), but you have to admit, it’s pretty tricky to see where the seams are.  Applique seams totally saved this dress from being a tragic disaster.

Yes, you can insert an invisible zipper in lace

Don’t get me wrong, I was sweating bullets and so nervous when I sewed my invisible zipper in the back.  I mean, what if I screwed up and got the zipper twisted?  Spoiler alert: I did!  What saved me was that I basted the zipper in first and used a contrasting thread so it would be easier to see the stitches if I needed to rip them out.  Just taking some simple precautions beforehand makes it possible to sew a zipper in a lace garment.

Here’s the big question: would I ever sew with lace again?  Well now that you mention it, I have some lace in my stash for two simple blouses, but I don’t think I’d jump at the chance again to make a lace garment like this knowing all of the labor and time that goes into constructing a lace garment.  Lace is not for the faint of heart, my friends!

Have you ever sewn with lace? 

Follow: