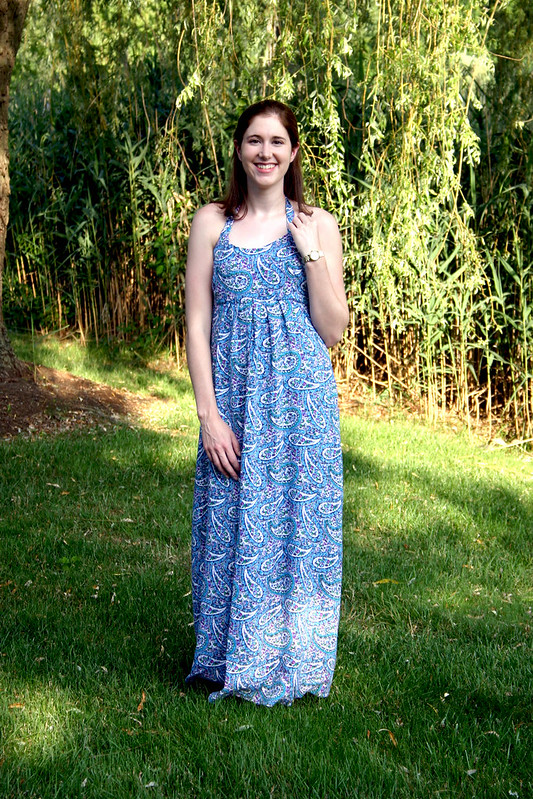
Finished Project: Lonsdale Dress [Sewaholic Patterns]


lonsdale 2

Pattern: bodice Lonsdale by Sewaholic
              skirt By Hand London Charlotte Skirt
Fabric: stretch cotton sateen from Metro Textile
Size: bodice – 4; skirt – 8

Earrings: Charming Charlie
Sandals: Nine West
Sunnies: Tommy Hilfiger

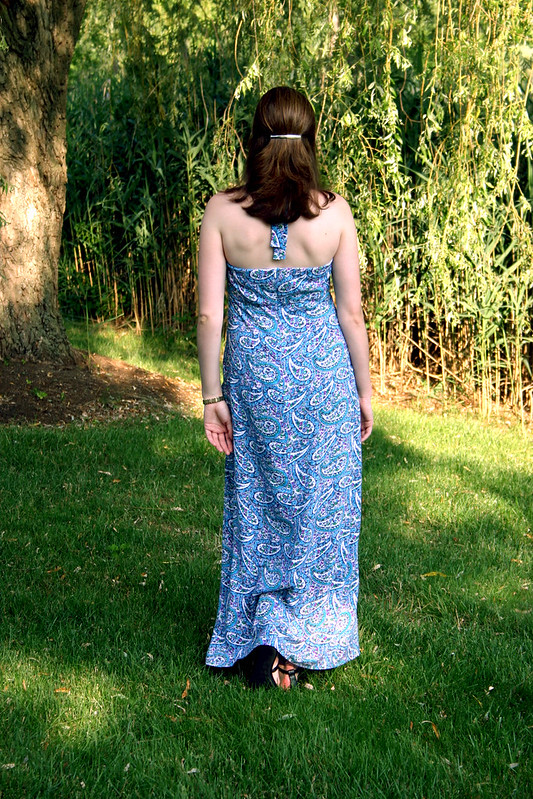
That Sarai, she’s got some great ideas – did you see her white Lonsdale dress a few weeks ago?  Pure fabulousness, especially in all white for summer.  Sue gave me this pattern last year during the spring sewing swap and I’ve been saving it for just the right fabric; I thought my paisley rayon in my stash would be perfect, but realized just before cutting into it that the paisleys were directional.  Darn it!  But what I loved about Sarai’s version is how she changed the dress from a flowy skirted number to a form-fitting silhouette.  When I considered that design change, I discovered I already had the perfect fabric all along.


lonsdale 4

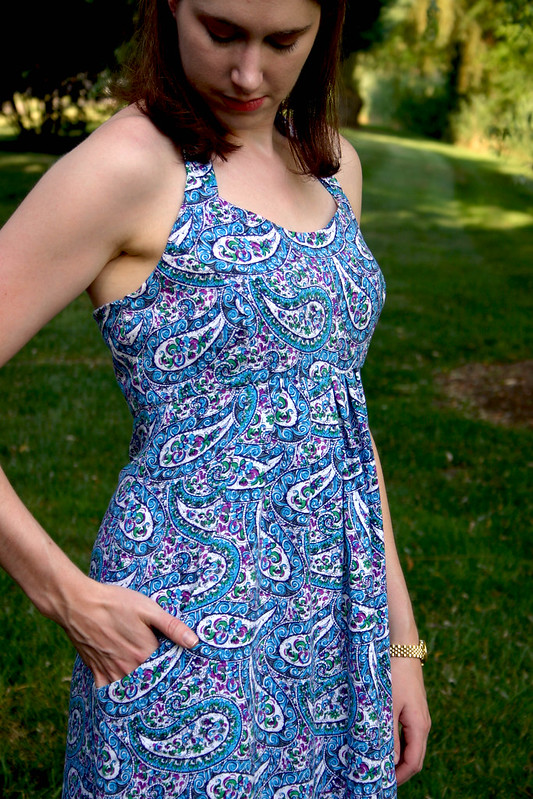
I make a point of going into Metro Textile with a focused shopping list of what I need to find, but always walk out with something unexpected that I’m not sure what I’ll end up using it for…such is the case with this fabric from my last shopping trip.  “Buy three yards, make a dress,” Kashi said.  Those three yards were exactly what I needed to make this dress, what luck!  I love the body and weight of this cotton sateen, and with the little bit of stretch, it doesn’t wrinkle at all and makes the skirt easy to sit and move in.


lonsdale 1

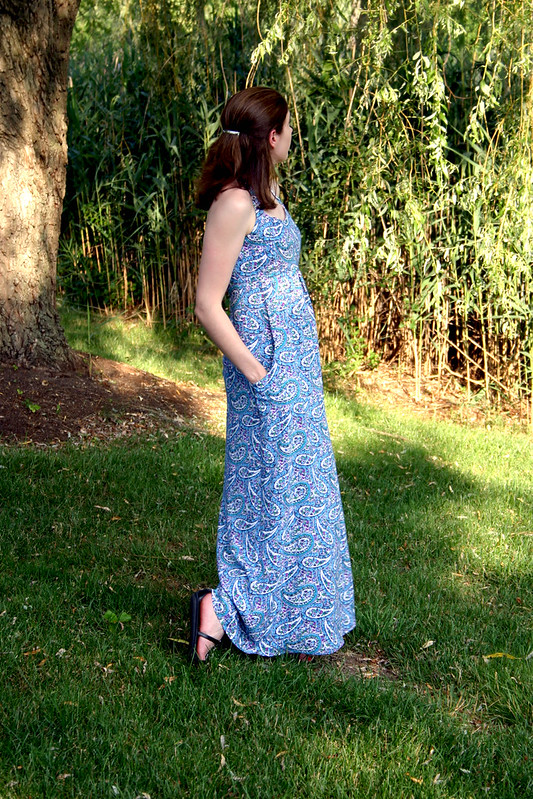
So how did I go about making this pattern hack?  Well, I didn’t have the confidence or pattern drafting abilities that Sarai has to alter the original skirt pattern for the Lonsdale dress – it was on the bias, a-line…didn’t want to touch that puppy and risk screwing up.  Instead, I turned to my trusty and beloved Charlotte skirt pattern.  The waist of the Charlotte skirt measured the same as the Lonsdale bodice in my size, so it was a no-brainer to go that route instead of drafting my own pencil skirt.  What I did end up drafting was the curved pocket, to emulate the pockets on the original Lonsdale skirt…I do love me some pockets in my skirts and dresses.

The pocket drafting was pretty simple: I copied the curve of the original Lonsdale pocket onto my Charlotte skirt pattern (traced, of course) to get a general shape, and tweaked it a little to fit the shape of the sides of the skirt.  I also took the original pocket pattern piece of the Lonsdale dress, altered the curve, and shrank it down slightly since I was worried that the original pockets would be too big for a tight fitting skirt.  Easy-peasy change, and now I can make my future Charlotte skirts with pockets!


lonsdale 3

With the fabric being a bit stiff, it’s easier just to knot the ties instead of tie them into a bow.  I think the straps are my favorite detail, they make the dress so different than other patterns out there and RTW dresses.  This is why sewing is awesome!!


lonsdale 5

Ok, I had to include this shot – Chris took pictures, unbeknownst to me, of me peeking through a crack in the fence at the horses next door and I couldn’t stop laughing!

Well, that’s my last garment of the summer.  I finished this a few week’s ago to wear to a party with Chris and his family, and now I’m tucking it away until our winter vacation somewhere warm in January (I hope!!).  So far for 2014, this dress just may be my favorite garment of the year…but I have a long list of garments to make for the balance of the year, so who knows!!

Follow:

Finished Project – Ukulele Case


ukulele case1

I have a new hobbie, and no, it’s not of the crafty variety.

Ever since visiting the Martin Guitar factory in July and learning about the ukuleles they make (I had no idea!), I’ve had a longing to learn to play one.  They’re not as intimidating to learn as a guitar, and with Chris absolutely enamored with the mandolin I bought him for his 33rd birthday, it made me want to learn to play a stringed instrument so we could play songs together (however, he’s been playing guitar for over 20 years…I have some catching up to do…)

Playing the ukulele is So. Much. Fun.  I’ve had my little guy for about two weeks now and can stumble my way through a handful of chords and some songs like Somewhere Over the Rainbow, Octopus’s Garden, Hotel California, and Both Sides Now.  Since we were leaving to go on vacation to Ogunquit, ME shortly after my ukulele arrived, and I didn’t want to lose out on a week of practice, I whipped up a carrying case from some fabric in my stash so I could take my uke to the beach.


ukulele case5

To make a pattern, I traced around the body and neck of the ukulele on pattern paper, adding seam allowances and wiggle-room to make it easy to take the uke out of the case and put it back in.  I also measured the depth of the ukulele, so I knew how wide to make my side panels.

Even though this is a cheap uke I bought online, I wanted the case to be durable enough to protect my instrument from bumps and scratches.  The case is made up of leftover quilting cotton from a few years ago, a layer of stiff interfacing, craft fleece, and a flannel lining.  If I was to make a uke case again, I’d use a different fusible interfacing than the craft kind I found, maybe a woven fusible.  The interfacing creases around the neck and isn’t as stiff as I’d like it to be.  I’d also use fusible fleece instead of the regular fleece I had kicking around, it’d be much easier to work with.


ukulele case3


The zipper I used was a 36″ robe zipper, so I cut two 36″ rectangles half the width of the side panels and attached the zipper to the middle of the two pieces to create the zipper portion of the case side panel.  Then, I measured around the ukulele to see how long I needed to make the other side panel piece, cut it out, and sewed the short ends of the zippered panel to the new, shorter panel, forming a loop.

Sewing the side panel loop to the main body of the case was the hardest part – trying to get a reinforced rectangular piece to bend and form to the curves of the ukulele body made me want to tear my hair out!  Not gonna lie – there was some swearing and seam-ripping. 


ukulele case4

The easiest way I could figure out to sew the webbing strap on was to do it by hand before attaching the lining.  I pinned the strap onto the side of the case, playing around with the placement of the strap so the body would balance when holding the strap like a handle.  The nice thing about the length of the strap is that it can be worn on the shoulder, and it’s not too long that I can’t hold the strap in my hand if I feel like it.


ukulele case2


I carted my ukulele down to the beach every day on vacation last week to get my practice sessions in without worrying about it getting scratched or banged up, thanks to this little case.  Funny enough, a guy on a blanket next to us one day also brought his ukulele to the beach – his was much nicer and more expensive looking than mine,  but had a boring black case.  I think I definitely trumped him there with my apple-print case!

Now please excuse me, I need to practice learning Stairway to Heaven…

Follow:

Sewing Treats


1e0a0286-d7d3-4fe8-bf93-2ffe991c091a

Whoa – it’s August.  How can it be that we’re in the last hey-days of summer already?  Personally, it’s felt like a weird summer to me with the weather – it was such a cool spring, and then it got hot all of a sudden, but not the kind of hot where you crave the beach (at least in my opinion).  There’s been some perks though: cool nights for sleeping with the windows open a lot, beautiful morning temps for running outside before work, low/no humidity.  I’m just worried with my beach vacation to Maine in two weeks that the weather won’t be not enough up north for swimming in the ocean!

Maine is my second summer vacation, I went to visit my family in PA two weeks ago with Chris.  It was so nice – (almost) 100% unplugged from work, hanging out with my family, just decompressing.  That doesn’t mean I didn’t do anything sewing related, though!  My mom and I went to a quilt show in Hershey, PA one afternoon, where I unexpectedly found some great sewing goodies, like the above vintage sewing pattern decorated with buttons.  I thought it would look cute in a frame on the wall over my sewing area.

The mother-load of the day was this:


Untitled

HIGH QUALITY THREAD, DUDES!!

This is 100% lint free poly-wrapped polyester thread from Superior Threads.  My mom told me about how some of her quilting friends raved about the quality of Superior Threads, so I was curious to see if they had any thread suitable for garment sewing.  I squealed when the vendor showed me thread that’s good for sergers and garment sewing.  I’m not going to lie – this stuff is not cheap.  However, when you consider the money invested in a serger and how much you use it (I use it a ton!!), it’s a shame to gunk it up with cheapy, linty thread from Joann Fabrics.  At 6,000 yds per spool, this seemed well-worth the money, and it’s been wonderful to sew with.  It’s a bit heavier weight than the Toldi Lock I used to use, but the stitches look more professional and smooth.  Can you tell from above photo that I stocked up??  You can learn more about Omni thread and see the colors available here.


Going along with the whole theme of lint-free serging and sewing, I finally bought a micro vacuum attachment kit to suck up all the dust bunnies from my Bernina and Babylock.  It’s one of those things where I don’t know whyyyyy I waited so long to buy one.

Here’s the before vacuuming photos of my Babylock (no scolding!):


Evil lint monsters!  You escape my lint brush every time!


Begone, lint!!  You will torment the insides of my serger no more!

Have you treated yourself to any sewing treats lately?

Follow:

Pattern Review: Simplicity 1800 [Oonapalooza!]


halter maxi1

Pattern: Simplicity 1800, view C
Fabric: rayon challis from Metro Textile
Size: 10 graded to a 12 at the hip

How have I not sewn a maxi dress until 2014??  I am so in love with this dress and how easy and elegant it is to wear.  If I could have a closet full of maxi dresses I would…well maybe not a whole closet, because I do like to show my legs in the summer, hahaha.

Sewing this dress coincided nicely with Oonapalooza month – you know, “What would Oona make?” (could we all get W.W.O.M. bracelets?).  Loud, bright colors and a funky print? Check.  Saucy silhouette that’s classy at the same time? check and check.


halter maxi2

This pattern is part of Simplicity’s Amazing Fit collection, which I’m a fan of – any pattern that offers different pattern blocks based on body type is a win in my book, especially when it comes to fitting the bust.  It’s hard to tell with the paisley print, but the bodice is constructed with princess seams that continue down into the skirt, which make bust fitting really easy.  I was very happy that I didn’t need to alter the bust when I tissue-fit the slim pattern block, woohoo!  That rarely happens.


halter maxi3

I’m planning on making the other views of this dress for the fall, with sleeves, and I have a feeling that the overall dress may fit better with those versions – here’s why.

The directions instruct to make an elastic casing at the top of the bodice back pieces, which I thought was odd for a halter dress, but the intention is for the elastic to support the back of the dress.  It didn’t work so well, even after tightening the elastic – the back bodice did not fit snuggle against my back.  In retrospect, I should have taken in the back bodice pieces and the side seams of the dress to get a better fit.  However, I just don’t think this piece was drafted correctly for a halter style dress, and instead was a cropped version of the regular back bodice piece.

I also had to make small tucks in the top of the bodice by the straps to prevent the top from gaping open – this wasn’t evident as I tried the dress on during the sewing process.  I ran into this problem before with another halter dress I made, and it was an easy (and invisible) solution to the fitting problem I had.  The problem stems from how the straps lie – they collapse and move in a bit when wearing and don’t support the top of the bodice, causing it to gape.  When they’re adjusted to lay in the correct position, the bodice is flat against my chest.  My theory is that if I make the other versions, the dress will lay correctly because of the sleeves supporting the neckline and fitting properly, and I won’t have a problem with gaping.


halter maxi4

The skirt is pleated in the front, which makes this dress great for eating a big meal…however it also makes me look a little preggo from the side!  A soft fabric is definitely best for a dress this style, anything stiff would make the skirt look like a tent.


halter maxi5

The way the pockets incorporate into the seam lines is genius, it’s like a little surprise, especially with a busy print.  They’re not too deep, but I can’t help putting my hands in them as I walk around.

Isn’t this fabric gorgeous???  I bought three yards with the intention to make a Sewaholic Lonsdale dress, but since the paisleys curve in one direction, and the Lonsdale requires a print that is mult-directional, it wasn’t meant to be.  No matter, I’m absolutely in love with the garment that this fabric turned into

Did you sew anything for Oonapalooza Month?

Follow:

Pattern Review – Lane Raglan [Hey June]


lane raglan4


lane raglan2

Pattern: Lane Raglan by Hey June, from Indiesew.com
Fabric: Cotton sweatshirt knit from Mood Fabrics
Size: Small

It may seem odd to sew a sweatshirt in the summertime, but when the nice folks at Indiesew asked me to try out some patterns from their site, I couldn’t pass up trying out the Lane Raglan sweatshirt.  Summertime in New England is fickle, and a short sleeve sweatshirt like this is something I can picture layering on in the evenings this summer on vacation in Maine – I’m actually wearing it over a tank top in these photos.


lane raglan5

This is such a great pattern, and is really the raglan sleeved top I’ve been searching for!  I’ve seen many versions of this shirt all over sewing blogs (my favorites are the ones Cut Cut Sew makes) since it’s such a good base for different design elements and changes.  Make it out of a drapy knit with contrasting sleeves for a flowy baseball-style shirt, or a beefy fleece for a cool weather sweater.  I like how there’s a good amount of ease in the size small, but I could go down a size to make more of a fitted top.


lane raglan3

I know this is going to be a TNT pattern, and it’s great for an instant-gratification project – I think I made this in an hour, including the time it took to cut out the fabric.  To “summer-ize” the sweatshirt, I cropped the sleeves and rolled up the bottom twice to create a 2 1/2″ cuff above the elbow.  Then, I stitched the cuff in the ditch along the sleeve seam line so it stays put when wearing.  I like the contrast of the wrong side of the knit showing outside, the texture is cool looking.


lane raglan1

The sweatshirt knit is from the third floor at Mood Fabrics in NYC – Oona is right, the third floor of Mood is a truly magical place.  This fleece is really different from fabrics I gravitate towards (I never sew with cream), and has a cool marled texture throughout.  It’s so comfy to wear, and I can’t wait to wear it more often once fall weather arrives.

Disclaimer – this pattern was provided to me for free from Indiesew.com

Follow: