A Video Update of My Wedding Dress

I got the base of the dress to fit - 181 days to go #weddingdress #sewing #diyeverything
Hooray for productive weekends!  I got so much done – unpacking from a trip, laundry, groceries, cleaning…oh yeah, and getting my wedding dress pattern to fit.  OH YEAH.

That’s right my fellow readers, I am now ready to cut out my wedding dress from the lovely silk, lace, and silk georgette I bought in September.  Good thing too, because tomorrow marks 180 until I need to wear this dress for the big day.

I thought it would be fun as I go through the creation process to share some videos of the different stages I’m working on – I think it’s a lot easier to show the whole dress and details through video since I can’t capture everything in a photo, like how the fabric drapes and behaves.  Here’s my second entry in my “Wedding Dress Diary” (the first one was a Periscope, which you can view here).


Follow:

When Bad Things Happen to Good Fabric


#mmmay15 ready to go out in my new jumpsuit, a hybrid of a @mccallpatterncompany bodice and @byhandlondon Holly trousers #sewing #mmm15

This was supposed to be a happy post about a sassy jumpsuit I made for a friend’s bachelorette party a few weekends ago in Boston. A post about how I took two patterns, the Holly pants pattern from By Hand London and a McCall’s bodice pattern from a dress, mashed them together, and came up with a jumpsuit that made me feel like a million bucks, as well as a jumpsuit that my fiance hated, which meant it must be 100% awesome (because boys are stupid sometimes).  I was man-repelling in this baby, and I didn’t really care.

However, that is not the story for this post.  But, it does have a semi-happy ending.


Monique L'Huillier Silk Crepe de Chine, digitally printed in Italy. Destined to be a jumpsuit to wear to a friend's bachelorette party next weekend. #nuffsaid #gonnabeepic #fabricheaven #sewing

Wanting to wear something special for a night out in the city, I splurged on some Monique L’Huillier silk crepe de chine, digitally printed in Italy. 

Did you catch that last sentence?   There is nothing not amazing about that sentence!!!  Her garments made out of fabric like this sell at Bergdorf Goodman, omg.

Stumbling upon amazing designer finds like that at Fabric Place Basement is why I keep coming back over and over again.  There were so many stunning prints to choose from, and I ended up landing on this green/black colorway that looked like abstract-printed butterfly wings.  Beautiful drape, easy to sew, and felt great on the skin.  I couldn’t wait to wear it when I was finished!


Untitled

A full-length shot in my hotel room before we went out to dinner – was loving this whole look so much.

We then proceeded to have a fun night of dinner, a cruise out in the harbor on a boat with a live band, and then drinks and dancing back at our hotel.  All-in-all, not a rowdy night, especially for a bachelorette party (we may or may not have asked some guys to pose for butt-judging contest…as you do when you’re out for a bachelorette paty!)

With all of that being said, someone please tell me how this happened all over the front of my jumpsuit:


Untitled

I started to notice this happening as the night went on.  At first, I thought it was fuzz from my white napkin at dinner, but it grew progressively worse and worse as the night went on.  Keep in mind, silk crepe de chine is a pretty durable fabric, dresses and blouses are made from it all the time.  I also want to mention that I didn’t wash/launder this fabric in any way, shape, or form before I made this, figuring if I needed to clean it I’d take it to the dry cleaners.  This pilling/pulling/bearding was all over the top of my thighs, lower part of the bodice, and along the upper side seams of the pants.  The back was completely fine, which I couldn’t understand!  If anything, if friction caused this, this should have happened to the rear-end from all of the sitting I did that evening.  Even when I got home, I tried to replicate this effect by rubbing and picking at the fabric, but I couldn’t get the fabric to behave as such.

So, I took my beloved jumpsuit to the store, spoke to a manager, and explained to her what happened – she was just as stumped and puzzled as I was as to why and how this happened.  After taking it to the back to show one of the other associates and figure out if there was any kind of solution to this, she came back out and apologized for this happening to my garment and gave me a full refund.  The whole point of taking my jumpsuit in was to let the store know they may have a faulty roll of fabric – I’d hate for this to happen to someone else!  I’m also really glad she was so understanding and accomodating, because this wasn’t a small amount of money spent on this project.

Trying to be the eternal optimist, I’m seeing the silver lining of this whole experience that this jumpsuit was a “first run” of the future version that I will eventually make again.  I really liked this garment, and got lots of wonderful compliments in the few short hours I wore it, so I know the next one I make will be just as fabulous to wear.  And yes, much to my fiance’s protestation, I will wear the new version out to dinner with him.  So there!

Have you ever had a freaky-weird situation with fabric for a garment you made? 

Follow:

Pattern Review – Butterick 6031


gertie slip 2

Pattern: Butterick 6031, view A
Fabric: slip-making kit purchased last year from Gertie (stretch jersey and lace trims included)
Size: 10 graded to a 12, A/B cup pattern piece

My progress on my Yona coat stalled this weekend due to a) making a big, stupid sewing mistake with the collar and running out of thread, and b) waiting for my flannel to arrive from Fabrics.com, the shipping has been soooooo slow.  So, I took it as an opportunity to whip up a quick project from Gertie’s slip sewalong kit that’s been lingering in my stash since last year.


gertie slip 1

Isn’t it pretty??  I just love how girly and feminine this slip is with the lace trims, light pastel color, and cute little bow.  This was a super-fast project that I whipped up in a few hours Saturday afternoon, and wore out to dinner that night underneath my dress for extra warmth.


gertie slip 5

I followed along with the sewalong posts on Gertie’s site, which were really helpful in guiding me on what size zig-zag stitch to use on my machine for attaching the different lace trims and sewing together the seams.  This is my first foray into lingerie sewing, and I’m not completely certain if it’s for me.  Sure, it’s pretty easy to whip up a cute bra or panties in no time, but when making this slip, I wasn’t a fan of the fiddly nature of stretch lace and flimsy, slippery fabrics.  It’s a different type of fussiness I guess I’m not used to.

The fit is spot-on with the pattern, the cups fit perfectly (which I wasn’t sure about, since it’s a combo A/B pattern piece) and I did my standard grading of taking the pattern from a size 10 at the waist out to a 12.  This gal is fitted, which is perfect for wearing under clothes – you don’t want anything too loose adding extra bulk and making it difficult for clothes to fit!


gertie slip 3

This fabric is a dream and feels absolutely soft and lovely!  It’s a stretch micro jersey that Gertie sourced for the slip kits (which I don’t believe are available anymore), I’d love to get my hands on some more.  Luckily, there was fabric leftover after I cut the slip out, so I have a pair of undies cut out to make and I can probably squeeze a cami out as well…I’ll just need to get some stretch lace trim.


gertie slip 4

However, I wasn’t a fan of using stretch lace for the straps, they seem really flimsy and not sturdy enough to function properly.  I think in the long run these straps won’t hold up to wear and tear, so I’m going to replace them with bra strapping I picked up at Fabric Place Basement.  That would be my only suggestion to anyone looking to make this – find real strap material, because stretch lace aint gonna cut it.

Have you tried sewing underpinnings?  The new issue of Seamwork has some great information on fabrics and sewing techniques for lingerie, and a cute bra and undie set that I think I want to try!

Follow:

Pattern Review – McCall’s 6711 Wool Blazer


wool blazer 1

Pattern: McCall’s 6711, view A
Fabric: Italian wool from Mood Fabric
Size: 10

Shirt: Gap
Jeans: Gap
Sunnies: Tommy Hilfiger

Remember my post from November about this fabric?  I originally slated it for a Gerard Coat, but when the fabric arrived, I realized it was much too lightweight for a coat and more suited for a blazer.  Then, I thought about using Vogue 8887, but the muslin I made had some fitting issues in the back I didn’t want to deal with, and the entire front and back was cut on the bias – something else I didn’t want to deal with.

The blazer from McCall’s 6711 was on my sewing list from fall, and seemed like a good alternative pattern.  It has simple princess seams and a one-piece collar that would be easy to fit and sew, so I decided to take a stab at it – the muslin was perfect!  Not a thing to alter.

With beautiful wool fabric like this, I wanted the blazer to turn out looking like a well-tailored, high-end blazer worthy of a designer label inside.  If I do say so myself, I think I did a pretty good job!  I owe all of it to Pam Howard’s tailoring classes on Craftsy, which I’ve been watching obsessively (and highly recommend!).  A lot of the extra steps I took elevated this blazer from a quick-and-easy sew to a in-depth project with nicer, more professional results – here’s what I did.


wool blazer 2

Interfacing

Modern tailoring really comes down to choosing the right weights of interfacing in a jacket – you don’t use the same weight throughout.  There’s a great article from Threads Magazine dissecting the innards of an Armani jacket and the different types of fusible interfacings used throughout.  For the jacket front/lapel and collar, I used a weft-insertion fusible to give the front more structure, and a fusible tricot for the jacket side front.  Typically, sewing patterns recommend that you only fuse the fronts and not the sides, but it’s necessary to fuse the entire front to get a nice shape and support the jacket.  I noticed a big difference in the body the interfacing gave the wool after fusing the whole front.

Also, I steamed the crap out of the lapels to shape them and get them to lay as flat as possible instead of flopping around.  The design of the pattern is pretty casual and there isn’t a roll -line (heck, the model has her lapels “popped” on the envelope…is that a thing?), but I wanted this jacket to be more structured.


wool blazer 3

Tailoring the Sleeves

When I made my Anise jacket last year, I was disappointed by the dent that formed at the top of the sleeve cap when I moved my arm, and also how the sleeve hung from the sleeve cap. This was probably cause by a few different factors, but it made me aware of the importance of supporting the sleeve cap in a jacket and masking the look of the jacket innards (sleeve seams, shoulder pads, etc).  To solve this for my wool blazer, I interfaced the sleeve from the sleeve cap down to about two inches below the underarm with fusible tricot interfacing.  This gave the sleeve a nice shape and supported the fabric beautifully:


Damn fine set-in sleeve. #tailoring #blazer #wool


Isn’t that a yummy set-in sleeve??  It hangs absolutely straight with no dents or divets.  I also eased the whole cap instead of just the section notated between the small dots on the pattern, and I think that helped me get a better result.


wool blazer 4

The Back and Hems

In retrospect, I should of used a back stay to get better support in the upper back since the fabric is floppy, but ahhhhh whaddayagonnado.  Interesting fact:  the more pieces in a jacket, the better the tailored result.  Why?  There’s more seams to tweak to get a better fit.  A jacket pattern with a back like this that’s cut on the fold will not be as fitted as a jacket with a back center seam – there’s no way to really adjust the fit other than tweak the darts, which can be limiting.

The jacket and sleeve hems are all interfaced with a 1 1/2″ wide strip of weft-insertion interfacing cut on the bias.  The bottom hems really keep their shape with the interfacing and it add a bit of weight, causing the hems to hang better.


wool blazer 5

The Lining

And just to show you the last, final shot – the lining!  I love color pops and surprises with my linings, so why not make that functional part of a garment a little bit more fun?  When I was researching jacket patterns to sew, it was very hard to find a pattern out there that included a lining.  Why guys, why?  Linings really aren’t that hard to sew, I swear.  And they make it so much easier to wear the finished jacket, they protect the inside and prolong the life of the jacket etc.  Anyway, this was a well-drafted lining with a center back pleat, and I sewed a jump-hem in the bottom by hand.

Well, that’s my first project of 2015!  It was definitely a good project to make as a way to ease myself into the coat project I’m up to my eyeballs in right now.  Hands down, this is the best/nicest garment I’ve made thus far in my sewing career, and I can’t wait to sew more blazers and jackets.

PS:  the snow in these photos is from the storm that hit Boston this past weekend…I’m bracing for #snowpocalypse #BOSnow right now!

Follow:

So It Begins – The Great Coat Project of 2015


Taking an Instagram poll! Should I make the Named Yona Coat or Vogue 1365? I'm torn between the two, like the styling of both. Would be made out of eggplant purple cashmere wool. #instapoll #coatproject #sewing #tailoring

It’s the middle of January, so I suppose it’s time to get cranking on what I’m calling “The Great Coat Project of 2015,” or, my attempt to make a tailored winter coat this year.  Prior to starting, I made a quick tailored blazer that boosted my confidence in my tailoring skillz (which you may have seen on Instagram, photos to come), so I’m ready to go!

Of course, I got cold-feet initially – there’s so many variables to take into consideration when launching into a major project like a coat: what kind of fiber/weave/weight of fabric to use, combinations of interfacing to get the right support and drape, should I underline or interline (can’t do both!), how to make the coat warm without adding bulk, hand-tailoring vs fusible tailoring…I could go on.  There were quite a few nights recently where I was up to the wee hours of the morning researching and reading and making myself dizzy with the knowledge and contradicting opinions of those who have prior experience making coats.  And of course, I doubted my choice in pattern selection at the last minute and put up a poll on Instagram and Twitter last weekend on which coat I should make.

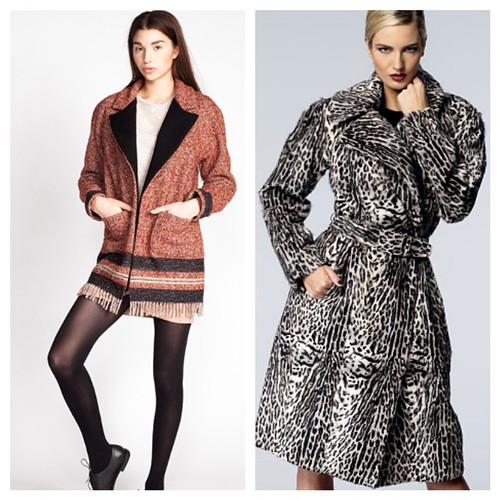
Vogue 1365, on right above, won the poll on Twitter.  The Named Patterns Yona coat, on left, won on Instagram.  Since I originally planned on making the Vogue coat, I went ahead and cut out the muslin this week to see what the fit was like – if it was bad, I could always use Yona as my backup plan.

To sum up my Vogue 1365 fitting-experience: I’m making the Yona coat now.


vogue coat 1

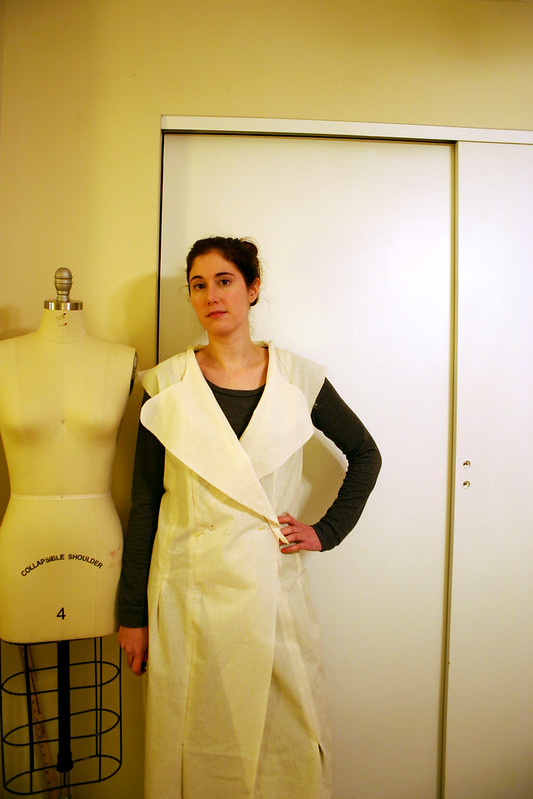
Doesn’t look too bad, right?  I’m not standing up straight, so the fronts aren’t lined up correctly. Holy lapel action, Batman!  Those are some statement lapels, amiright?


vogue coat 5

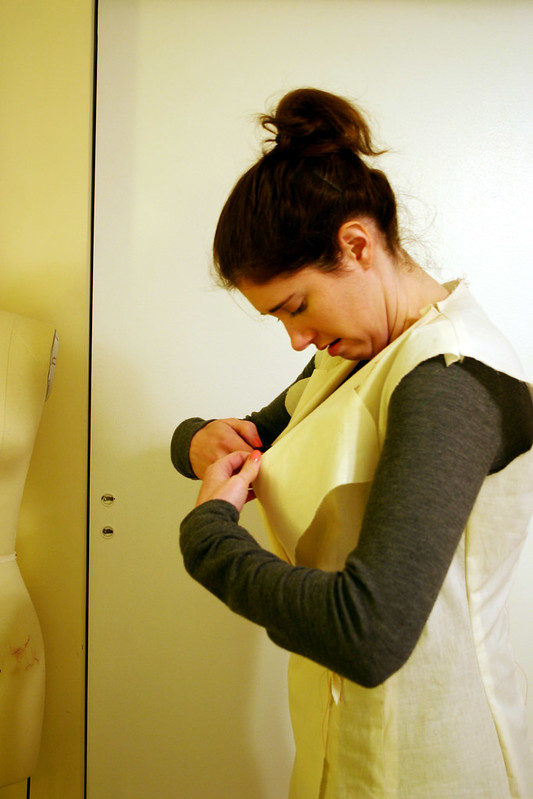
Not too crazy from the side either…


vogue coat 6

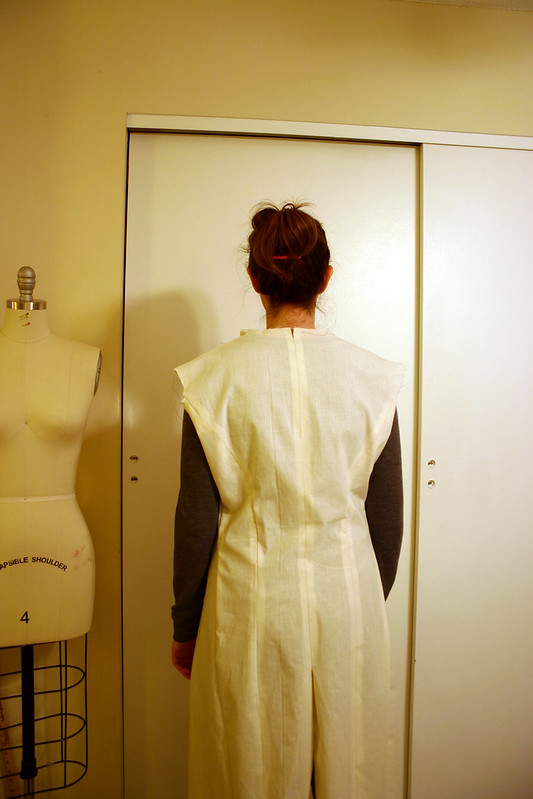
I think the back is ok, too.  Setting the sleeves in would alleviate some of the bagginess around the armholes, I wasn’t too concerned with it.


vogue coat 2

Seriously, I could fit my lunch in here.

So here’s where it gets good…my friends, this coat is drafted with 10 inches of ease in the bust.  After doing some extensive research on coat ease (on one of those recent late nights I referred to), 10″ is standard ease for a loose-fitting coat and is calculated to fit over a jacket and a blouse (here’s a great post on Sewingplum about layering ease for BMV patterns).  However, on the model on the pattern envelope and also in the article “Secure a Coat Lining” from the December 2014 issue of Threads, this coat has much more of a semi-fitted look.  I cut a straight 10 for this coat, which is typical of what size I make for Vogue patterns, so I figured I would just go down a size in the chest and grade out at the hips – no big deal.

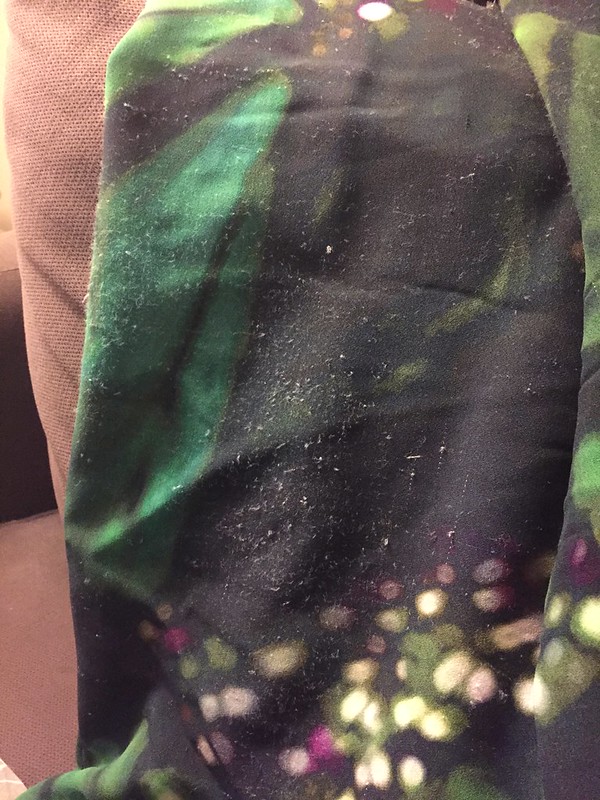
HOWEVER – observe the following photo illustrating where the real issues with this coat lie:


vogue coat 3

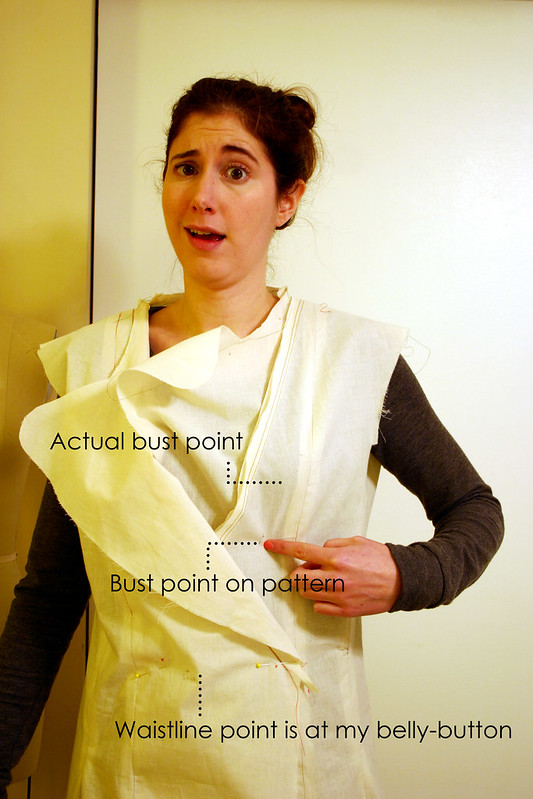
In order to get this coat to fit correctly, there needs to be some major overhauling of the entire front.  The bust point is two inches below my actual bust point – I run into this problem from time to time, but never to this dramatic effect!  The waistline is almost down to the top of my hip bones by my belly-button.  Fixing the waist would be no problem, since I could just adjust along the “lengthen or shorten here” line on the pattern, but altering the pattern to raise the bust to the correct level would affect: the front, front facing, length of the lapel and lapel facing, side front, armhole, and all three parts of the three-piece sleeve.  Maybe even the collar, too.

It was at this point that I threw my hands up in the air and said, “fuggedaboutit!”  There’s already going to be so much labor put into constructing the coat, since I decided to hand-tailor this project, that I couldn’t really bother/deal/didn’t want to go through with the pain of redrafting half a coat to get it to fit me correctly.  Hmm, is there a reason I couldn’t find a single person on the internet that made this coat pattern?


vogue coat 4

Additionally, the side seams irritated me.  No, this is not an error – the side seams are really supposed to hang like that, I checked the line art and it shows the side seams curving towards the back (the front is cut much wider than the back).  In my opinion, even though this is an intentional part of the design, it just looks bad – one of the hallmarks of a well-tailored coat is a side seam that hangs perpendicular to the floor, and I want my coat to look well-tailored.

I love the style of this coat, but I’m quitting while I’m still ahead and moving on to the Yona Coat – this is why we make muslins to test-drive patterns before cutting into our nice fashion fabric!  Yesterday evening, I made a muslin of the Yona pattern and the fit is absolutely perfect – more to come on that, I can’t wait to share!


Coat-Project-2015

Are you making a coat this winter?  Sew along with me!  Use #coatproject2015 on Instagram to tag your progress so we can all see what you’re working on!

Follow: