Finished Project – Toaster Sweater #2

Toaster #2 Sweater
 

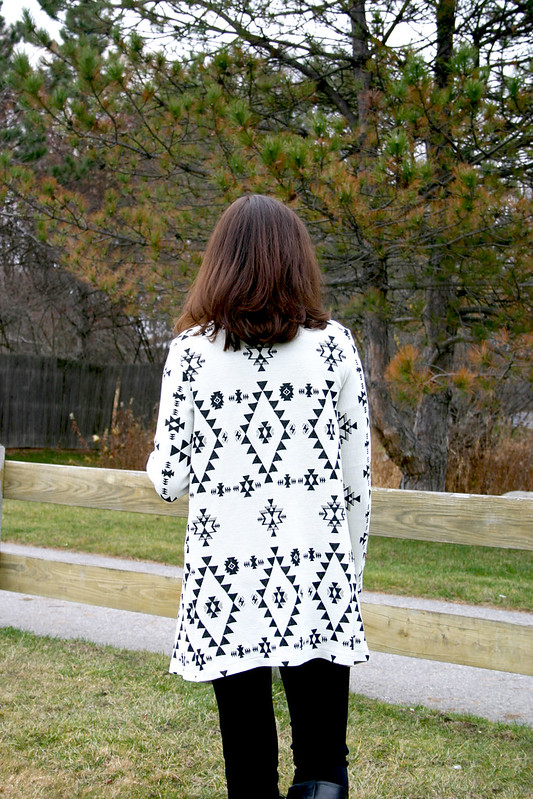
Pattern: Toaster Sweater #2 by Sew House Seven
Fabric: french terry knit from Indiesew (sorry, sold out)

So yeah…this whole “slow sewing” movement is my jam because that’s all I seem to do these days when it comes to sewing.  Sewing time is now few and far between – I started grad school this fall and work kicked into high gear two months ago.  I thought after the wedding I’d have the time to get back into the swing of things with sewing, but I guess not!

(Oh, and I got a hair cut and chopped off 6″ since my last post – I swear my hair is not that poofy IRL)

Since my time is so limited now, I need to really focus on garments that I will absolutely enjoy making (and wearing) or will challenge my sewing skills – no more time to waste on garments that I don’t have 100% of my heart into.

Toaster Sweater #2 was a perfect jump-start to get back into garment sewing this fall.

Toaster #2 Sweater
 

When all was said and done, I made this sweater in an afternoon.  I have a weakness for funnel necks/turtlenecks and jumped on this pattern as soon as I saw it as part of the Indiesew Fall Collection (now I need to check out Toaster Sweater #1!).  The fabric is such a soft, yummy french terry and I just want to wrap myself up in a giant french terry burrito with this fabric.  If you’re thinking about making this pattern, make sure to pick a fabric that has some body to it for the neck to sit correctly, anything jersey-like will result in a flimsy neck and the neck facing may flop open.

I loved the construction of the funnel neck – it’s a brilliant way of drafting the facing into the neckline and constructing the curved shoulder seam in the beginning of making the sweater.  Hard to explain, but pretty cool when you make it.


Toaster #2 Sweater
 

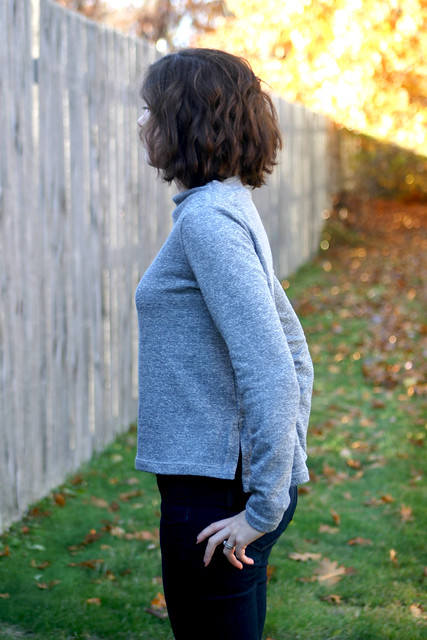
I’m gravitating towards loose-fitting tops and dresses these days and I love the a-line fit of this sweater – see how roomy it is?  The only thing I would change next time is to lengthen the top – I love the split hem and the hi/lo design, but I feel like it’s a smidge too short in the front for my liking.  I’m also wearing a tank top underneath because the splits go pretty high on the side and I would be flashing some skin without an underlayer.

Toaster #2 Sweater
 

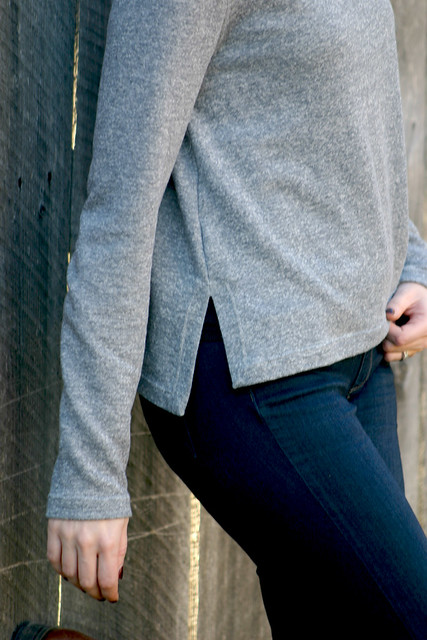
The mitered corner instructions were great, too, and made it easy to hem everything in place with professional-looking results.  I used my twin needle for both the sleeve hems and bottom hem, pivoting around the slit opening.

Did you know there’s a Toaster Sweater #1 as well?  I’m itching to try my hand at that one since I love #2 so much – I wore it twice already in the last week!

This post is part of the Indiesew Blogger Network – pattern or fabric may have been provided by Indiesew, however all thoughts and opinions are my own 

Follow:

A Simple Sewing Project

New sewing machine cover
 

Today is my last day of a week-long vacation, the majority of which I was in PA staying with my parents, and I decided to make a quicky sewing project that was long overdue: a cover for my Bernina 550.  Considering that I just got it cleaned and serviced last week, I want to keep my little beauty as lint-free as possible.  And what fabric could be more perfect for a sewing machine cover than Alexander Henry’s “Home Sewing is Easy!”

There’s something to be said about simple sewing projects – it’s not that they’re mindless, but there isn’t as much thinking involved can be a kind of mediative way to pass a few hours.  Other than taking the measurements of the dimension of my machine, I cut out the pieces fairly quickly with my rotary cutter, did some simple quilting following the lines of the print, and assembled my cover with lining in an afternoon.

Maybe it’s because I’m still recovering from sewing my wedding dress this year (final dress post to come soon, we just got the photos back!), but I’ve been in a bit of a sewing + blogging rut lately.  There’s three projects I made since the wedding in June that I have yet to blog, but shared some project detail images on Instagram.  I dunno…I just don’t feel the motivation to get all dressed and dolled up, find a place to take photos, set up my tripod etc.  Plus, it’s been so awful hot here…I’m sure this sentiment will pass, I’m just being whiny.  But rest assured, there’s some garment sewing going on over here.  Just not at a fast and furious rate, I’ll probably switch over to early-fall sewing in August once I make a swimsuit and/or coverup for our Ogunquit beach vacation coming up.


Thread card
Something that’s sparking my creativity right now is quilting.  After going to some fabric stores, the Hershey Quilt Show, and a quilt exhibit last week in PA, I think I’m at the point now that I really want to sit down and give it a try.  The last time I was interested in quilting was back in 2009 (here’s a really old blog post with no images!) and I remember how fun it was to turn cotton prints into geometric shapes.  Oh yeah, I also attempted to make a quilt two years ago but got discouraged when my blocks were all wonky and my pieces weren’t as accurately cut as they needed to be.  I started a Pinterest board this week to gather ideas on the type of quilt I want to make, something small and simple that can be used on the couch as a throw blanket.  I’m also planning on making some placemats this week out of a charm pack I found at a quilt shop last week – that will be some good practice before I try to start a real quilt.

How’s your summer sewing going?

Follow:

How To Select a Pattern For Your First Coat

yona 3

It’s finally full-on winter here in Boston and this month on Sew Wrong is going to be all about one of my favorite types of garments to sew – coats! I’m a bit of a coat addict, but I think you have to be when you live in a cold climate where winter seems to never end.  If you’ve never sewn a coat before, or are thinking about making one for the first time, I’m sharing plenty of information this month to get you off and running with making your first coat.

Download a FREE Coat Supply Checklist


One of the first, most-obvious decisions when starting to make a coat is: what coat pattern should you choose?


View Post

Follow:

Wedding Dress Update – We Have A Bodice!

Underlining in progress...a little more finicky than I thought it would be. Gotta stay-stitch silk! #sewing #weddingdress
Tomorrow is five months until the wedding, and I can confidently say that I am making progress on sewing my wedding dress.  Finally, right?  I’ve only been talking about making this dress for, oh, I don’t know, the last eight months or so.  HAH!

A good chunk of my Christmas vacation was spent carefully cutting out single layers of silk, silk georgette, and lace on top of my parent’s ping-pong table, which was the perfect surface for spreading out all of this fabric and just wide enough for my fabric to fit.  I realized after I started cutting out the silk that there was no way possible that I could have cut this out on the floor at home and have everything nice and smooth.  I even had an earlier crazy idea to go into the office on a weekend and use the long conference tables pushed together in a meeting room to cut out all of my fabric, but the tables wouldn’t have been wide enough and I would have run out of time.

I’m happy to say, after many hours of careful pattern placement and cutting with my Gingher shears, I have all parts of my wedding dress cut out and ready to sew.  I even went ahead and underlined and assembled the bodice while on vacation – that lace gave me a bit of a panic attack when I started to underline it with the silk because it ended up growing slightly, but after some careful pinning and stitching, everything went together just fine.

Here’s a little video of how my dress is coming together – I also talk about how exactly I cut out my silk and silk georgette, the problem I ran into with my lace, and some thoughts on the oh-so-coveted book Bridal Couture by Susan Khalje:


Click here to download my Wedding Dress Sewing Resource Guide
 

Follow:

Pattern Review: Eleanor Cardigan

eleanor cardigan

Pattern: Eleanor Cardigan, c/o Indiesew
Version: mid-thigh length with extra long sleeves
Fabric: ribbed knit from Indiesew (sorry, sold out!)

Boots: Nine West
Top: JCrew
Pants: Macy’s

Perhaps not the most original garment I’ve made (*cough* Allie’s version *cough*), but I absolutely love my new Eleanor Cardigan.  For those of you who subscribe to my newsletter, I committed a few weeks ago that I would be strict about not sewing any other projects until I got a major chunk of my wedding dress completed.  Well, since I’m in a “holding pattern” until next weekend when I can cut out my real dress at my parent’s house, I figured whipping up a little instant-gratification project wouldn’t hurt.

eleanor cardigan

I actually attempted to make this pattern back in September for Selfish Sewing Week, but ended up chucking the project since the grey french terry I used made it look like a bathrobe.  Not a good look, and a sad waste of nice fabric!  It was also too big for my liking; I cut out a small when I made the first version but didn’t like how baggy the fit was or the fact that the sleeve seam was way off my shoulders.  Fast-forward to October and Allie’s launch of a new fabric collection – I saw this fabric in action during one of her Periscope broadcasts and knew I had to have it.

eleanor cardigan

The fabric is pretty nifty – it’s a rib knit that’s white on one side, black on the other.  However, the print of the pattern doesn’t follow stretch of the fabric, the ribs run horizontally across the body.  I had to cut the sleeves so the ribs ran vertically, increasing the degree of stretch like a normal knit fabric, and it changed the orientation of the print on the sleeves.  Not a big deal, but it would have made the sleeves much tighter if the fabric was cut like the rest of the cardigan.  I also had to be a little creative with cutting out the long neckbands, and utilized a section of the print repeat to create a zig-zag look down the front.

eleanor cardigan

The Eleanor Cardigan is a super-fast make and you really don’t even need the directions to make it.  I found Allie’s tutorial on serging bulky knit fabrics really helpful – I had wavy seams on some of my knit garments in the past and it didn’t really bother me, but now I know how to fix that on my serger and prevent it from happening in the future.  Everything lays so nice and flat and neat, it feels very RTW!

Follow: